No-Bake Chocolate Peanut Butter Bars were the first recipe I ever posted on NoobRecipes, and honestly, they saved me during my first summer running the blog. I had just moved into a tiny apartment where the window AC unit fought a losing battle against the Texas heat, and I realized my entire beginner audience was probably sweating just thinking about turning on their oven. I needed something foolproof, something that tasted like pure childhood nostalgia but required zero baking skill. These bars are the definition of easy no bake success, delivering that rich peanut butter flavor we all crave without ever needing to preheat anything. Trust me, if you can stir things in a bowl, you can master these!

Why You Will Love These No-Bake Chocolate Peanut Butter Bars
I’m telling you, these No-Bake Chocolate Peanut Butter Bars are going to be your new favorite go-to treat. They hit every mark for a perfect beginner recipe: they are lightning fast, incredibly satisfying, and they taste like you spent way more time on them than you actually did. I keep coming back to this recipe whenever I need a quick fix for a sweet craving or when I have unexpected guests. There’s just something wonderful about pulling something this decadent out of the fridge that required zero actual cooking!
- The base is dense, creamy, and perfectly salty-sweet.
- The chocolate topping sets up beautifully, giving you those clean, satisfying squares.
- Prep time is seriously under 20 minutes—you can whip these up after work!
- They are the definition of beginner dessert success; there is almost nothing that can go wrong here.
The Appeal of Zero Oven Time
If your oven is currently staging a protest because it’s too hot outside, these are your answer. Seriously, who wants to heat up the whole house for a dessert? These bars are perfect for summer holidays or when you just don’t feel like dealing with high temperatures. Novice cooks often feel intimidated by oven temperatures and baking times, but here, you eliminate all that guesswork. You just mix, press, melt, and chill. It’s foolproof!
Simple Ingredients for Guaranteed Success
You don’t need specialty grocery runs for this recipe, and that’s exactly how I like it here at NoobRecipes. Everything you need for the rich peanut butter base and the shiny chocolate top—like creamy peanut butter, powdered sugar, and graham cracker crumbs—is probably already in your pantry right now. We use ingredients that behave predictably. They mix well and set up perfectly every time, which is crucial when you are just starting out and need that early confidence boost.
Essential Equipment for Your No-Bake Chocolate Peanut Butter Bars
Okay, since we aren’t using an oven, we don’t need a ton of fancy gear, which is great for keeping things simple. But having the right tools makes the assembly process much smoother. You mainly need a couple of mixing bowls—one medium for the base and maybe a small one for melting the chocolate. A sturdy rubber spatula is going to be your best friend for mixing and pressing everything evenly. Don’t forget measuring cups and spoons, of course!
Preparing Your Square Pan
This is the most important setup step, so don’t skip it! You absolutely must line your 8-inch or 9-inch square pan with parchment paper first. When you cut the parchment, leave a good overhang on two opposite sides—these are your handles. When the bars are fully chilled, you just grab those parchment ‘slings’ and lift the whole slab right out of the pan. It makes slicing so much cleaner, and you won’t lose any of that gorgeous peanut butter bottom to the corners of the pan!
Gathering Ingredients for No-Bake Chocolate Peanut Butter Bars
Let’s talk about what you need to gather for these amazing No-Bake Chocolate Peanut Butter Bars. Since we aren’t relying on baking chemistry, the quality and exact measurement of what we put into the base really matter for getting that perfect set and texture. Everything here is designed to be super accessible, so you can grab this stuff on your next quick grocery run. We are making two main layers: the thick, sweet peanut butter foundation and the luscious chocolate shell on top. Make sure you have your ingredients laid out before you start mixing!
Ingredient Clarity and Specifics
Precision is key when you’re mixing by hand. For the base, you need exactly 1 cup of creamy peanut butter, paired with 1/2 cup of melted unsalted butter. Don’t eyeball the dry stuff; we need 2 cups of powdered sugar and 2 cups of graham cracker crumbs. Remember that tiny pinch of salt—it really wakes up the peanut butter flavor! For the topping, you’ll melt 1 1/4 cups of semi-sweet chocolate chips along with 2 extra tablespoons of creamy peanut butter to keep that chocolate layer soft and spreadable.
Substitution Guidance for the Base
Now, if you want to change up the texture of the base, I have a fun little trick for you. If you like a little crunch mixed in with that creaminess, you can replace half of those 2 cups of graham cracker crumbs with crisped rice cereal. It adds a nice little pop! Also, for anyone who needs to keep things dairy-free, this recipe is very adaptable. Just make sure you swap out the regular chocolate chips for a good quality dairy-free version and use plant-based butter in the base, and you are good to go!
Step-by-Step Instructions for No-Bake Chocolate Peanut Butter Bars
This is where the magic happens, and I promise, it’s easier than making toast! We are moving fast because once the butter melts, things start coming together quickly. Read through these steps once before you start mixing, just so you know what’s coming next. We’ll build our foundation first, then move right on to that beautiful chocolate layer. Mastering these No-Bake Chocolate Peanut Butter Bars today means you’ll be an expert by tomorrow!
Creating the Creamy Peanut Butter Base
First things first, make sure that parchment paper sling is ready in your square pan—that’s non-negotiable for easy removal later! In your mixing bowl, combine the melted butter, the main cup of peanut butter, the powdered sugar, graham cracker crumbs, and that tiny pinch of salt. Now, you need to mix this really well. Use a sturdy spoon or spatula and keep going until everything is incorporated. It’s going to look thick, almost like cookie dough, and it shouldn’t have any dry pockets of sugar left. That’s when you know it’s ‘thick and evenly combined.’
Once it’s mixed, dump that whole mass into your prepared pan. Now, this is crucial: you have to press it down hard. Use the bottom of a flat measuring cup or just your clean hands and press that peanut butter layer down firmly and evenly across the entire bottom of the pan. You want it compact and level so the chocolate topping doesn’t end up lopsided. Get those corners nice and tight!
Preparing and Spreading the Rich Chocolate Topping
Next up is the topping, which is so simple it feels like cheating. Place your semi-sweet chocolate chips and those 2 extra tablespoons of peanut butter into a microwave-safe bowl. I always use the microwave for this because it’s fast, but you have to be careful not to scorch the chocolate. Heat it in 20–30 second bursts. After each blast, pull it out and stir it really well, even if it still looks chunky. Keep doing this until it’s completely smooth and glossy. The extra peanut butter helps keep it from getting hard and brittle once it sets.
Pour that smooth chocolate right over your pressed peanut butter base. Use your spatula to gently encourage the chocolate to spread evenly to all the edges. Try not to dig into the peanut butter layer underneath! Give the pan a little gentle tap on the counter a couple of times; this helps release any air bubbles and settles the topping into a nice, flat surface. If you grabbed that flaky salt, sprinkle it on now while the chocolate is still wet. It looks so professional!

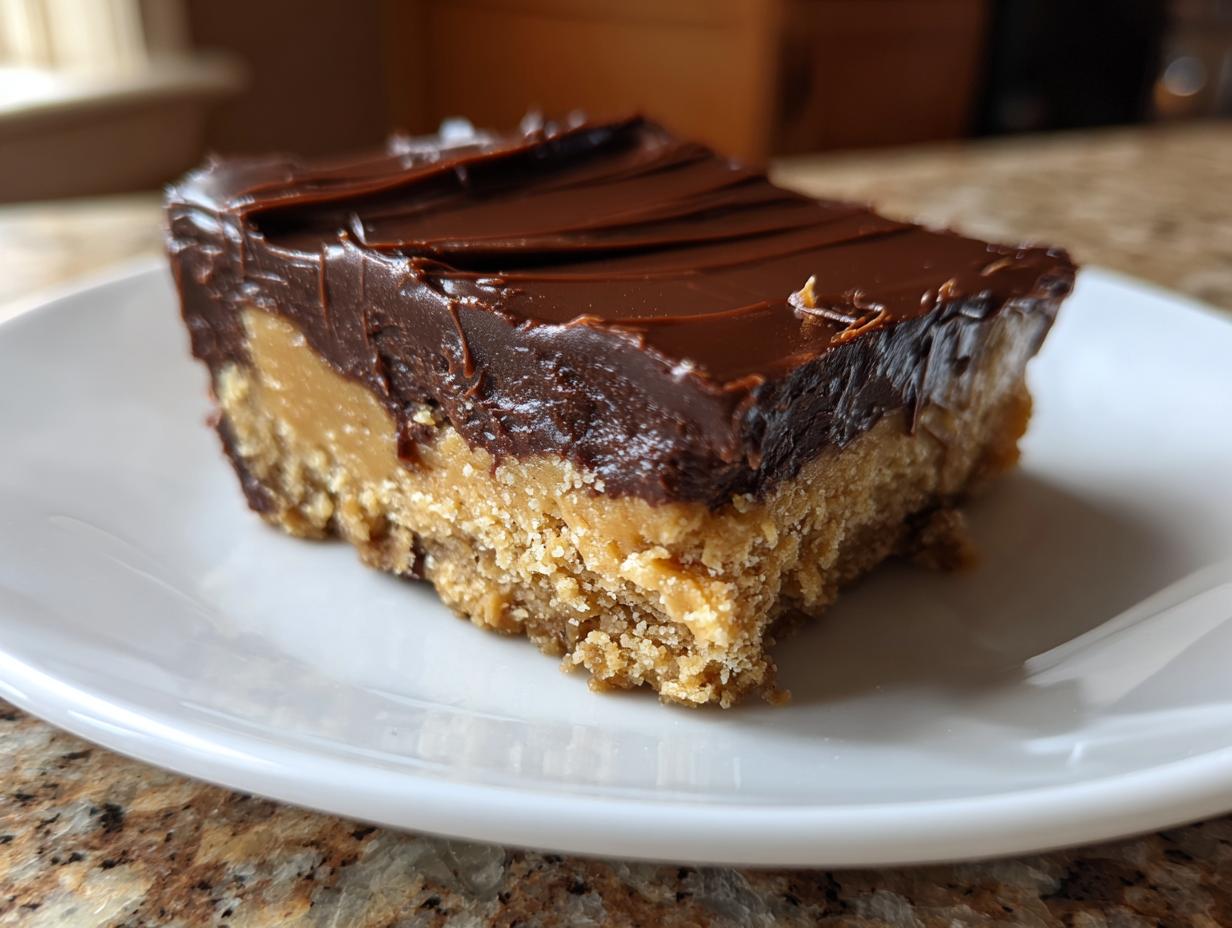
Setting and Slicing Your No-Bake Chocolate Peanut Butter Bars
Alright, the hard part is over! Now we wait. These bars need time to firm up properly so they don’t turn into a gooey mess when you try to cut them. Pop the whole pan into the refrigerator for at least 1 1/2 to 2 hours. Don’t rush this part; patience here guarantees perfect bars! Once they feel completely firm to the touch, pull them out.
Here’s a pro tip for clean slicing: let them sit on the counter for about 10 minutes before you slice. If they are ice-cold straight from the fridge, the chocolate topping will crack everywhere. After that short rest, use the parchment overhang to lift the entire slab onto a cutting board. Use a large, sharp knife and slice them into 16 nice squares. You’ll find that these No-Bake Chocolate Peanut Butter Bars store wonderfully, too!
Tips for Perfect No-Bake Chocolate Peanut Butter Bars
Even though these are designed to be foolproof, sometimes we all need a little tweak to make them exactly right for our taste buds. The beauty of these No-Bake Chocolate Peanut Butter Bars is how forgiving they are when it comes to minor adjustments. Don’t stress if your initial mix seems a little loose or too stiff—we can fix that right before it goes into the pan. Remember, baking success is all about learning how your ingredients behave!
Adjusting Consistency for Your Preference
If you taste your base mixture before pressing it down and decide you want it a little sweeter—maybe your peanut butter was extra savory—you can add 1 or 2 extra tablespoons of powdered sugar right into the mix. Just make sure to stir it in thoroughly! On the flip side, if you find your base feels too soft or sticky—maybe your butter was a bit too warm when you started—you can firm it up by adding 2 to 4 tablespoons more of the graham cracker crumbs. Go slowly, adding just a tablespoon at a time until it feels sturdy enough to press firmly into the pan. This little bit of on-the-fly adjustment is what separates just following a recipe from actually mastering it!
Storing and Serving Your No-Bake Chocolate Peanut Butter Bars
One of the greatest advantages of these bars is how well they keep! Unlike delicate baked goods, these store like a dream, which is perfect for meal prepping snacks for the week ahead. I usually make a double batch because they disappear so fast in my house. When they are fully set, you can slice them up and keep them ready to go. They are fantastic straight out of the fridge, but sometimes I let them sit on the counter for about five minutes before serving if I want that chocolate topping to soften up just a tiny bit.
Storage and Shelf Life
Always keep these covered tightly, either in an airtight container or wrapped well in plastic wrap. They hold up great for several days, maintaining that perfect texture. Here’s the breakdown for keeping them fresh:
| Storage Location | Maximum Time |
|---|---|
| Refrigerator (Covered) | Up to 1 week |
| Freezer (Airtight) | Up to 2 months |
Frequently Asked Questions About No-Bake Chocolate Peanut Butter Bars
I know when you’re starting out, you have a million questions, and that’s totally fine! That’s why I put this section together. These No-Bake Chocolate Peanut Butter Bars are so simple, but people still worry about things like texture and storage. Don’t hesitate to ask if you have other concerns, but here are the ones I hear most often about this classic peanut butter dessert.
Can I use natural peanut butter in this easy no bake recipe?
That’s a great question, and one I get a lot! While you technically *can* use natural peanut butter (the kind that separates), I strongly advise against it for this recipe. Natural peanut butter has way too much oil, and it will make your base mixture runny and greasy. It won’t set up properly, and you’ll end up with a soupy mess instead of those firm bars. For this recipe, stick with the standard, homogenized creamy peanut butter—it has the right stabilizers to hold everything together perfectly.
How do I prevent the chocolate topping from cracking?
Cracking is super common, especially when the topping gets too cold too fast, or if the base underneath is rock hard. The main trick is twofold: first, make sure you mix that extra 2 tablespoons of peanut butter into your melted chocolate; that keeps the topping from becoming brittle. Second, and this is the big one, do *not* slice the bars straight out of the fridge! Let them sit on the counter for about 10 minutes first. This slight warming allows the chocolate to relax just enough so that when you cut through it, it gives way instead of shattering. It makes slicing your No-Bake Chocolate Peanut Butter Bars so much cleaner!
Nutritional Data Disclaimer
Listen, I’m Adam, and I run NoobRecipes—I focus on making things easy and delicious, not on being a certified nutritionist! Because everyone uses slightly different brands of peanut butter, chocolate chips, or even powdered sugar, the exact nutritional content for these No-Bake Chocolate Peanut Butter Bars can change quite a bit from batch to batch. For that reason, I don’t provide exact calorie or macro counts here. If you need those numbers for dietary tracking, I highly recommend inputting the specific brands you use into a reliable online nutrition calculator. That way, you get the most accurate information for your needs!
Share Your Beginner Success
I genuinely hope you loved making these bars as much as I love seeing your results! Once you’ve chilled and sliced your first batch, come back here and leave a rating—let me know how easy this was for you. And please, snap a photo of your perfect squares and tag me on social media! Seeing your success is exactly why I created NoobRecipes. You can follow along for more easy recipes on our Facebook page or save this recipe on Pinterest!
Print
No-Bake Chocolate Peanut Butter Bars: 16 Simple Fixes
- Total Time: 2 hours 10 minutes
- Yield: 16 bars
- Diet: Vegetarian
Description
These No-Bake Chocolate Peanut Butter Bars deliver rich flavor with zero oven time. You get a creamy peanut butter base topped with smooth melted chocolate. They are simple to make and perfect for new bakers.
Ingredients
- 1 cup creamy peanut butter
- 1/2 cup melted unsalted butter
- 2 cups powdered sugar
- 2 cups graham cracker crumbs
- 1 1/4 cups semi-sweet chocolate chips
- 2 tablespoons creamy peanut butter (for topping)
- Pinch of salt
- Flaky salt for garnish (optional)
Instructions
- Line an 8-inch or 9-inch square pan with parchment, leaving overhang.
- In a bowl, mix melted butter, 1 cup peanut butter, powdered sugar, graham crumbs, and a pinch of salt until thick and evenly combined.
- Press the mixture firmly into the pan in an even layer.
- In a microwave-safe bowl, melt chocolate chips with 2 tablespoons peanut butter in 20–30 second bursts, stirring until smooth.
- Spread the chocolate over the base. Tap the pan to level; sprinkle flaky salt if using.
- Refrigerate until set, 1 1/2–2 hours. Rest 10 minutes at room temperature, then slice into bars.
- Store covered in the refrigerator up to 1 week or freeze up to 2 months.
Notes
- For crunch, replace half the graham crumbs with crisped rice cereal.
- For a sweeter bar, add 1–2 extra tablespoons powdered sugar; for a firmer base, add 2–4 tablespoons more graham crumbs.
- For dairy-free, use dairy-free chocolate and plant-based butter.
- Prep Time: 15 minutes
- Cook Time: 0 minutes
- Category: Dessert
- Method: No-Bake
- Cuisine: American