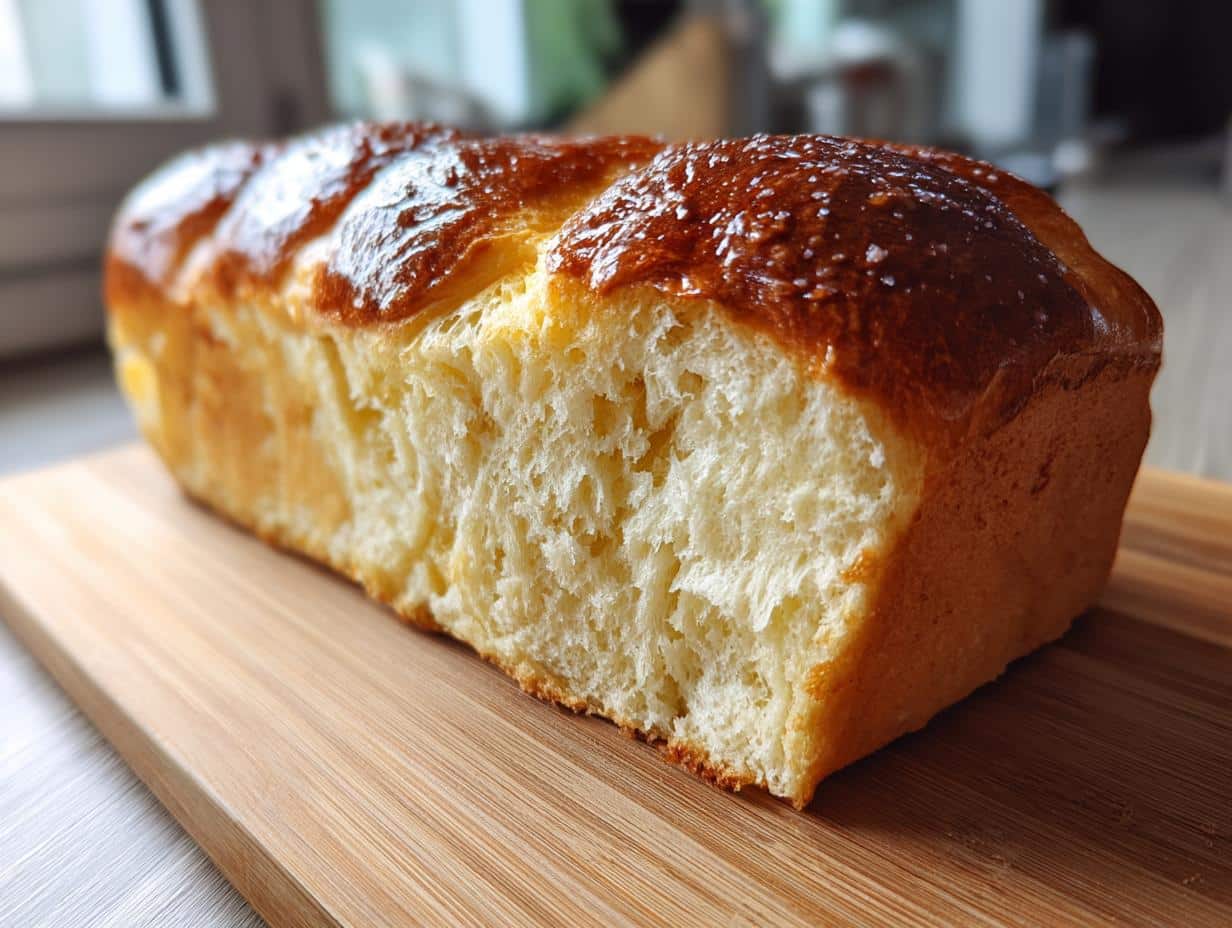
There’s something magical about pulling a loaf of Shokupan from the oven—that crisp golden crust giving way to a cloud-like interior so soft it practically melts in your mouth. This isn’t just any milk bread; it’s Japan’s beloved breakfast staple, the foundation for those Instagram-famous fruit sandwiches, and my absolute weakness when toasted with butter. The secret? That ingenious Yudane method I discovered during my first Tokyo bakery crawl—mixing boiling water with flour to create a gelatinized starter that gives Shokupan its legendary fluffiness and shelf life.
I’ll never forget my first bite of proper Shokupan at a tiny Tokyo kissaten (coffee shop). The baker saw my wide-eyed reaction and whispered “Yudane” with a wink, like sharing a national secret. Back home, I tested countless versions before perfecting this recipe that balances simplicity with mind-blowing results. Unlike Western sandwich bread, Shokupan bakes up with four perfect corners, a fine crumb, and just enough sweetness to shine whether you’re making tamago sando or simply enjoying it fresh with jam. Trust me, once you try this featherlight loaf—especially when still warm from the oven—you’ll understand why Japanese bakeries guard their Shokupan techniques so fiercely.
Ingredients for Shokupan Japanese Milk Bread
Gathering the right ingredients is half the battle when making perfect Shokupan. I promise, every single one of these plays a crucial role in creating that signature cloud-like texture. Here’s exactly what you’ll need:
- 50 g bread flour (for the Yudane starter)
- 40 ml boiling water (above 194°F/90°C – I test mine with a thermometer to be precise)
- 150 ml milk (room temperature – cold milk will shock the yeast!)
- 15 g sugar (just enough to feed the yeast without making it overly sweet)
- 3 g dry instant yeast (about 1 teaspoon – I prefer instant because it doesn’t need proofing)
- 10 g unsalted butter (room temperature and soft – not melted!)
- 200 g bread flour (for the main dough)
- 5 g salt (fine sea salt dissolves best)
Ingredient Notes & Substitutions
Bread flour is non-negotiable for authentic Shokupan texture. Its higher protein content (12-14% vs all-purpose’s 10-12%) creates that perfect chewy-yet-tender crumb. In a pinch? You can use all-purpose flour plus 1 tablespoon vital wheat gluten per cup of flour, but the results won’t be quite as magical.
The Yudane method (mixing boiling water with flour) is Japan’s brilliant trick for ultra-soft bread. The heat gelatinizes the starches, creating a water-retaining gel that keeps your Shokupan fresh for days. Don’t skip the overnight rest—this develops flavor and that signature stretchy texture.
Room-temperature ingredients matter more than you’d think! Cold milk slows yeast activity, while melted butter changes the dough structure. I take my butter and milk out 2 hours before baking. If you forget? Microwave milk in 5-second bursts until lukewarm (not hot!), and cube cold butter to help it soften faster.
Equipment Needed for Shokupan Japanese Milk Bread
You don’t need fancy gadgets to make incredible Shokupan, but these tools make the process so much easier. Here’s what I always have ready before starting:
- Stand mixer with dough hook (20 minutes of kneading by hand is possible but exhausting – trust me, I’ve tried!)
- Loaf tin (9x4x4 inches) – The classic Japanese Pullman pan gives those perfect square corners, but any standard loaf pan works
- Digital kitchen scale – Baking is science, and grams beat cups for accuracy every time
- Thermometer – Crucial for checking that boiling water hits at least 194°F (90°C) for proper Yudane
- Dough scraper – My secret weapon for clean shaping and dividing
- Pastry brush – If you’re going for that glossy egg wash finish
A quick tip about loaf tins: I lightly grease mine even if it’s nonstick. That first perfect release when you flip out your golden loaf? Pure baking joy. And don’t stress if you don’t have every item – my first successful Shokupan was mixed in a food processor and baked in a makeshift pan made from folded foil!
How to Make Shokupan Japanese Milk Bread
Now for the fun part—transforming these simple ingredients into pillowy-soft magic! I’ll walk you through each step just like my Tokyo baker friend taught me. Don’t let the multiple rises scare you; that’s what creates Shokupan’s legendary texture. Set aside an afternoon (plus overnight for the Yudane), and you’ll be rewarded with the most incredible loaf you’ve ever baked.
Step 1: Preparing the Yudane
The night before baking, I prepare my Yudane—the secret weapon for ultra-fluffy bread. In a small bowl, I mix 50g bread flour with 40ml boiling water (must be above 194°F/90°C!). Stir quickly with a chopstick until it forms a shaggy dough—no dry flour spots remaining. Then I press it into a disc, cover tightly with plastic wrap (right against the surface to prevent drying), and refrigerate overnight.
Here’s why this works: The boiling water gelatinizes the flour’s starches, creating a gel that retains moisture like crazy. By morning, your Yudane will look dry and cracked—don’t panic! Just tear it into small pieces before adding to your dough. This step can’t be rushed; that overnight rest develops both flavor and texture.
Step 2: Mixing and Kneading the Dough
Next day, I add 150ml room-temperature milk to my stand mixer bowl, followed by 15g sugar, 10g softened butter, and 3g instant yeast. Then I toss in those torn Yudane pieces—they’ll look weird and lumpy, but that’s perfect. The dry ingredients go last: 200g bread flour and 5g salt (always keep salt and yeast separate until mixing!).
I start with the dough hook on low speed (2 on my KitchenAid) until everything comes together—about 2 minutes. Then comes the magic: bumping up to speed 5-6 for a full 20 minutes of kneading. Yes, that sounds long, but we need to develop that gluten structure! The dough should eventually pull cleanly from the bowl’s sides and pass the windowpane test—when stretched thin, it shouldn’t tear but show light through it.
Step 3: First Rise
Once kneaded, I shape the dough into a smooth ball (lightly oil your hands to prevent sticking!) and place it in a greased bowl. Here’s my trick for the perfect rise: I turn my oven to 86°F (30°C) for exactly 1 minute, then turn it off—creating a cozy proofing box. Covered with a damp towel, the dough rises there for 45 minutes to 1 hour, until doubled in size.
The poke test never lies: gently press a floured finger about 1cm into the dough. If the indentation stays without springing back, it’s ready! If it fills in, give it 15 more minutes. Under-proofed dough makes dense bread, so patience is key.
Step 4: Shaping the Dough
Now for the satisfying part—shaping! I turn the dough onto a lightly floured surface and divide it into two equal portions using my bench scraper (weigh them if you’re obsessive like me). Each piece gets rolled into a tight ball, then covered with a damp towel to rest for 20 minutes—this relaxes the gluten for easier shaping.
Working with one piece at a time, I roll it out to about 15×20 cm (6×8 inches), then fold the left and right sides inward like a letter. Rotating 90 degrees, I roll it up tightly from the short end—almost like a cinnamon roll without filling. The seam goes down into my greased loaf pan. Repeat with the second piece, placing them side by side. This technique creates those beautiful swirl layers Shokupan is known for!
Step 5: Second Rise and Baking
Another rise! I cover the loaf pan with a damp towel and return it to my warm oven (again, just 1 minute at 86°F). This time, we wait until the dough just reaches the pan’s rim—about 30 minutes. Over-proofing here causes collapse, so keep an eye on it!
Preheat your oven to 365°F (185°C) during the last 15 minutes of rising. For extra shine, I brush the loaf with beaten egg (but skip this if you prefer the classic matte finish). Bake for 25-30 minutes until golden brown—the loaf should sound hollow when tapped underneath. Immediately turn it out onto a rack to cool (resisting the urge to slice while hot prevents gumminess!).

That first slice revealing the fine, even crumb? Pure baking victory. The hardest part now is waiting until it’s cool enough to eat without burning your tongue! Pro tip: the end pieces make the most incredible toast you’ll ever taste.
Tips for Perfect Shokupan Japanese Milk Bread
After baking countless loaves (and eating even more!), I’ve gathered all the little tricks that take Shokupan from good to “how is this bread so perfect?” levels. These are the details I wish someone had told me when I first started!
Room temperature is your best friend
I can’t stress this enough – cold ingredients are the enemy of fluffy bread! That milk and butter need to be truly at room temp, not just “not cold.” I leave mine out for at least 2 hours before baking. If you forget (we’ve all been there!), here’s my emergency trick: microwave the milk in 5-second bursts until it’s just barely warm to the touch, and cut cold butter into tiny cubes to help it soften faster in the dough.
Don’t rush the kneading
That 20-minute knead time isn’t a suggestion – it’s the golden rule. I set a timer because it always feels longer than it is. The dough will go from shaggy to smooth to incredibly elastic and windowpane-ready if you’re patient. If you’re kneading by hand (brave soul!), expect to put in some elbow grease for about 25-30 minutes until it passes the stretch test.
Watch your yeast like a hawk
Yeast is the little engine that makes our bread rise, but it’s finicky. If your kitchen is cold, try this trick: boil a cup of water in the microwave, then place your covered dough bowl in the (now turned off) microwave with the hot water. It creates the perfect cozy 86°F (30°C) environment. And never let yeast come into direct contact with salt – it’ll kill it before it can work its magic!
The egg wash decision
That glossy, bakery-style top is tempting, but traditional Shokupan often skips the egg wash for a more matte finish. I do both depending on my mood! For egg wash, beat one egg with 1 tbsp water and brush gently right before baking. Pro tip: if you want extra shine without egg, brush with melted butter as soon as it comes out of the oven.
Slice it right
Resist slicing into your beautiful loaf while it’s hot – I know, it’s torture! Waiting at least 1 hour lets the crumb set properly. When you do slice, use a serrated knife and gentle sawing motion – no squishing this cloud-like perfection! My ideal slice thickness? About 1.5cm for sandwiches, slightly thicker for toast.
Serving Suggestions for Shokupan Japanese Milk Bread
Oh, the possibilities! Fresh Shokupan is like a blank canvas waiting for your culinary creativity. My favorite way to enjoy it? Still warm from the oven, torn by hand (no knife needed!) with just a smear of good butter melting into its pillowy crumb. But let me share the secrets I’ve collected from Tokyo’s best kissaten and my own kitchen experiments.
Egg Sandwiches That’ll Make You Swoon
The Japanese tamago sando is life-changing when made with Shokupan. I mix soft-boiled eggs (yolks still slightly jammy) with kewpie mayo, a pinch of sugar, and just enough salt to make the flavors pop. Spread thick between two slices of bread, crusts trimmed for that iconic look—it’s simple perfection. For my lazy weekend version, I scramble eggs with cream cheese and chives, piling them high on toasted Shokupan.
Fruit Sandwiches That Belong on Instagram
You’ve seen those gorgeous furutsu sando taking over social media? Shokupan’s tight crumb makes it ideal for holding whipped cream and fresh fruit without getting soggy. My go-to combo: lightly sweetened whipped cream with strawberries and kiwi slices arranged like little jewels. Pro tip: chill your assembled sandwiches for 30 minutes before slicing—clean cuts every time!
Toast Transformations
Shokupan toast is next-level. The high edges prevent toppings from spilling, and that tender interior crisps up beautifully. My current obsession? Brushing slices with condensed milk before toasting—it caramelizes into a sticky-sweet crust. For savory days, I top with avocado and shichimi togarashi or melted cheese with honey drizzle.
Unexpected Perfect Pairings
Don’t limit yourself to sandwiches! Shokupan makes incredible:
- French toast – Soak thick slices in custard overnight for the fluffiest breakfast
- Bread pudding – Its moisture-holding superpowers prevent dryness
- Croutons – Cubes toasted with garlic butter elevate any salad
- Bread bowls – Hollowed out for creamy soups or Japanese curry
My most surprising discovery? Shokupan makes the absolute best grilled cheese. The thin crust gets perfectly crisp while the interior stays cloud-soft around the melted cheese. I like to mix sharp cheddar with mozzarella and a swipe of miso paste for umami magic. Whatever you choose, just promise me you’ll try at least one slice plain first—it’s a religious experience!
Storing and Reheating Shokupan Japanese Milk Bread
Okay, let’s be real—this bread probably won’t last long enough to need storing, but just in case you miraculously have leftovers (or, like me, you bake an extra loaf to freeze), here’s how to keep your Shokupan tasting fresh as the day it was baked:
The Art of Keeping It Soft
That gorgeous fluffy texture stays perfect when stored properly. I wrap my completely cooled loaf tightly in plastic wrap—like, mummy-level tight—then tuck it into a bread bag or airtight container at room temp. The Yudane method means it’ll stay fresh for 2-3 days this way, which is practically forever in bread years! If you slice it, store it cut-side down on the wrapper to prevent drying.
Freezing Like a Pro
For longer storage, I slice the loaf before freezing—this way I can pull out just what I need. Each slice gets parchment paper between it (trust me, fighting frozen-together bread is no fun), then the whole stack goes into a freezer bag. Squeeze out all the air, and it’ll keep for up to a month. When toast cravings hit, pop frozen slices straight into the toaster—no thawing needed!
Reviving Day-Old Bread
If your Shokupan starts to lose its magic after day two, don’t panic! My favorite trick: sprinkle a few drops of water on the slice (just a mist, not a soak), wrap in foil, and warm in a 300°F (150°C) oven for 5 minutes. The steam brings back that just-baked softness. For single slices, 15 seconds in the microwave with a damp paper towel works in a pinch, though it won’t crisp the crust.
One last tip—never refrigerate Shokupan! The cold turns the starches gritty. I learned this the hard way after ruining half a loaf. Now I either eat it fresh, freeze it, or turn leftover slices into the most luxurious bread pudding you’ve ever tasted. The struggle is real, but so worth it!
Nutritional Information for Shokupan Japanese Milk Bread
Let’s be honest—when you’re biting into that cloud-soft slice of Shokupan, nutrition facts are probably the last thing on your mind! But since we’re all curious (and maybe trying to justify that third slice), here’s the breakdown per standard 1.5cm thick slice:
- Calories: About 150 (perfect for guilt-free snacking!)
- Fat: 3g (mostly from that glorious butter)
- Carbs: 25g (the good kind—complex carbs from quality flour)
- Protein: 5g (thank you, bread flour’s higher protein content)
- Sugar: 5g (just enough to complement the milk’s natural sweetness)
- Sodium: 200mg (mostly from our pinch of sea salt)
A quick disclaimer—these numbers can vary based on exact slice thickness, how much butter you slather on (no judgment!), and whether you use my optional egg wash. Compared to typical sandwich bread, Shokupan tends to be slightly higher in protein and lower in sugar—one more reason to love it!
Fun fact: The Yudane method actually makes the nutrients more bioavailable by breaking down some starches during that overnight rest. So while I’m no nutritionist, I’d say this counts as “smart carbs.” Now pass me another slice—for science!
FAQ About Shokupan Japanese Milk Bread
After baking hundreds of loaves and answering countless questions from friends (and random Instagram followers!), I’ve gathered the most common Shokupan mysteries. Here’s everything I wish I knew when I first started—no judgment, just honest bread-talk from one enthusiast to another!
Can I Use All-Purpose Flour Instead of Bread Flour?
Oh honey, I feel your pain—we’ve all been stuck without bread flour at 2 AM with a bread craving! While you can use all-purpose flour in a pinch, the results won’t have that signature Shokupan chew. Here’s my emergency fix: for every cup of all-purpose flour, add 1 tablespoon vital wheat gluten (find it in most baking aisles). It helps mimic bread flour’s protein content. Your loaf will still be delicious, just slightly less cloud-like. Pro tip: knead the dough an extra 5 minutes to compensate!
Why Refrigerate Yudane Overnight?
I know, waiting is torture when you want bread NOW! But that overnight rest does three magical things: 1) It fully hydrates the flour (no dry pockets ruining your texture), 2) It develops complex flavors (like a sourdough starter’s tang, but milder), and 3) Most importantly—it gelatinizes the starches so your bread stays moist for days. Once I tried rushing it with just a 2-hour rest… let’s just say I ended up with something closer to a brick than bread. The fridge is your friend here!
How Do I Know When the Dough Is Fully Risen?
Ah, the eternal baker’s dilemma! Here’s my foolproof method: after about 45 minutes in a warm spot, poke the dough with a floured finger. If the indentation stays like you’re poking a marshmallow, it’s ready. If it springs back immediately, give it 15 more minutes. And if it collapses? Oops—you’ve overproofed (but don’t worry, just reshape and let it rise again!). My grandma’s trick: the dough should look like a plump pillow and smell sweetly yeasty, not boozy.
Bonus tip: If your kitchen’s cold like mine in winter, create a DIY proofing box by microwaving a cup of water for 2 minutes, then placing your covered dough bowl inside the (now turned off) microwave with the hot water. Works like a charm every time!
Share Your Shokupan Japanese Milk Bread Experience
Okay, now it’s YOUR turn! I’ve shared all my secrets, my little quirks, and my absolute favorite ways to enjoy this incredible Shokupan. But the real magic happens when you bake it in YOUR kitchen, with YOUR family and friends.
Did you try the Yudane method? How did it turn out? Was your dough super stretchy? Did you go for the egg wash or keep it matte? I honestly can’t wait to hear about it! Drop a comment below and tell me everything. Did you make an egg sandwich? A fruit sandwich? Or just devour it straight from the cooling rack (my personal favorite)?
If you loved this recipe, please give it a star rating! It really helps other bakers find their way to this fluffy goodness. And if you snap a pic of your beautiful loaf, tag me on Instagram! I promise to share my favorites. Happy baking, everyone!
Print
Amazing 1 Shokupan Japanese Milk Bread
- Total Time: 1 hour 20 minutes (plus overnight for Yudane)
- Yield: 1 loaf
- Diet: Vegetarian
Description
Shokupan is a soft and fluffy Japanese milk bread, perfect for sandwiches or enjoying on its own.
Ingredients
- 50 g Bread flour
- 40 ml boiling water (above 194°F/90°C)
- 150 ml milk (room temperature)
- 15 g sugar
- 3 g dry instant yeast
- 10 g unsalted butter (room temperature)
- 200 g Bread flour
- 5 g salt
Instructions
- Make Yudane the night before. Mix bread flour and boiling water, cover, and refrigerate overnight.
- Pour room-temperature milk into a stand mixer bowl.
- Add sugar, butter, yeast, and torn Yudane pieces to the bowl.
- Add bread flour and salt.
- Attach the kneading hook and mix on low speed until combined.
- Increase speed to 5 or 6 and knead for 20 minutes.
- Shape dough into a ball, place in a greased bowl, cover, and let rise for 45 min to 1 hour at 86°F (30°C).
- Test dough readiness by poking it—if the hole remains, it’s ready.
- Punch down dough, divide into two equal parts, and roll.
- Cover with a wet cloth and let rest for 20 minutes.
- Roll each dough into a 15×20 cm rectangle.
- Fold tightly from left and right toward the center.
- Rotate 90 degrees and roll from one end.
- Place rolled dough in a lightly greased loaf tin, seam side down.
- Cover with a wet cloth and let rise until dough fills the tin (~30 min).
- Preheat oven to 365°F (185°C).
- Bake for 25-30 minutes.
- Remove from tin and cool on a rack.
- Optional: Brush with beaten egg before baking.
Notes
- Use bread flour for best results.
- Ensure water for Yudane is above 194°F (90°C).
- Room-temperature ingredients help dough rise evenly.
- Optional egg wash adds shine.
- Prep Time: 20 minutes
- Cook Time: 30 minutes
- Category: Bread
- Method: Baking
- Cuisine: Japanese