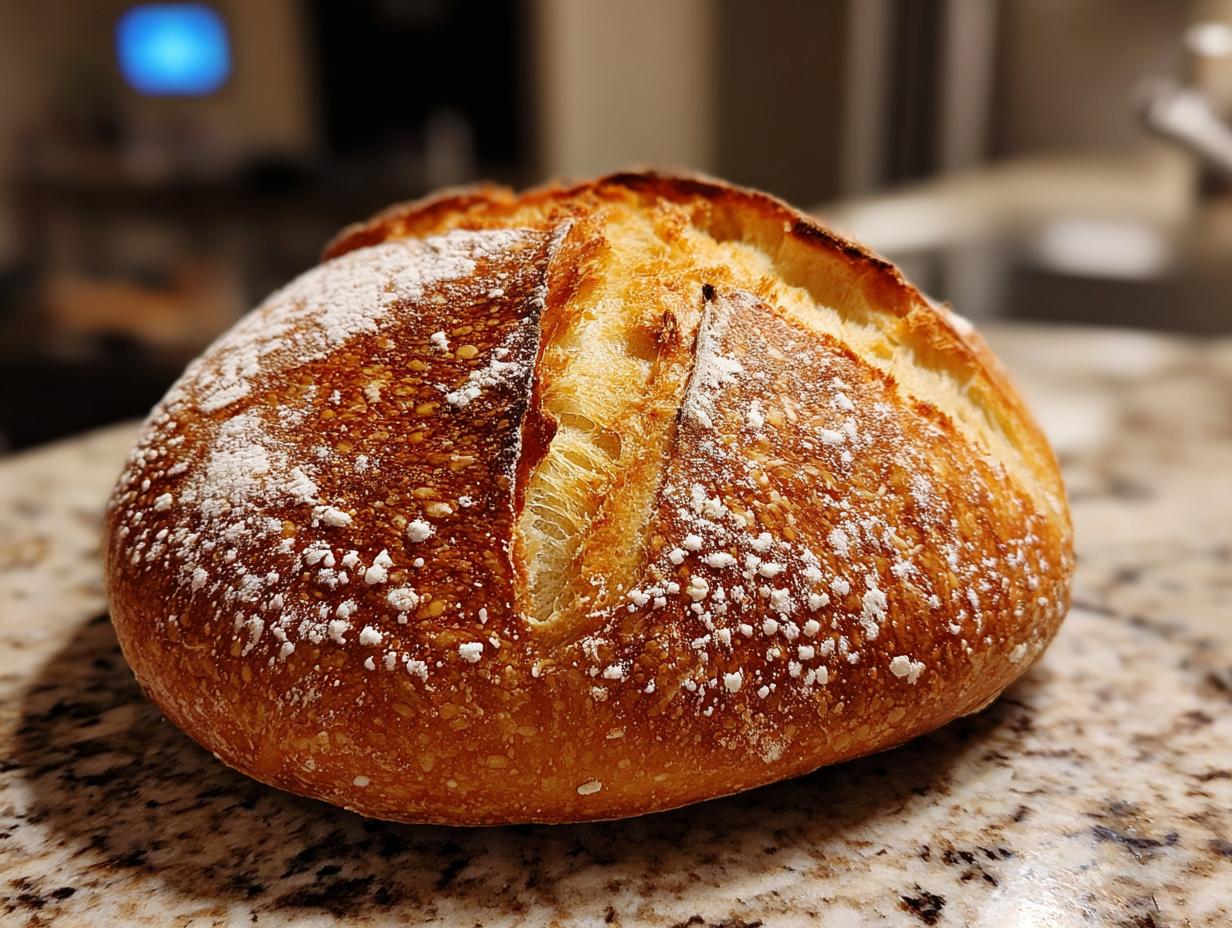
Hey bakers! If you’ve ever dreamed of pulling a perfectly golden, crusty loaf of bread from your own oven, then this Artisan Bread Recipe is absolutely for you. Seriously, making your own bread doesn’t have to be intimidating! I remember my first attempts, thinking it was this super complicated thing, but this recipe changed all that for me. It’s so simple and forgiving, you’ll be amazed at the delicious, homemade bread you can create. It’s that ‘wow’ moment when you slice into it, the crust crackling just right, and you know *you* made this. Let’s get baking!
Why This Artisan Bread Recipe is Your New Go-To
Honestly, this Artisan Bread Recipe is a game-changer for anyone who thinks baking bread is too much work. It proves that you can achieve bakery-quality results without all the fuss! It’s all about that fun, simple, and totally stress-free experience we love. You’ll be whipping up crusty, delicious loaves that taste incredible and make your kitchen smell amazing. It’s seriously satisfying!
- Super beginner-friendly – no fancy equipment needed!
- Achieves that perfect crispy crust and soft inside every time.
- Minimal hands-on time, meaning more time for you to relax.
- Incredibly versatile – it goes with everything!
The Joy of Homemade Artisan Bread
There’s just something magical about pulling a warm, crusty loaf of homemade bread from your oven. This Artisan Bread Recipe makes that feeling totally achievable. The aroma alone is worth it, and the satisfaction of slicing into your own creation is unbeatable. It’s a little bit of pure joy baked right in!

Perfect for Every Occasion
This isn’t just bread; it’s your new kitchen bestie! It’s the absolute best bread for soaking up all that delicious soup, and trust me, it makes the most incredible garlic bread. Whether you’re having a quiet night in or hosting friends, this versatile loaf is always a winner.
Gathering Your Artisan Bread Recipe Ingredients
Okay, let’s talk about what you’ll need for this amazing Artisan Bread Recipe. The best part? It’s a super short list, and you probably have most of it in your pantry already! We’re keeping it simple, just like we like it. No need to hunt down fancy ingredients. Just grab these few things, and we’ll be on our way to some seriously delicious homemade bread in no time. It really is that easy!
Essential Flour for Your Artisan Loaf Bread Recipe
For this Artisan Bread Recipe, you’ll need 3 cups (that’s about 395 grams) of all-purpose flour or bread flour. Either works wonderfully! Bread flour will give you a slightly chewier texture, but all-purpose flour is totally fine if that’s what you have.
The Simple Magic of Yeast and Salt
In this Dough Bread Recipe, yeast is our magic ingredient for making the bread rise and get that lovely texture. We’re using ¼ ounce of instant or active dry yeast, which is usually one standard packet or about 2 ¼ teaspoons. And don’t forget the salt! ½ tablespoon of kosher salt adds flavor and helps control the yeast.
Just Add Water: The Key to Your Artisan Bread Recipe
You’ll need 1 ½ cups of warm water for this Artisan Bread Recipe. Make sure it’s not too hot or too cold – aim for around 105°F (43°C). Too hot and it can kill the yeast, too cold and it won’t activate properly. This warm water is what wakes up our yeast and gets our dough going!
How to Prepare Your Perfect Artisan Bread Recipe
Alright, let’s get this dough ready! Making this Artisan Bread Recipe is really a straightforward process, and I’ll walk you through every step. It’s all about a little patience and letting the dough do its thing. Don’t worry if it seems a bit messy at first; that’s part of the fun! We’re aiming for that rustic, delicious loaf that looks like it came straight from a fancy bakery, but tastes even better because you made it yourself.
Mixing the Dough for Your Easy Baked Bread Recipes
First up, grab your biggest bowl! Toss in your flour, salt, and yeast. Give it a quick stir to combine everything. Now, pour in that warm water. Mix it all together with a spoon or your hands until it just comes together. It’ll be sticky – that’s exactly what we want for this Dough Bread Recipe. Resist the urge to add more flour; we’re going for a wet, shaggy dough.
The Crucial Rise Time for Your Artisan Loaf Bread Recipe
This is where the magic happens and the flavor develops! Cover your bowl with a kitchen towel or some plastic wrap. You want to let this dough rest at room temperature. You can let it rise for a couple of hours, or even longer, like overnight in the fridge if you want a deeper flavor. The longer it rests, the more complex and delicious your Artisan Bread Recipe will be. Don’t skip this part!
Shaping Your Homemade Bread Artisan Masterpiece
Time to get our hands a little floured! Wet your hands a bit – this helps keep the sticky dough from clinging to you. Gently turn the dough out onto a lightly floured surface. You can either gently fold the edges into the center to make a nice round loaf, or if you want two smaller loaves, just divide the dough and shape them similarly. Tuck the ends underneath to create a smooth top. It doesn’t need to be perfect; rustic is the goal here!
Preparing for the Bake: Preheating and Steam for Your Artisan Bread Recipe
While your dough is doing its final little rest (about 20-30 minutes after shaping), it’s time to preheat your oven. Crank it up to 450°F (230°C). If you have a baking stone, pizza stone, or even a Dutch oven or cast-iron skillet, pop that inside to get super hot. Now, for that amazing crust: carefully slide your shaped dough (on its parchment paper) onto the hot surface. Then, carefully add about a cup of hot water or a few ice cubes to the bottom of the oven. This creates steam, which is key for a crackly crust on your Artisan Bread Recipe!

Baking Your Artisan Bread Recipe to Golden Perfection
Close the oven door quickly after adding the water/ice to trap that steam. Bake for about 25 to 30 minutes. You’re looking for a beautiful golden-brown color all over, and it should sound hollow when you tap the bottom. It’s that satisfying sound that tells you your Artisan Bread Recipe is ready!
Cooling and Storing Your Artisan Bread Recipe
Once it’s out of the oven, resist the urge to slice it immediately! Let it cool on a wire rack for at least 30 minutes. This helps the inside finish cooking and prevents it from getting gummy. For the best crust, store your bread in a paper bag. Plastic wrap traps steam and will make that gorgeous crust soft.
Tips for Success with Your Artisan Bread Recipe
Making this Artisan Bread Recipe is so rewarding, and a few little tips can make all the difference. It’s all about understanding what the dough needs! Don’t be afraid if things seem a bit messy or sticky – that’s totally normal. We’re building flavor and texture here, and a little patience goes a long way. These tricks have helped me turn out perfect loaves every time, and I know they’ll help you too!
Achieving the Best Crust on Your Artisan Loaf Bread Recipe
That crackly, golden crust on your Artisan Loaf Bread Recipe? It’s all about steam! Make sure you get that oven and your baking surface piping hot before you slide the dough in. Adding that bit of water or ice to the oven bottom creates the steam needed to keep the crust soft initially, allowing the loaf to expand fully before it crisps up beautifully. Cooling it on a wire rack is also super important – it lets the air circulate and keeps that crust perfectly crisp.
Troubleshooting Common Issues with Your Dough Bread Recipe
If your dough for this Dough Bread Recipe feels way too sticky to handle, just wet your hands a little before shaping. Seriously, it’s a lifesaver! If your dough isn’t rising as much as you’d like, check your water temperature (too hot kills yeast!) or make sure your yeast is fresh. Sometimes, a slightly cooler kitchen can slow down the rise, but it’ll still work, just maybe take a bit longer. Don’t stress, just let it do its thing!
Variations for Your Make Own Bread Adventure
Once you’ve mastered this basic Artisan Bread Recipe, the fun really begins! Making your own bread is such a creative outlet. Don’t be afraid to play around and make this recipe your own. You can totally switch things up to create something totally unique that fits your taste. It’s all part of the adventure of learning to Make Own Bread, and it’s so much fun to experiment with different flavors!
Herb and Seed Infusions for Your Regular Bread Recipe
Want to jazz up your Regular Bread Recipe? Try adding some fresh herbs like chopped rosemary or thyme right into the dough when you mix the dry ingredients. A handful of sunflower seeds or poppy seeds folded in also adds a lovely crunch and nutty flavor. It’s a super easy way to give your homemade loaf a gourmet twist!
Sweet Touches for Your Homemade Bread Artisan Style
For a slightly sweeter take on your Homemade Bread Artisan style, try adding a tablespoon of honey or a teaspoon of cinnamon along with the dry ingredients. It gives the bread a subtle sweetness that’s just lovely, especially when toasted. Imagine this with a smear of butter – pure bliss!
Serving Suggestions for Your Artisan Bread Recipe
This incredible Artisan Bread Recipe is so versatile, it’s practically begging to be paired with something delicious! It’s not just a loaf; it’s the perfect foundation for so many meals. You’ll find yourself reaching for it again and again because it just *works* with so many things. Let’s talk about how to make it shine!
The Best Bread for Garlic Bread Creations
Seriously, if you want to make the most amazing garlic bread, this is your loaf! The crust gets so wonderfully crispy when toasted, and the inside soaks up all that garlicky, buttery goodness. It’s a total game-changer for your garlic bread game.
Pairing Your Artisan Bread Recipe with Soups
This bread is the ultimate companion for any soup, whether it’s a hearty lentil or a creamy tomato. That crusty exterior and soft interior are just begging to be dipped into your favorite Bread For Soup Recipe. It makes a simple soup feel like a gourmet meal!
Frequently Asked Questions About This Artisan Bread Recipe
Got questions about whipping up your own Artisan Bread Recipe? I get it! Baking bread can seem tricky, but this recipe is designed to be super easy. Here are some common things people ask, and I’m happy to help clear them up so you can bake with confidence!
Can I Make This Artisan Bread Recipe in Under an Hour?
While the actual baking and mixing for this Artisan Bread Recipe is pretty quick, the magic really happens during the rise time. So, while you can’t quite get a loaf in exactly 1 hour total from start to finish, the hands-on time is minimal, and the results are totally worth the wait for that extra flavor!
What if My Dough Bread Recipe is Too Sticky?
If your dough for this Dough Bread Recipe feels super sticky, don’t panic! It’s supposed to be a bit wet. Just wet your hands slightly before you shape it. Trust me, it makes all the difference and prevents the dough from clinging to you. It’s better to be a little sticky than to add too much extra flour, which can make the bread dense.
How Do I Store Leftover Artisan Loaf Bread Recipe?
To keep that amazing crust on your Artisan Loaf Bread Recipe, you’ll want to store it in a paper bag rather than plastic. Plastic wrap traps moisture and will make the crust soft. A paper bag lets the bread breathe and stay wonderfully crusty for a day or two. If you have more than that, you can slice it and freeze it!
Understanding the Nutritional Value of Your Artisan Bread Recipe
Just a friendly heads-up about the nutritional info you might see for this Artisan Bread Recipe: those numbers are estimates! Things like the exact brand of flour you use, how thick you slice your loaf, or even if you add extra goodies can change things up. So, think of it as a helpful guide, not a hard-and-fast rule for your delicious homemade bread.
Find more delicious recipes and baking inspiration on our Pinterest page!
Connect with us on Facebook for daily updates and community!
Print
Artisan Bread Recipe: Absolute Joyful Loaf
- Total Time: 1 hour 45 minutes (plus resting time)
- Yield: 1 large loaf or 2 smaller loaves
- Diet: Vegetarian
Description
This artisan bread recipe is simple and fun to make. You can create a delicious homemade bread with a crispy crust. It’s perfect for beginners and great with soup or for garlic bread.
Ingredients
- 3 cups (395 grams) all-purpose flour or bread flour
- ½ tablespoon kosher salt
- ¼ ounce instant or active dry yeast packet (or 2 ¼ teaspoons)
- 1 ½ cups warm water (105°F)
Instructions
- In a large bowl, combine flour, salt, and yeast.
- Pour warm water over dry ingredients and mix until combined. Dough should be sticky but manageable.
- Cover bowl with towel or plastic wrap and let rise at room temperature for 2 to 10 hours or overnight for best flavor.
- Wet your hands and turn dough onto lightly floured surface. Gently fold edges into center to form a round loaf or divide into two loaves, tucking ends underneath.
- Place dough on parchment paper, dust top with flour, score 1 to 4 lines with a bread knife, and let rest 20 to 30 minutes.
- Preheat oven to 450°F with a baking stone, pizza stone, Dutch oven, or iron skillet inside.
- Slide dough with parchment onto hot surface. Add 1 cup hot water or 5 ice cubes to oven bottom to create steam for crustier loaf, then close oven quickly.
- Bake for 25 to 30 minutes until golden brown and crusty.
- Cool on a rack for at least 30 minutes before slicing.
- Store bread in a paper bag to maintain crust crispness.
Notes
- Store bread in a paper bag to maintain crust crispness.
- Prep Time: 15 minutes
- Cook Time: 30 minutes
- Category: Baking
- Method: Baking
- Cuisine: American