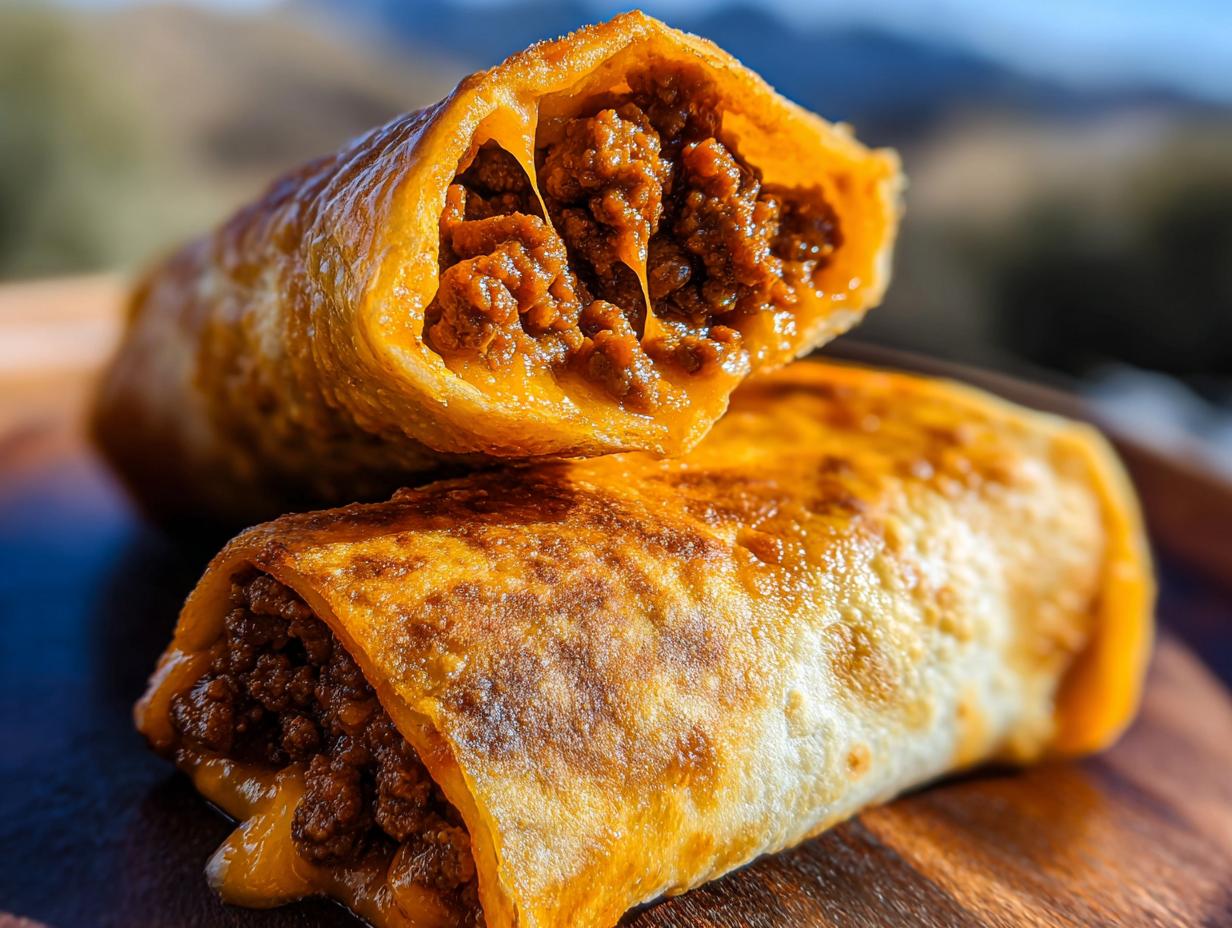
I don’t know about you, but sometimes I just need that deep-fried, crunchy, cheesy satisfaction that only takeout seems to deliver—but I really don’t want the guilt or the cleanup that comes with it. That’s why I spent an entire weekend perfecting these Beef and Cheese Chimichangas. I needed a weeknight fix that was fast, felt indulgent, but I could whip up in the oven or quickly pan fry without making a huge mess.
When I finally figured out the secret to super crispy tortillas holding in that savory, melty filling? Game changer. My family now asks for these almost every week. They’re so much better than standard messy burritos because that crisp shell just makes everything taste better. Trust me, once you see how easy it is, you’ll never order them out again!
Why You Will Love These Crispy Beef and Cheese Chimichangas
These aren’t your average deep-fried bombs; we are baking and pan-frying these to perfection, which dramatically cuts down on oil and cleanup time. I rely on these for those nights when I need something truly satisfying fast.
- Speedy Weeknight Savior: Seriously, from start to finish, this takes less than 40 minutes. If you’re looking for truly quick weeknight meals, this is a winner.
- Ultimate Crunch Factor: Whether you bake or pan fry, we get that golden, shatteringly crisp tortilla shell that you just can’t beat. It’s texturally satisfying!
- Two Cooking Methods: Don’t have time or oil for frying? Bake them! Want maximum flavor? A quick pan fry does the trick. You choose your own adventure, making these perfect for busy nights.
- Hearty and Filling: With seasoned beef, refried beans, and melted cheddar, these are a full meal wrapped up. My husband needs absolutely nothing else when these come out of the oven.
- Freezer Friendly: I always double the batch because they freeze beautifully un-fried, making future dinner assembly instant.
Essential Ingredients for Perfect Beef and Cheese Chimichangas
I love that this recipe is so budget-friendly! Ground beef and pantry staples turn into something incredibly special here. If you’re looking to stretch your dollar, these struggle meal dinners are fantastic.
- 1 pound ground beef (I find 85/15 gives the best flavor once the grease is drained)
- 1 small yellow onion, finely diced (Don’t skip this, it adds so much depth!)
- 2 cloves garlic, minced (Use fresh, this makes a difference!)
- 1 tablespoon chili powder
- 1 teaspoon ground cumin
- 1 teaspoon paprika (Smoked is amazing if you have it)
- ½ teaspoon salt and ½ teaspoon black pepper
- ½ cup salsa (Use your favorite medium heat kind)
- 1 cup refried beans (I press mine against the counter to warm them up before spreading)
- 1 ½ cups shredded cheddar cheese (Sharp cheddar melts the best here)
- 6 large flour tortillas (The biggest ones you can find work best for rolling tight)
- 2 tablespoons vegetable oil (For brushing if baking, or for the skillet if frying)
Step-by-Step Instructions for Making Beef and Cheese Chimichangas
I always recommend getting the filling finished before you even think about assembling. Once the filling is warm and ready, you want to roll these puppies up fast so they don’t tear. This whole process goes way smoother if you have everything prepped.
Step 1: Get your ground beef and that finely diced onion into a big skillet over medium heat. Let that sizzle away for about 6 to 8 minutes until the meat is totally browned and mushy, and the onion has softened right up.
Step 2: Crucial step here: drain off any extra grease. Nobody wants a greasy chimichanga! Once it’s drained, stir in your minced garlic, chili powder, cumin, paprika, salt, and pepper. I also add the salsa right now and let it simmer for another 3 to 4 minutes until that mixture thickens up a bit. Taste it and add a tiny pinch more salt if you need it.
Step 3: Time to prep the wraps! You need to warm those large flour tortillas—just 10 seconds in the microwave wrapped in a damp paper towel usually does the trick. This keeps them pliable so they don’t crack when you roll them.
Step 4: Lay your warmed tortilla flat. Spread about 2 tablespoons of refried beans right down the center strip. Then, top that with a generous scoop of the beef mixture, making sure you leave a good border on the sides. Finish it with about ¼ cup of that shredded cheddar cheese.

Step 5: This is where you need to be firm! Fold in the sides of the tortilla first over the filling, then tuck the bottom edge up and roll it tightly away from you, just like rolling a Christmas present so everything stays tucked in. Place the finished log seam side down. This seam is so important for keeping things neat. If you need to make one-pan meals later, do them now before cooking!
Step 6: Decide your method! If you’re baking, preheat that oven to 400°F (that’s about 200°C). Lightly brush the top and sides of the seam-down chimichangas with the vegetable oil and put them on a baking sheet. Bake them for 18 to 20 minutes, flipping halfway through until they look golden brown and perfectly crispy. If you are pan-frying, heat that oil in your skillet over medium heat and cook them seam side down for 2 to 3 minutes per side until they achieve that gorgeous crispy texture.

Step 7: Let them cool down on a paper towel-lined plate for just 2 minutes. They are molten lava hot inside, so resist the urge to bite immediately! They’re ready to serve right away then.
Tips for Achieving Crispy Beef and Cheese Chimichangas
Listen, the biggest fear people have with these is getting a soggy wrapper, and I totally get it! The texture is literally the entire point of a chimichanga. If you follow these few little tricks, you’ll get that satisfying crunch every single time, regardless of your method.
Oven Baking Method Secrets for Beef and Cheese Chimichangas
If you’re using the oven, two things matter most: high heat and thorough oil brushing. Make sure your oven is truly preheated to 400°F before those logs go in. Don’t be shy with the oil application; use a pastry brush to lightly coat all sides of the rolled chimichanga. This barrier prevents the tortilla from drying out while it crisps up. Also, make sure you flip them halfway through cooking! That way, you don’t get one sad, pale side.
Skillet Frying Tips for Perfect Beef and Cheese Chimichangas
When pan-frying, skip the huge pool of oil you might use for deep frying. Use just enough vegetable oil to lightly coat the bottom of your skillet—that’s usually about 2 tablespoons for a big pan. Heat that oil until it shimmers slightly before you ever put the chimichanga in. Place them seam side down first! This seals the seam shut right away. Work in batches so you don’t crowd the pan, because crowding drops the oil temperature and makes them steam instead of crisp.
What to Serve with Your Beef and Cheese Chimichangas
These chimichangas are already stuffed and satisfying, but the toppings are where you can really take the meal from ‘great solo dish’ to ‘Taco Tuesday level amazing.’ Don’t serve them plain—you need something cool and creamy to cut through all that richness!
Guacamole: You just can’t go wrong with fresh guacamole. It adds healthy fats and a cool, earthy flavor that contrasts perfectly with the spicy beef filling. If you want to make your own amazing version, check out my creamy avocado dressing recipe which works perfectly as a drizzle here too!
Shredded Lettuce and Extra Salsa: I always keep a big bowl of shredded iceberg lettuce for crunch—it’s simple but essential. Plus, adding extra of your favorite salsa, maybe the fiery one you made from scratch using my restaurant-style salsa guide, brings liquid moisture back into the experience.
Sour Cream (or Greek Yogurt): A big dollop of cool sour cream melts slightly onto the hot chimney, instantly balancing any spice from the filling. If I’m watching calories, I’ll swirl in plain Greek yogurt instead—it gives you the tang without nearly as much fat.
Cilantro-Lime Crema: If you have five extra minutes, whip up a quick crema by blending sour cream or Mexican crema with fresh lime juice and a handful of cilantro. It tastes bright and fresh and makes these feel restaurant-quality.
Storing and Reheating Your Leftover Beef and Cheese Chimichangas
Oops, made too many? I always do! The good news is that these save brilliantly. You can keep leftover cooked Beef and Cheese Chimichangas in the fridge for up to 4 days, stored snugly in an airtight container. They are so good for meal prepping too; just make sure they are completely cooled before sealing them up for tomorrow’s lunch, check out my tips for quick protein snack boxes for prep ideas!
Now, reheating is where we separate the pros from the amateurs. Do not use the microwave unless you are in a massive hurry and don’t care about texture—it turns them instantly soggy. For the best results, put them back in a 375°F oven for about 10 minutes until they are piping hot all the way through and that cheese is melty again. That gets you 90% of the way back to that fresh-fried crunch!
Frequently Asked Questions About Beef and Cheese Chimichangas
I always get asked about air frying these because, let’s be honest, who doesn’t love an air fryer hack? I’ve tested it out, and the results are fantastic if you’re looking for minimal oil.
Can I air fry these Beef and Cheese Chimichangas?
Yes, you absolutely can! This is my preferred method when I don’t want to mess with a skillet. After rolling them tightly, brush them lightly all over with oil—don’t skip the oil, or they get dry! Pop them into the air fryer basket in a single layer (work in batches!) at 380°F for about 10 to 12 minutes, flipping them halfway through. They get incredibly crisp!
What if I want to skip the beef?
These are super adaptable because the base filling works so well. If you want vegetarian Beef and Cheese Chimichangas, simply skip the ground beef in Step 1. Instead, use the onion and garlic to build flavor, then stir in a drained can of black beans along with the seasoning and salsa. It’s delicious and just as satisfying!
What temperature should my ground beef reach?
Safety first! Since we are using ground beef in this recipe, you must make sure that beef mixture reaches a safe internal temperature of 160°F before you stop cooking the filling in Step 2. It’s easy to check with a quick-read thermometer before you start rolling them up. This guarantees everything is cooked through before we crisp up the outside.
Enjoy Making These Beef and Cheese Chimichangas
I really hope you give this recipe a try soon. There’s nothing better than that first bite of a hot, crispy chimichanga packed with savory beef and gooey cheese. If you make them for your family, please hop back over and leave me a star rating or a quick comment letting me know how they turned out! Happy cooking, and check out some more of my easy family dinners!
Print
Crispy Beef and Cheese Chimichangas
- Total Time: 35 min
- Yield: 6 chimichangas
- Diet: Vegetarian
Description
Golden crispy beef and cheese chimichangas filled with seasoned ground beef, beans, and melted cheese. Easy to bake or pan fry for a perfect dinner.
Ingredients
- 1 pound ground beef
- 1 small yellow onion finely diced
- 2 cloves garlic minced
- 1 tablespoon chili powder
- 1 teaspoon ground cumin
- 1 teaspoon paprika
- ½ teaspoon salt
- ½ teaspoon black pepper
- ½ cup salsa
- 1 cup refried beans
- 1 ½ cups shredded cheddar cheese
- 6 large flour tortillas
- 2 tablespoons vegetable oil
Instructions
- Cook the ground beef and diced onion in a large skillet over medium heat for 6 to 8 minutes until the meat browns and the onion softens.
- Drain excess grease. Stir in garlic, chili powder, cumin, paprika, salt, pepper, and salsa. Cook for 3 to 4 minutes until the mixture thickens slightly and combines well.
- Warm the tortillas briefly to make them easy to roll.
- Spread about 2 tablespoons of refried beans down the center of each tortilla.
- Add a scoop of the beef mixture and sprinkle about ¼ cup of shredded cheese on top.
- Fold in the sides and roll tightly into a burrito shape, placing seam side down.
- Preheat oven to 400°F (Oven Method) OR Heat vegetable oil in a skillet over medium heat (Skillet Method).
- (Oven Method) Lightly brush chimichangas with vegetable oil and place seam side down on a baking sheet.
- (Oven Method) Bake for 18 to 20 minutes, flipping halfway through, until golden and crisp.
- (Skillet Method) Place chimichangas seam side down and cook for 2 to 3 minutes per side until golden and crispy.
- Let rest for 2 minutes before serving.
Notes
- Serve with sour cream, guacamole, shredded lettuce, or extra salsa.
- Ground beef must reach an internal temperature of 160°F for safe eating.
- Prep Time: 15 min
- Cook Time: 20 min
- Category: Dinner
- Method: Baking or Pan Frying
- Cuisine: Mexican-American