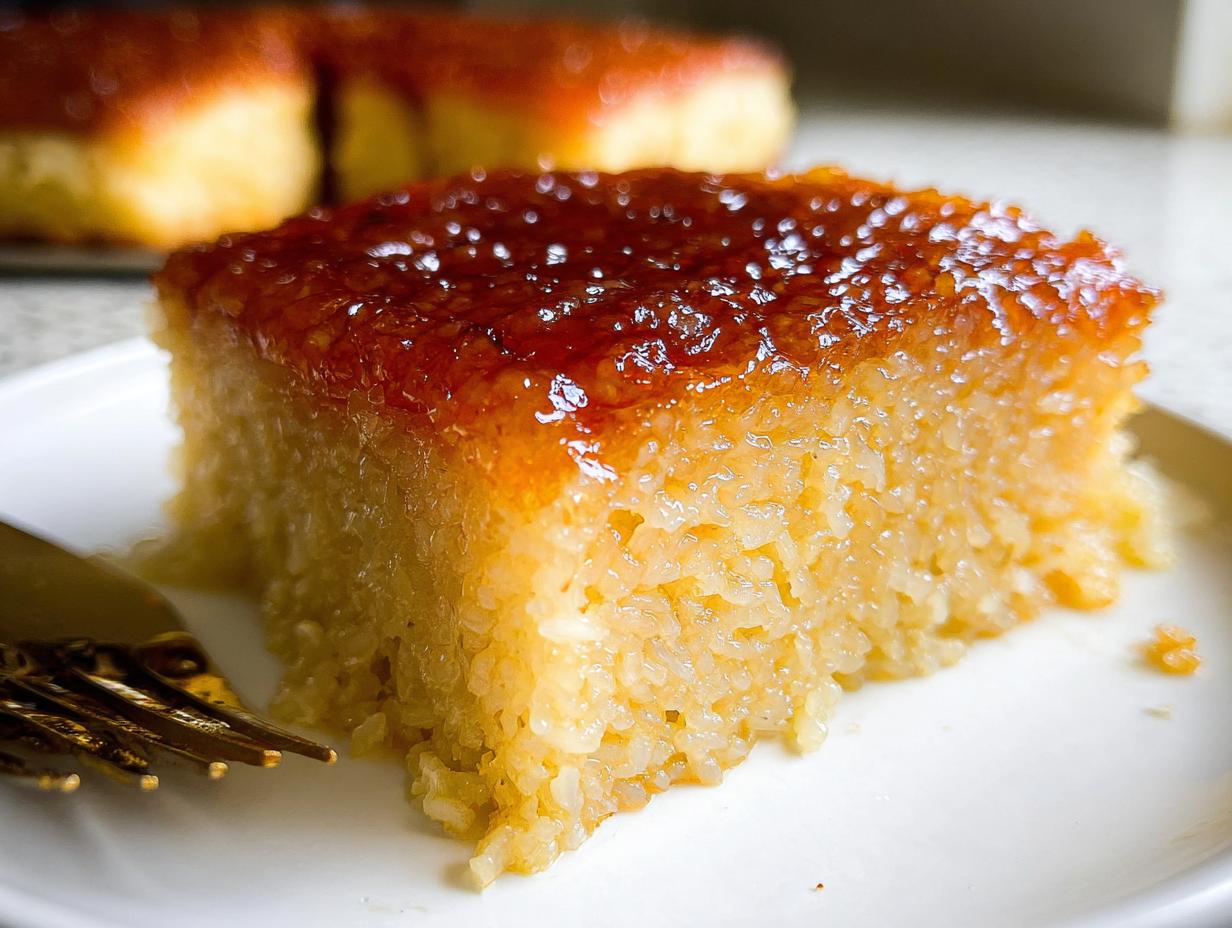
Oh my gosh, you guys have to try this! I’m so excited to share my creation because I finally cracked the code on making a truly satisfying Filipino dessert that doesn’t leave me feeling completely weighed down afterward. Forget everything you thought you knew about traditional sweets—we’re making High Protein Biko Coconut Sticky Rice, and yes, you read that right! It’s creamy, it’s rich, and it sneaks in that extra protein we all need.
When I first started trying to make Biko, I always messed up the texture. It would stick to the pan, or the coconut milk would separate, and I’d just end up ordering takeout. But this version? This recipe is foolproof, even for a beginner cook like I was just a few years ago. The addition of cottage cheese might sound wild, but trust me, it melts right in and just makes the whole thing feel more substantial. It’s the best of both worlds!

Why This High Protein Biko Coconut Sticky Rice Stands Out
Traditional Filipino desserts are amazing, but sometimes they need a little update for modern life, right? This high protein biko is that update! I took the classic, comforting flavors—that deep, earthy brown sugar and rich coconut—and made it better. We aren’t sacrificing authenticity here; we are just making it smarter.
The cottage cheese is my secret weapon. It dissolves completely into the rice mixture as it cooks, adding a fantastic creaminess that you wouldn’t expect, plus seven grams of protein per square! It keeps the sticky rice tender but gives it a satisfying chew that lasts. You get all that traditional flavor with a serious nutritional boost. It’s a game-changer for dessert time!
Gathering Your Ingredients for High Protein Biko Coconut Sticky Rice
Okay, getting the right stuff ready is half the battle, and honestly, the success of this High Protein Biko Coconut Sticky Rice really depends on using the right type of ingredients. You can’t just eyeball this one, especially when it comes to the rice and the coconut milk. I learned the hard way that using watery milk makes for a sad, soupy Biko!
I always lay everything out on my counter before I even turn on the stove. It saves me from that panicked moment when I realize I forgot the salt or something. Here’s exactly what you need for the whole bake, from the creamy base to that gorgeous golden top. Make sure you soak that rice overnight—no cheating on that step!
| Ingredient | Quantity | Specific Detail Needed |
|---|---|---|
| Glutinous Rice | 4 cups | Soaked overnight and thoroughly drained |
| Coconut Milk | 4 cups (for cooking) + ¾ cup (for topping) | Must be full-fat for richness |
| Water | 1½ cups | For initial cooking |
| Dark Brown Sugar | 1 cup (for base) + ½ cup (for topping) | Packed measurements are best |
| Low-Fat Cottage Cheese | 1 cup | This is our protein secret! |
| Kosher Salt | ½ teaspoon | Don’t skip this; it balances the sweetness |
Essential Components for the Base
The base is where all the magic, and the protein, happens. You need those four cups of glutinous rice, which is usually called sweet or sticky rice—make sure it has been soaking for at least eight hours and is drained well before it hits the pot. Then we mix in the main four cups of full-fat coconut milk and the water. The cottage cheese is crucial here; measure it exactly! It needs to be low-fat so it melts smoothly without adding too much extra grease, just the protein lift we want.
Crafting the Caramelized Coconut Topping
For the top, we keep it simple but effective. You’ll reserve the last three-quarters of a cup of that creamy, full-fat coconut milk and another half cup of dark brown sugar. This isn’t mixed into the rice at all! We cook this part separately until it thickens just a bit before pouring it over the top. That little bit of extra sugar ensures you get that beautiful, bubbly, caramelized crust when it bakes. It’s the best part!
Step-by-Step Instructions for High Protein Biko Coconut Sticky Rice
Alright, now that you have all your ingredients lined up, let’s get cooking! This isn’t a quick stir-fry; we need patience, especially in the beginning, to get that signature sticky rice texture just right. Don’t walk away during the first cooking phase—it tends to boil up fast!
Preparing and Cooking the Sticky Rice Base
First things first, get a big, sturdy pot on the stove. We’re combining the drained glutinous rice, the main four cups of coconut milk, and the water right into that pot. Turn the heat up to medium and bring it to a gentle boil. You want bubbles, but nothing aggressive, you know? Once it starts bubbling nicely, immediately drop the heat down to medium-low. Now, you have to stir this often for about eight to ten minutes. The goal here is to get the rice tender—it will soak up most of that liquid. Keep stirring so nothing scorches on the bottom!
Incorporating the Protein and Sweetener
Once the rice is tender and most of the liquid is gone, it’s time for the good stuff. Stir in the cup of brown sugar, the salt, and that secret ingredient, the cottage cheese. Keep stirring constantly for about four to six minutes. This is where the mixture transforms from soupy rice into thick, sticky Biko! You’ll notice it getting really heavy on the spoon. It has to be thick enough to hold its shape before it goes into the pan, otherwise, it won’t set right later.
Baking and Creating the Topping
While that’s getting thick, go ahead and preheat your oven to 350°F. Grab your 9 by 13 baking dish and give it a good grease—I use butter and a light dusting of flour myself. Spread that thick rice mixture evenly into the prepared dish. Don’t press it down too hard! In a separate, smaller saucepan, combine the remaining three-quarters cup of coconut milk and the half cup of brown sugar for the topping. Heat that gently until it just starts to thicken up a little bit—it doesn’t need to turn into caramel yet, just simmer for a minute.
Pour that lovely coconut topping evenly right over the rice base. This is important: bake it uncovered for 55 to 65 minutes. Keep an eye on it after the 50-minute mark because you want that top golden brown and slightly caramelized, but you absolutely don’t want it to burn! Once it’s golden, pull it out and let it cool for at least 30 minutes before you even think about slicing it. That resting time is non-negotiable!

Tips for Perfect High Protein Biko Coconut Sticky Rice
Even with the best recipe, sometimes things go a little sideways, right? That’s why I always have a few tricks up my sleeve for troubleshooting this High Protein Biko Coconut Sticky Rice. Dealing with sticky rice can be tricky because it changes so much as it cooks and cools. Don’t panic if things look a little strange midway through!
Achieving the Right Consistency
If your rice base seems too dry when you’re stirring in the sugar and cottage cheese—maybe you drained your rice a little too well—just add a tablespoon or two of extra water or coconut milk at a time until it loosens up. You want it thick, but not concrete! On the flip side, if your topping mixture starts getting too thick on the stovetop before you pour it over, just take it off the heat and whisk in a tiny splash of water. It thickens up fast in that small pan, so you have to work quickly before you pour it onto the rice.
Slicing and Setting the Dessert
This is the most important tip, seriously! You must let this Biko cool down. I know, waiting for dessert is torture, but if you try to slice it while it’s piping hot, the whole thing will smear into a delicious, sticky puddle. The instructions say at least 30 minutes, but if you can let it cool until it’s just warm—or even room temperature—it sets up perfectly. That resting time allows the starches in the sticky rice to firm up, giving you those beautiful, clean squares for serving. Patience pays off! You can see more of our baking adventures over on Facebook.
Frequently Asked Questions About High Protein Biko Coconut Sticky Rice
I get so many messages asking about substitutions, and that’s totally fair! When you’re trying out a new recipe, especially one that fiddles with a classic like Biko, you have questions. I’ve tried to answer the most common ones I hear about this High Protein Biko Coconut Sticky Rice so you can bake with confidence!
Can I Use a Different Type of Rice
Oh, this is a big one! For this recipe to work and achieve that signature thick, chewy texture, you really need to stick with glutinous rice. That’s what makes it a true sticky rice dessert. If you try to use regular long-grain or even short-grain white rice, it won’t absorb the liquid the same way, and you won’t get that satisfying, dense pull we are looking for. It might cook, but it won’t be Biko! If you enjoy exploring new recipes, check out our collection of easy orange cranberry scones for a different kind of treat.
How Does the Cottage Cheese Affect the Flavor
Honestly, I was nervous about this part too! But since we are cooking it down with all that sugar and rich coconut milk, you really can’t taste the cottage cheese at all. What you *do* get is a noticeable improvement in texture. It adds an incredible creaminess that makes the whole thing feel richer, and of course, it boosts the cottage cheese protein content significantly. It melts right into the base, making it super smooth! We share more recipe tips on Medium.
Storing and Reheating Your High Protein Biko Coconut Sticky Rice
This Biko is so good, you’ll definitely want leftovers, but you have to store it correctly so that coconut topping doesn’t get weird. Since this dessert is so rich in coconut milk and sugar, it keeps really well, provided you keep it airtight. I usually make a double batch because my family devours it!
The most important thing is making sure it cools down completely before you cover it. If you cover warm, steamy rice, you’re basically inviting condensation, and nobody wants watery Biko. Once it’s totally cool, you can cover it tightly with plastic wrap or foil. It lasts surprisingly long at room temperature for the first day, but for longer storage, the fridge is your friend! For more baking inspiration, take a look at our recipe for cinnamon swirl banana bread with vanilla icing.
| Storage Method | Duration | Reheating Instructions |
|---|---|---|
| Countertop (Airtight) | Up to 12 hours | Serve at room temperature or slightly warm. |
| Refrigerator (Airtight) | Up to 4 days | Microwave individual squares in 15-second bursts until warm. |
| Freezer (Wrapped well) | Up to 2 months | Thaw overnight in the fridge, then microwave or warm gently in the oven. |
Understanding the Nutrition in High Protein Biko Coconut Sticky Rice
I know some of you are baking this because it tastes amazing, but I’m betting a few of you are like me and appreciate that little nutritional bump! Because we added that cottage cheese, this High Protein Biko Coconut Sticky Rice is definitely more filling than the traditional version. It truly turns a dessert into something that feels a bit more substantial. If you are interested in other ways to boost protein in your diet, check out our high protein cottage cheese cookie dough.
Now, you have to remember that this is still a sweet treat! We’re using full-fat coconut milk and brown sugar, so the numbers reflect that richness. These figures below are just my estimates based on dividing the total ingredients across the 20 squares the recipe makes. Don’t treat this like a strict diet plan, but it’s good to know what you’re getting!
Estimated Nutritional Breakdown Per Serving
Here’s a quick look at what’s packed into one of those glorious squares. See that protein number? That’s the cottage cheese working hard!
| Nutrient | Estimated Amount Per Square |
|---|---|
| Calories | 245 |
| Protein | 7 g |
| Fat | 11 g |
| Carbohydrates | 32 g |
Share Your High Protein Biko Coconut Sticky Rice Creations
I really want to know what you think once you try this! Did the cottage cheese surprise you? Did your topping get perfectly golden brown in the oven? Drop a comment below and tell me how your High Protein Biko Coconut Sticky Rice turned out, or even share a picture if you made something beautiful. You can also follow our latest recipe pins on Pinterest!
Print
Amazing High Protein Biko Coconut Sticky Rice 7g
- Total Time: 1 hour 20 minutes plus soaking
- Yield: 20 squares
- Diet: Vegetarian
Description
This high protein biko is a creamy coconut sticky rice dessert with a protein boost. It offers a modern twist on classic biko, making it rich and satisfying.
Ingredients
- 4 cups glutinous rice soaked overnight and drained
- 4 cups full-fat coconut milk
- 1½ cups water
- 1 cup low-fat cottage cheese
- 1 cup dark brown sugar
- ½ teaspoon kosher salt
- ¾ cup full-fat coconut milk (for topping)
- ½ cup dark brown sugar (for topping)
Instructions
- Combine the drained glutinous rice, 4 cups coconut milk, and water in a large pot. Bring to a gentle boil over medium heat.
- Reduce heat to medium-low. Simmer for 8 to 10 minutes, stirring often, until the rice is tender and most liquid absorbs.
- Stir in 1 cup brown sugar, salt, and cottage cheese. Cook for 4 to 6 minutes, stirring constantly, until thick and sticky.
- Preheat the oven to 350°F. Lightly grease a 9 by 13 baking dish.
- Spread the rice mixture evenly into the prepared dish.
- In a small saucepan, combine the remaining coconut milk and ½ cup brown sugar. Bring to a gentle boil until slightly thickened.
- Pour the coconut topping evenly over the rice.
- Bake uncovered for 55 to 65 minutes until the top is golden and lightly caramelized.
- Cool for at least 30 minutes before slicing into squares.
Notes
- Allow the biko to cool fully before slicing so the sticky rice sets properly.
- Prep Time: 20 minutes
- Cook Time: 1 hour
- Category: Dessert
- Method: Baking
- Cuisine: Filipino