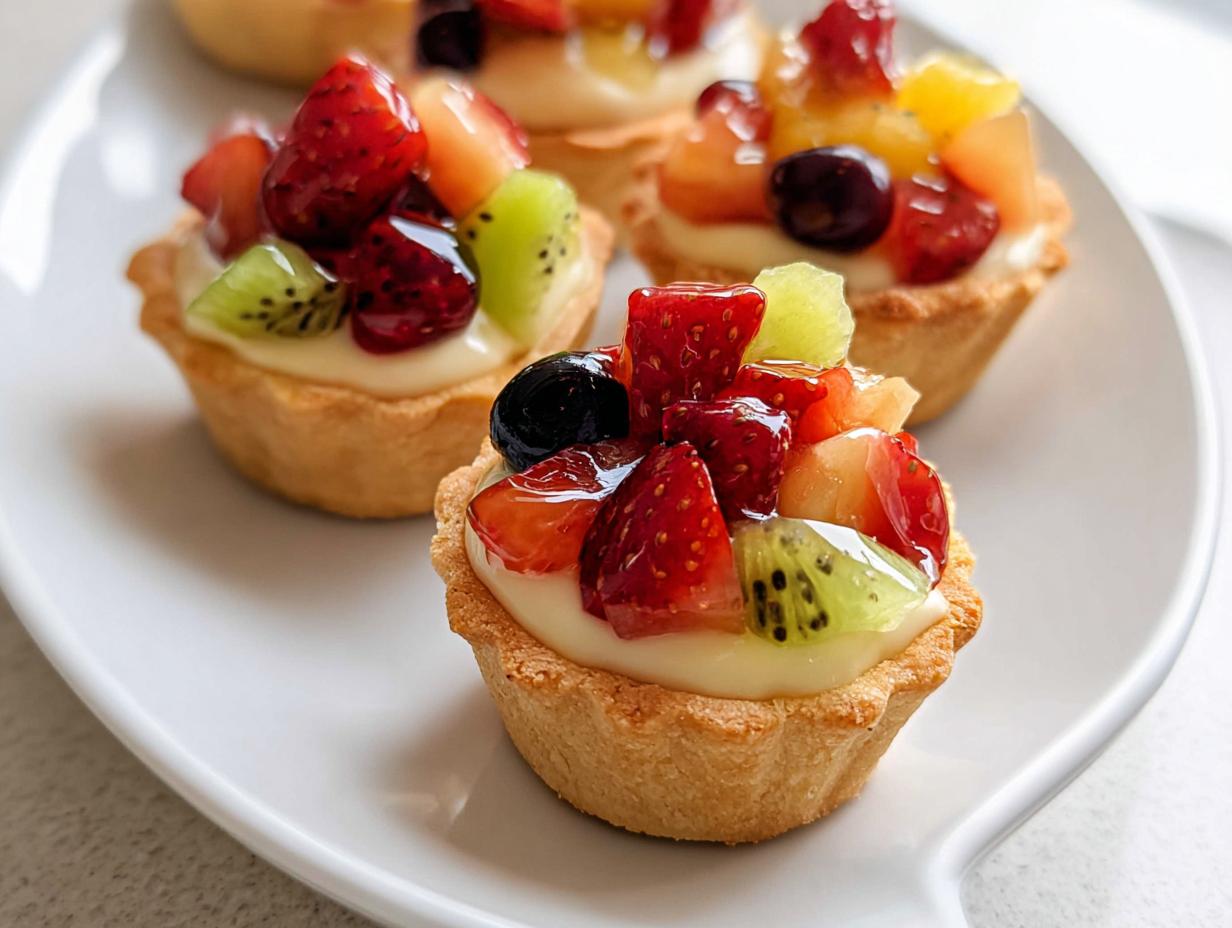
Forget those fussy, giant holiday centerpieces! If you want a dessert that screams elegance but whispers, “I made this in under an hour,” you absolutely need to master these Mini Fruit Tarts with Vanilla Filling. Seriously, these bite-sized beauties are my secret weapon for potlucks and last-minute dessert needs. They look like they took days, but trust me, they’re surprisingly straightforward.
We’re not just making good desserts here; we’re building confidence in the kitchen. That’s what my blog is all about! These little wonders prove you don’t need years of pastry school to turn out something truly show-stopping. I’ll show you every little trick I’ve learned over the years.
My Journey to Perfect Mini Fruit Tarts with Vanilla Filling
When I first tried making pastry, it was a disaster. I mean, rock-hard, crumbly messes! I thought tarts were only for professionals. Then, I realized the issue wasn’t my skill; it was my fear of cold butter and over-mixing.
This recipe changed everything for me. It uses a food processor, which takes away all the guesswork of hand-cutting butter. It’s forgiving, which is exactly what a nervous baker needs. Once I nailed those buttery shells and paired them with that smooth, chilled vanilla filling, I knew I had found my signature crowd-pleaser. If I can make these look perfect, so can you!

Essential Ingredients for Your Mini Fruit Tarts with Vanilla Filling
Okay, let’s talk ingredients. For these Mini Fruit Tarts with Vanilla Filling, you don’t need anything fancy, but you do need precision, especially with the pastry. If you get these components right, the rest is just assembly, which is the fun part!
We are building three distinct layers here: the shell, the cream, and the color on top. Don’t skip the chilling step for the dough—that’s non-negotiable for that flaky, buttery outcome we want.
Pastry Shell Components
For the shells, everything needs to be cold! We’re using standard all-purpose flour, just a little bit of granulated sugar for sweetness, and salt to make those buttery flavors pop. The star here is the 12 tablespoons of unsalted butter, and I mean COLD and cubed. Don’t try to soften it; the food processor needs those hard chunks to create those beautiful layers.
Vanilla Filling and Fruit Toppings
For the filling, I strongly recommend using a high-quality, homemade vanilla pudding that is already CHILLED solid. Seriously, warm pudding in a warm shell is a recipe for soup! Then, you need lots and lots of assorted fresh fruit. I dice everything finely so it sits nicely on top of the pudding without sliding off. Think small strawberries, blueberries, and kiwi pieces.
Optional Glaze Details
If you want that professional, shiny finish, you’ll need the optional glaze. It’s just apricot preserves melted down with a tiny bit of water. It’s super easy, but if you’re serving these right away, you can skip it!
Equipment Needed for Mini Fruit Tarts with Vanilla Filling
You don’t need a huge arsenal of tools, but there are a couple of specific items that make whipping up these Mini Fruit Tarts with Vanilla Filling so much easier. If you have a food processor, pull it out now!
Tools for Pastry Preparation and Baking
- A food processor is your best friend for cutting in that cold butter quickly.
- You absolutely must have a mini muffin pan—this dictates the size of your tarts!
- A simple fork for docking the dough before baking.
- A wire cooling rack so the bottoms of the shells don’t get soggy while cooling down.
Step-by-Step Instructions to Make Mini Fruit Tarts with Vanilla Filling
Now for the fun part—turning those ingredients into gorgeous, bite-sized desserts! We’re moving fast here, so make sure your butter is still cold when you start. Remember, we want flaky shells, not tough cookies!
Creating the Buttery Tart Shell Dough
Grab your food processor! Toss in the flour, sugar, and salt first. Give it a few quick pulses just to combine everything nicely. Next, add the cold, cubed butter. Pulse this mixture until it looks like coarse crumbs—you should still see some pea-sized pieces of butter remaining. That’s how you get flakiness!
Turn the machine on low and slowly drizzle in the milk, just a little bit at a time. You want to pulse only until the dough *just* starts to cling together. Stop immediately! If you see one big lump, you’ve gone too far. If it’s still crumbly, add maybe half a teaspoon more milk, but seriously, be gentle here. Overmixing is the enemy of tender pastry.
Shaping and Chilling the Mini Fruit Tarts with Vanilla Filling Shells
This step requires a little elbow grease, but it’s fast. Take about a tablespoon of that shaggy dough and press it firmly into the bottom and up the sides of each cup in your mini muffin pan. You’re trying to create an even wall around the edges. Make sure the bottom layer isn’t too thick, or they’ll bake up hard.
Once all 18 cups are lined, cover the pan gently with plastic wrap. Now, you must chill these beauties for at least 30 minutes in the refrigerator. This resting period is crucial; it lets the butter firm up again so the shells hold their shape perfectly when they hit the hot oven. Don’t skip this chill time, or they might shrink too much!
Baking the Tart Shells to Golden Perfection
While they chill, set your oven to preheat to 350°F. Once the 30 minutes are up, take the pan out. Use a fork to gently pierce the bottom of every single shell a couple of times—we call this docking, and it keeps them from puffing up into little domes!
Bake them for about 13 to 16 minutes. You’re looking for a light golden brown color, not dark brown. They cook fast! When they’re done, pull the pan out and let them cool *completely* in the pan on a wire rack. Trying to remove them hot will result in broken shells, trust me. Once totally cool, carefully wiggle them out and set them on your serving plate.
Final Assembly of Mini Fruit Tarts with Vanilla Filling
Time to fill! Take your chilled vanilla pudding and spoon about a teaspoon into the base of each cooled tart shell. You want a nice, smooth layer. Then, artfully arrange your finely diced fresh fruit on top of the pudding. Get creative with the colors!
If you’re adding that professional shine, this is when you quickly prepare the glaze.
Preparing the Quick Apricot Glaze
In a small, microwave-safe bowl, mix your apricot preserves and the teaspoon of water. Microwave this mixture on high for just 15 to 30 seconds until it’s melted and runny. It should be thin enough to brush easily. Use a pastry brush to lightly swipe the warm glaze over the fruit on each tart. It sets up quickly and makes those fruits look incredible!

Tips for Success with Your Mini Fruit Tarts with Vanilla Filling
Making these Mini Fruit Tarts with Vanilla Filling is easy, but if you want them to be *perfect*—crisp shells, vibrant fruit—you need to pay attention to a couple of key details. Most issues come down to temperature or timing, so listen up!
Maintaining Pastry Texture and Flavor
When you’re making the dough, remember that cold butter is your best friend. If you feel the dough warming up between pulsing, just stick the whole bowl back in the freezer for five minutes. Also, when you’re pulsing in the food processor, stop as soon as it starts to look like wet sand that just holds together. If you over-process, you develop gluten, and that makes your beautiful buttery shells tough!
Timing Assembly for Maximum Freshness
This is the most important tip for any fruit tart: assemble them the same day you plan to serve them. If you fill the shells with pudding and fruit too early, the moisture from the pudding will start to soften that crisp pastry shell, and you lose that wonderful textural contrast.
If you absolutely must prep ahead, bake the shells and store them in an airtight container at room temperature for up to two days. Keep the pudding refrigerated separately. Then, just before your guests arrive, fill, top, and glaze!
Answering Common Questions About Mini Fruit Tarts with Vanilla Filling
I get asked the same few things whenever I bring these little bite-sized pastries to a party. Honestly, most of the questions revolve around making them ahead of time or what fruit to use. Let’s clear those up right now so you can serve the best Mini Fruit Tarts with Vanilla Filling!
Can I Make the Tart Shells Ahead of Time?
Yes, absolutely! Baked tart shells are very resilient if stored correctly. Once they are completely cool, place them in a single layer inside an airtight container. You can keep them on the counter, not in the fridge, for up to two days. If you refrigerate them, they sometimes absorb moisture and get a bit soft, so room temperature is best for the empty shells.
What Fruit Works Best for Mini Fruit Tarts with Vanilla Filling?
You want fruit that is firm and colorful! Berries like blueberries and raspberries are fantastic because they don’t release a lot of juice. If you use softer fruit like bananas or kiwi, make sure you slice them very thinly and apply the glaze immediately after placing them on the pudding. The glaze acts like a tiny barrier!
How Do I Get a Crisp Shell?
Crispness comes down to two things: cold butter going into the processor and making sure you pierce the bottom with a fork before baking. Also, don’t skimp on the bake time; 13 minutes might look done, but waiting until you see that light golden color ensures all the moisture has baked out of that buttery dough.
Storing Leftover Mini Fruit Tarts with Vanilla Filling
If, by some miracle, you have any of these beautiful Mini Fruit Tarts with Vanilla Filling left over, you need to handle them carefully. Because we have that moist pudding and fresh fruit layered in there, they don’t keep well sitting out on the counter.
You must refrigerate any assembled tarts immediately. The downside is that the pastry will definitely soften over time due to the moisture from the filling. If you can, store the shells and the pudding separately and only assemble what you plan to eat that day. If you must store them assembled, aim to eat them within 24 hours for the best texture.
Best Practices for Storage
Here’s a quick summary for keeping your leftovers safe and sound. Seriously, the shells alone last ages, but once you add that creamy vanilla filling, you need to eat them fast!
| Component | Storage Method | Best Eaten By |
|---|---|---|
| Baked Shells Only | Airtight Container, Room Temp | 2 Days |
| Assembled Tarts | Airtight Container, Refrigerated | 1 Day |
Sharing Your Beautiful Mini Fruit Tarts with Vanilla Filling
I truly hope you loved making these! They are such a joyful little dessert. Once you’ve finished decorating yours, please snap a picture and share it with me! I absolutely love seeing how everyone styles their fresh fruit toppings. You can share your creations with us on Facebook!
Let me know in the comments below how your first attempt at those buttery shells went. Did you manage to stop yourself from over-mixing? I can’t wait to hear about your success! Feel free to pin this recipe on Pinterest too!
Estimated Nutritional Data for Mini Fruit Tarts with Vanilla Filling
Look, I’m a baker, not a nutritionist, so take this with a grain of salt—or maybe a grain of sugar! Since the fruit can change wildly, these numbers are just a rough estimate based on using standard vanilla pudding and a light glaze. I calculated this for one single, perfect little tart.
Nutritional Facts Table
| Serving Size | Calories | Fat | Carbohydrates | Protein |
|---|---|---|---|---|
| 1 tart | 110 | 6 g | 13 g | 1 g |
Tips for Success with Your Mini Fruit Tarts with Vanilla Filling
Making these Mini Fruit Tarts with Vanilla Filling is easy, but if you want them to be *perfect*—crisp shells, vibrant fruit—you need to pay attention to a couple of key details. Most issues come down to temperature or timing, so listen up!
Maintaining Pastry Texture and Flavor
When you’re making the dough, remember that cold butter is your best friend. If you feel the dough warming up between pulsing, just stick the whole bowl back in the freezer for five minutes. Also, when you’re pulsing in the food processor, stop as soon as it starts to look like wet sand that just holds together. If you over-process, you develop gluten, and that makes your beautiful buttery shells tough!
Timing Assembly for Maximum Freshness
This is the most important tip for any fruit tart: assemble them the same day you plan to serve them. If you fill the shells with pudding and fruit too early, the moisture from the pudding will start to soften that crisp pastry shell, and you lose that wonderful textural contrast.
If you absolutely must prep ahead, bake the shells and store them in an airtight container at room temperature for up to two days. Keep the pudding refrigerated separately. Then, just before your guests arrive, fill, top, and glaze!
Answering Common Questions About Mini Fruit Tarts with Vanilla Filling
I get asked the same few things whenever I bring these little bite-sized pastries to a party. Honestly, most of the questions revolve around making them ahead of time or what fruit to use. Let’s clear those up right now so you can serve the best Mini Fruit Tarts with Vanilla Filling!
Can I Make the Tart Shells Ahead of Time?
Yes, absolutely! Baked tart shells are very resilient if stored correctly. Once they are completely cool, place them in a single layer inside an airtight container. You can keep them on the counter, not in the fridge, for up to two days. If you refrigerate them, they sometimes absorb moisture and get a bit soft, so room temperature is best for the empty shells.
What Fruit Works Best for Mini Fruit Tarts with Vanilla Filling?
You want fruit that is firm and colorful! Berries like blueberries and raspberries are fantastic because they don’t release a lot of juice. If you use softer fruit like bananas or kiwi, make sure you slice them very thinly and apply the glaze immediately after placing them on the pudding. The glaze acts like a tiny barrier!
How Do I Get a Crisp Shell?
Crispness comes down to two things: cold butter going into the processor and making sure you pierce the bottom with a fork before baking. Also, don’t skimp on the bake time; 13 minutes might look done, but waiting until you see that light golden color ensures all the moisture has baked out of that buttery dough.
Storing Leftover Mini Fruit Tarts with Vanilla Filling
If, by some miracle, you have any of these beautiful Mini Fruit Tarts with Vanilla Filling left over, you need to handle them carefully. Because we have that moist pudding and fresh fruit layered in there, they don’t keep well sitting out on the counter.
You must refrigerate any assembled tarts immediately. The downside is that the pastry will definitely soften over time due to the moisture from the filling. If you can, store the shells and the pudding separately and only assemble what you plan to eat that day. If you must store them assembled, aim to eat them within 24 hours for the best texture.
Best Practices for Storage
Here’s a quick summary for keeping your leftovers safe and sound. Seriously, the shells alone last ages, but once you add that creamy vanilla filling, you need to eat them fast!
| Component | Storage Method | Best Eaten By |
|---|---|---|
| Baked Shells Only | Airtight Container, Room Temp | 2 Days |
| Assembled Tarts | Airtight Container, Refrigerated | 1 Day |
Sharing Your Beautiful Mini Fruit Tarts with Vanilla Filling
I truly hope you loved making these! They are such a joyful little dessert. Once you’ve finished decorating yours, please snap a picture and share it with me! I absolutely love seeing how everyone styles their fresh fruit toppings.
Let me know in the comments below how your first attempt at those buttery shells went. Did you manage to stop yourself from over-mixing? I can’t wait to hear about your success!
Estimated Nutritional Data for Mini Fruit Tarts with Vanilla Filling
Look, I’m a baker, not a nutritionist, so take this with a grain of salt—or maybe a grain of sugar! Since the fruit can change wildly, these numbers are just a rough estimate based on using standard vanilla pudding and a light glaze. I calculated this for one single, perfect little tart.
Nutritional Facts Table
| Serving Size | Calories | Fat | Carbohydrates | Protein |
|---|---|---|---|---|
| 1 tart | 110 | 6 g | 13 g | 1 g |

Amazing 18 Mini Fruit Tarts with Vanilla Filling
- Total Time: 45 minutes plus chilling
- Yield: 18 mini tarts
- Diet: Vegetarian
Description
Mini fruit tarts feature crisp buttery pastry shells, smooth vanilla filling, and a topping of fresh, colorful fruit. These make beautiful, bite-sized desserts ideal for gatherings.
Ingredients
- 1 1/2 cups all purpose flour
- 1/4 cup granulated sugar
- 1/2 teaspoon fine salt
- 12 tablespoons unsalted butter cold and cubed
- 3 tablespoons milk
- 1 cup homemade vanilla pudding chilled
- 2 cups assorted fresh fruit finely diced
- 2 tablespoons apricot preserves (optional glaze)
- 1 teaspoon water (optional glaze)
Instructions
- Place the flour, sugar, salt, and cold butter into a food processor. Pulse the mixture until it looks like coarse crumbs.
- Add the milk. Pulse only until the dough forms and is flexible but not damp.
- Press about 1 tablespoon of dough into each section of a mini muffin pan, forming the bottom and sides evenly.
- Chill the pan in the refrigerator for 30 minutes.
- Set your oven to preheat to 350°F. Pierce the bottoms of the tart shells with a fork.
- Bake for 13 to 16 minutes until the shells are light golden brown. Let them cool fully in the pan.
- Carefully take the cooled tart shells out of the pan and set them on a serving dish.
- Put about 1 teaspoon of vanilla pudding into each tart shell.
- Place the fresh fruit on top of the pudding in each tart.
- If you are using the glaze, melt the apricot preserves and water together by microwaving for 15 to 30 seconds. Brush this glaze lightly over the fruit.
Notes
- Assemble the tarts on the same day you plan to serve them for the best result in texture and freshness.
- Prep Time: 30 minutes
- Cook Time: 15 minutes
- Category: Dessert
- Method: Baking
- Cuisine: American