Oh my gosh, you are going to absolutely fall in love with these! I’ve tried so many scone recipes over the years—some were dry hockey pucks, and others just sort of… deflated. But I finally cracked the code, and trust me when I say these Buttery Biscoff Cookie Butter Scones are the real deal. They are that perfect bakery-style treat you dream about, but I promise you, they are ridiculously easy to make, even if you’ve never touched a pastry cutter before.
When I first tried making scones, I thought they required some kind of secret pastry chef training. I was intimidated by the flakiness factor! But this recipe changed everything for me. It uses simple techniques, and the Biscoff cookie butter just melts right into the dough, giving it this unbelievable depth of flavor and moisture. It’s my go-to for quick weekend breakfasts now. Seriously, you’ll have these beauties ready for the oven in under 15 minutes. No stress, just pure, buttery, spiced goodness!

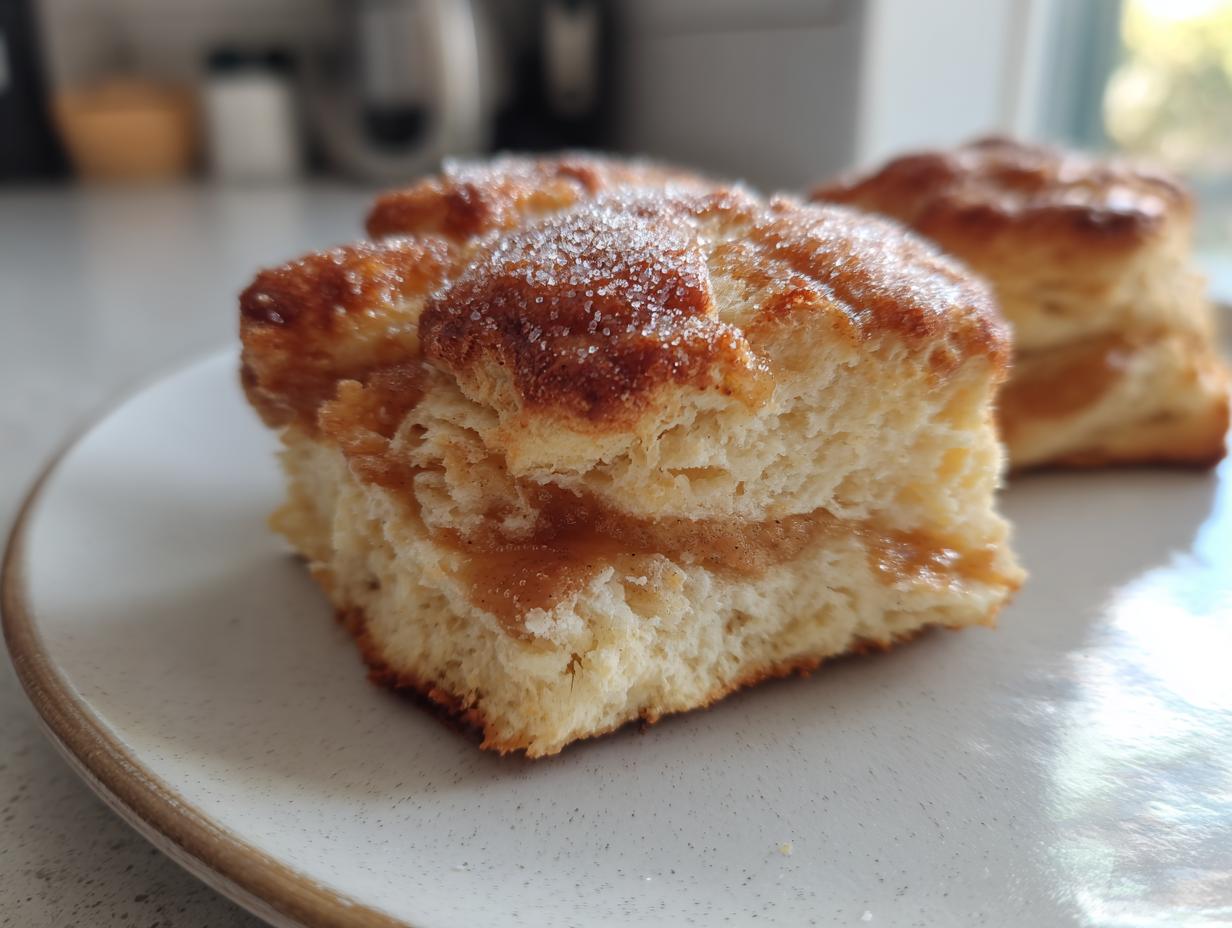
Why You Will Crave These Buttery Biscoff Cookie Butter Scones
I know, I know, there are a million scone recipes out there, but these buttery Biscoff ones stand head and shoulders above the rest. They hit all the right notes without any fuss. I spent way too many mornings testing ingredients to get this balance just right, so you don’t have to worry about failure!
- They are lightning fast! Prep and cook time combined is only 30 minutes—perfect for a last-minute breakfast treat.
- That texture is everything—flaky layers that practically melt in your mouth.
- The flavor is intense. You get the warmth of the spice mixed with that signature caramelized Biscoff taste.
Experience the Flavor Difference
Honestly, the depth of flavor in these isn’t accidental. After trying batches with cinnamon only, or using slightly too much vanilla, I finally landed on the measurements that make these scones sing. The combination of the crushed cookies and the melted cookie butter creates a rich, almost caramelized note that just screams “bakery quality.” When you bite into that slightly crisp, sugary top layer and hit that soft, buttery interior, you’ll know why I insisted on perfecting this recipe!
Essential Ingredients for Perfect Buttery Biscoff Cookie Butter Scones
Gathering your supplies is half the battle when it comes to perfect scones. Unlike a soft cake, scones rely heavily on the temperature and quality of what goes into them. Don’t substitute willy-nilly here, especially with the main flavor drivers like the cookie butter! I’ve laid out exactly what you need below. Trust me, having everything measured and ready before you start mixing makes the whole process smooth sailing.
Remember, the goal is flaky texture, and that starts with the right ratio of flour, fat, and liquid. I’ve included the exact measurements I found to give you those gorgeous, tall, bakery-style results. No sad, flat scones here!
| Quantity | Ingredient |
|---|---|
| 2 cups | All Purpose Flour |
| 2 tablespoons | Granulated Sugar (plus 1 teaspoon for topping) |
| 2 tablespoons | Light Brown Sugar |
| 1 tablespoon | Baking Powder |
| \u00be teaspoon | Salt |
| 6 tablespoons | Cold Unsalted Butter, cubed |
| \u215c cup | Cold Half and Half |
| 1 teaspoon | Vanilla Extract |
| 3 tablespoons | Biscoff Cookie Butter, melted and cooled |
| 6 | Biscoff Cookies, crushed |
Ingredient Clarity and Preparation Notes
Before you even turn the oven on, pay close attention to how you prep these items. This is where many people accidentally ruin their scones! The butter absolutely must be cold—and I mean rock hard cold—cut into small cubes. Those little cold butter chunks create steam pockets when baking, which is the secret to the flakiness you want.
Also, make sure your Biscoff cookie butter is melted down slightly but has cooled off a bit before you add it to the dough. If it’s hot, it melts the butter chunks we worked so hard to keep cold. For the sugar, we use both white and brown sugar to build flavor complexity. Don’t skip the brown sugar; it adds a richness that regular white sugar just can’t match. When measuring the flour, gently spoon it into your measuring cup rather than scooping directly, or your scones will turn out dense!
Equipment Needed for Your Buttery Biscoff Cookie Butter Scones
You don’t need a fancy stand mixer or a pastry blender for these beauties. Keeping things simple is key to getting these delicious Biscoff scones done fast! I always suggest laying out everything on the counter before you even think about turning on the oven. It saves so much scrambling time later on.
- One large mixing bowl for combining dry ingredients.
- A whisk or fork for that initial dry mix.
- A sturdy spatula or wooden spoon for folding everything together gently.
- A sharp knife or bench scraper for cutting the wedges.
- A standard baking sheet lined with parchment paper.
- A small pastry brush for applying the milk wash on top.
Step-by-Step Instructions for Buttery Biscoff Cookie Butter Scones
Okay, here is where the magic happens! Don’t rush these steps, especially the mixing part, but also don’t dawdle because we want those cold ingredients to stay cold. Preheat your oven right away—we need it roaring hot at 425\u00b0F. Line a baking sheet with parchment paper so cleanup is a breeze later. This sets the stage for success with your Buttery Biscoff Cookie Butter Scones.
Mixing the Dough and Incorporating Cookie Butter
First things first, we build the dry base. Whisk together your flour, both sugars (granulated and brown), baking powder, and salt in a big bowl. This evenly distributes the leavening agents so you don’t end up with one scone that explodes and one that stays flat. Next, the cold butter cubes go in. You need to “cut” that butter into the flour until it looks like coarse crumbs, and I mean coarse! You should still see some pea-sized pieces of butter floating around—that’s the key to the flaky layers, remember?
Once the butter is worked in, pour in your cold half and half and the vanilla. Stir this *just* until the dough starts clinging together. It will look shaggy, and that’s perfect. Now for the star: gently fold in your melted and cooled Biscoff cookie butter and those crushed Biscoff cookies. Here is my biggest warning: Stop mixing as soon as the Biscoff streaks disappear! If you overmix once the cookie butter is in, you activate too much gluten, and you lose the lightness. We want tender, not tough!
Shaping and Baking Your Scones
Turn that slightly cohesive mess out onto a lightly floured surface. Give it just 5 or 6 gentle kneads—no more! We are just trying to bring it together into a workable mass. Pat it gently into a thick circle, about an inch high. I find using a bench scraper helps keep the sides neat. Cut that circle into 8 nice, even wedges, like slicing a pizza.
Place these wedges onto your prepared baking sheet, making sure they have about 2 inches of breathing room between them so they can puff up nicely. Before they go in, brush the tops lightly with a tiny bit more half and half—this helps the sugar stick—and sprinkle them with that reserved teaspoon of granulated sugar for a little sparkle and crunch. Pop them into that 425\u00b0F oven for 12 to 15 minutes. Keep an eye on them; they’re done when they are puffed up beautifully and have that gorgeous golden brown color. Let them cool on a rack for just a few minutes before you dive in!

Tips for Achieving Bakery-Style Flaky Scones
If you want scones that look like they came straight from a fancy little coffee shop display case, you have to respect the temperature of your ingredients. It’s not just about having the right recipe; it’s about handling the dough correctly, too. I’ve learned the hard way that warm ingredients lead to flat, dense results, and we are definitely aiming for flaky heaven here!
My secret weapon, which I mentioned briefly, is treating the mixing process like a race against time. You want everything incorporated quickly so the heat from your hands doesn’t warm up that vital fat structure. This recipe works because I’m meticulous about that initial mixing stage.
Ingredient Temperature is Key
This is non-negotiable, folks! If you take away only one thing from this whole guide, let it be this: your butter and your half and half must be ice cold. I mean, if your kitchen is hot, stick your cubed butter back in the freezer for five minutes right before you cut it in. When the cold butter hits the hot oven, it instantly turns to steam, and that steam forces the layers of dough apart, creating those wonderful flaky pockets.
If your half and half is lukewarm, it melts the butter right away, turning your mixture into a greasy paste instead of crumbly dough. So, pull out your half and half right before you use it, and keep that butter frosty right up until the moment it hits the flour. It’s the number one difference between a mediocre scone and a truly amazing one!
Storing and Enjoying Leftover Buttery Biscoff Cookie Butter Scones
Even though these Buttery Biscoff Cookie Butter Scones are so addictive you might not have any leftovers, life happens! If you manage to save a few, keeping them fresh is important so they don’t turn stale on you. The key here is airtight storage, just like with any good pastry.
If you plan to eat them within a day or two, leaving them on the counter is fine, but I always prefer the fridge for anything spice-flavored to keep the texture firm. Reheating is super simple; you want to bring back that fresh-from-the-oven texture without drying them out.
| Storage Method | Duration | Reheating Tip |
|---|---|---|
| Airtight Container at Room Temperature | Up to 1 day | 30 seconds in the microwave to soften. |
| Airtight Container in Refrigerator | Up to 4 days | 5 minutes in a 350\u00b0F oven for crisp edges. |
| Freezer (Well Wrapped) | Up to 2 months | Thaw overnight, then reheat as above. |
For the best experience, skip the microwave if you can and use your oven when reheating leftovers. That quick blast of dry heat crisps up the exterior just perfectly, making them taste like they just popped out of the oven moments ago!
Frequently Asked Questions About Cookie Butter Scones
I get so many questions about these cookie butter scones after people try the recipe the first time. It’s always about texture or substitutions! I totally get it; sometimes you run out of an ingredient or want to try a slight variation. Here are the top things folks ask me about making these flaky scones.
If you’ve struggled with dry scones in the past, this recipe should solve that, but always remember the cold ingredient rule! If you find your dough seems too dry, a teaspoon of extra half and half is usually enough to bring it together, but don’t add too much!
Q1. Can I use something besides Biscoff cookie butter?
Absolutely! While the signature flavor comes from Biscoff, you can substitute it with peanut butter or even almond butter if you need to. Just remember that peanut butter might make the dough slightly stiffer, so you might need an extra splash of half and half to keep things loose.
Q2. Why are my scones tough instead of flaky?
This almost always means you overworked the dough after adding the wet ingredients or the cookie butter. Once you start mixing the liquid in, you just want to bring it together gently. Overmixing develops gluten, which gives you bread texture, not light, flaky scones.
Q3. Can I skip crushing the cookies?
You really shouldn’t! The crushed cookies add little pockets of intense flavor and texture throughout the scone. If you leave them whole, you end up with giant chunks instead of that lovely, even distribution we are aiming for in these dessert scones.
Can I use a different type of butter for these Buttery Biscoff Cookie Butter Scones
This is a tricky one because the butter is so crucial to the final rise! For the best results, you absolutely need cold, hard unsalted butter cut into cubes. That coldness creates the flakiness, remember? If you absolutely must substitute, you can try using a high-quality, cold European-style butter because it tends to have a higher fat content.
However, please avoid using margarine or soft tub butter. Those substitutes have too much water content, and they will melt too quickly when you cut them into the flour. That means you lose the steam pockets entirely, and your beautiful scone dough will just turn into a greasy mass instead of light, buttery layers.
Sharing Your Delicious Buttery Biscoff Cookie Butter Scones
I truly hope you enjoyed making these as much as I do! If you ended up with a batch of these amazing, flaky treats, please come back and tell me all about it. Snap a picture and tag me, or just leave a quick comment below telling me how they turned out. I love hearing about your baking adventures! You can also follow along for more great recipes on our Facebook page.
Print
Shocking 8 Buttery Biscoff Cookie Butter Scones
- Total Time: 30 minutes
- Yield: 8 scones
- Diet: Vegetarian
Description
Soft and flaky Biscoff scones made with cookie butter and crushed cookies. This is an easy bakery style scone recipe ideal for breakfast or dessert.
Ingredients
- 2 cups all purpose flour
- 2 tablespoons granulated sugar, plus 1 teaspoon for topping
- 2 tablespoons light brown sugar
- 1 tablespoon baking powder
- ¾ teaspoon salt
- 6 tablespoons cold unsalted butter, cubed
- ⅜ cup cold half and half
- 1 teaspoon vanilla
- 3 tablespoons Biscoff cookie butter, melted and cooled
- 6 Biscoff cookies, crushed
Instructions
- Preheat the oven to 425°F and line a baking sheet with parchment paper.
- In a large bowl, whisk together the flour, granulated sugar, brown sugar, baking powder, and salt.
- Cut the cold butter into the dry ingredients until coarse crumbs form with visible butter pieces.
- Stir in the half and half and vanilla just until the dough begins to come together.
- Gently fold in the melted Biscoff cookie butter and crushed cookies until evenly distributed.
- Turn the dough onto a lightly floured surface and knead gently 5 to 6 times until it holds together.
- Pat the dough into a 1 inch thick circle and cut into 8 equal wedges.
- Transfer the scones to the prepared baking sheet, spacing them 2 inches apart.
- Brush the tops with a small amount of half and half and sprinkle lightly with granulated sugar.
- Bake for 12 to 15 minutes until puffed and golden brown.
- Cool briefly on a wire rack before serving.
Notes
- Do not overmix once the cookie butter is added or the scones may lose their flaky texture.
- Prep Time: 15 minutes
- Cook Time: 15 minutes
- Category: Breakfast
- Method: Baking
- Cuisine: American