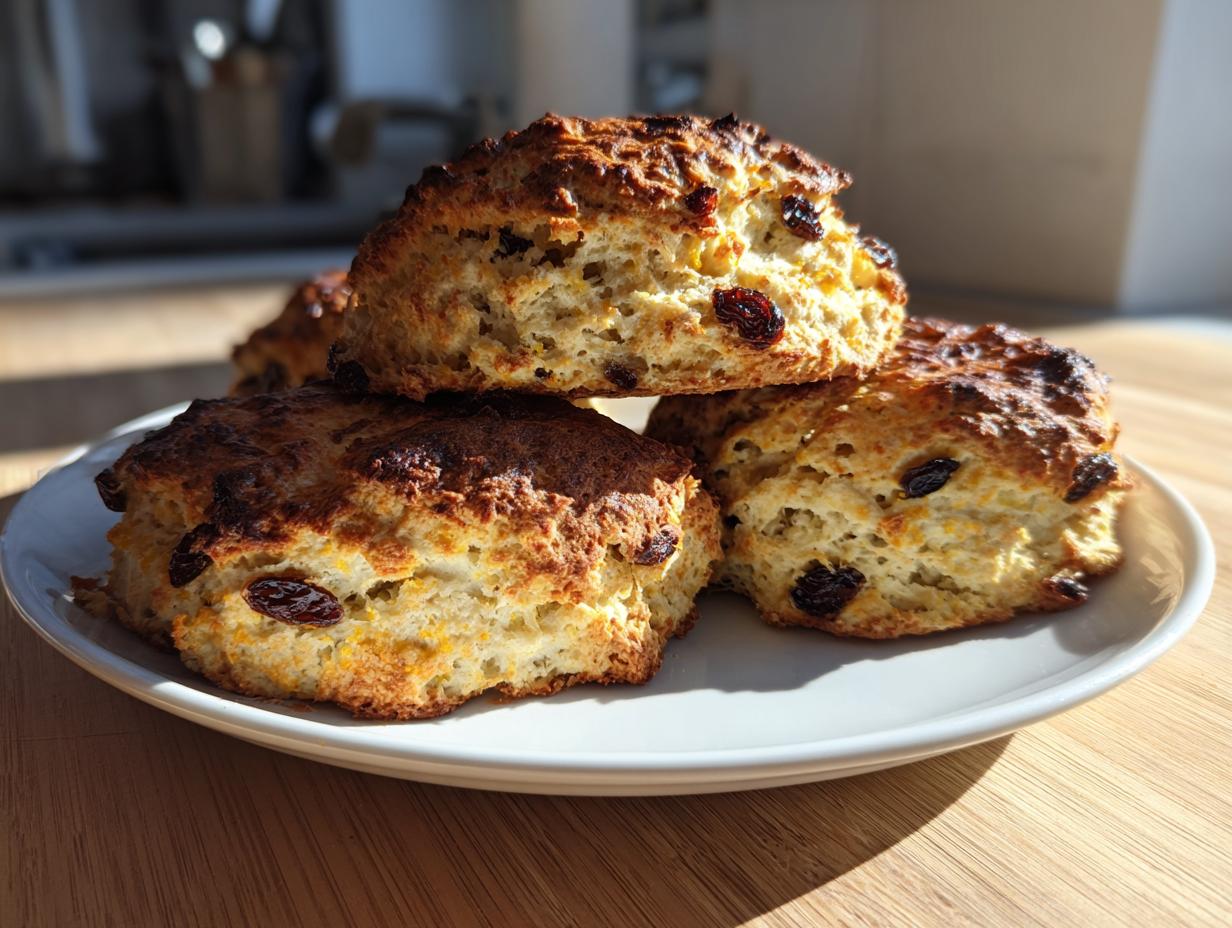
When I first started baking, anything that involved yeast or complicated rolling techniques sent me running! Seriously, I thought scones were reserved for pastry chefs. But then I found this recipe, and wow, it completely changed everything. I’m talking about the most tender, easy Orange Raisin Soda Bread Scones you will ever meet, and I promise, you can nail these even if your baking experience is zero.
The beauty of soda bread recipes is that they rely on baking soda and buttermilk to do all the heavy lifting—no waiting for dough to rise! This means you go from pantry pull to golden-brown perfection in under an hour. These rustic scones deliver that bright pop of citrus mixed with sweet, chewy raisins. Trust me, the first time you pull a tray of these out, smelling the orange and butter, you’ll know you’ve struck gold with a keeper recipe.

Essential Ingredients for Your Orange Raisin Soda Bread Scones
The secret to truly fantastic homemade baked goods always starts right here, with what you measure out. For these Orange Raisin Soda Bread Scones, we’re keeping things simple but insisting on quality where it counts. We need that quick lift from the baking soda and powder, but we also need the flavor backbone provided by the zest and the fruit. Don’t skimp on the zest; that’s where the brightness comes from!
When you look at the list, it’s mostly pantry staples, which is why I love this recipe for a speedy breakfast. But how you treat those staples makes all the difference between a good scone and a great one.
Dry Components Explained
We start with all-purpose flour, which gives us a nice structure without being tough. The sugar is just there to balance the tang of the buttermilk and the brightness of the orange—it’s not a super sweet dessert scone, which I love. You must use both baking powder AND baking soda here. The baking soda reacts immediately with the buttermilk for our rise, and the powder gives a secondary lift as it bakes. Don’t forget the salt to wake everything up! And please, grab a fresh orange for the zest. That fragrant oil from the fresh zest is irreplaceable.
Fats, Fruit, and Liquid Requirements for Orange Raisin Soda Bread Scones
This is where we nail the texture for these Orange Raisin Soda Bread Scones. The butter absolutely has to be ice cold and cubed. If it’s soft, you’ll just mash it into the flour, and we need those little cold pockets to create steam and flakiness later. For the fruit, use standard raisins—no need for fancy golden ones unless that’s all you have. Just make sure they are evenly mixed in so every scone gets some chewy goodness.
Finally, the liquid: buttermilk is non-negotiable for soda bread. It provides the necessary acid. Make sure you measure out the full cup, plus that extra tablespoon we save for brushing the tops later. That little bit of extra liquid helps achieve that deep golden crust we’re aiming for on these beautiful scones.
Equipment Needed for Making Rustic Scones
You don’t need a fancy stand mixer for these rustic scones, which is another reason I adore them! Grab a couple of good, sturdy mixing bowls—one for the dry stuff and maybe one for later, though we try to keep it to one main bowl. A whisk is essential for making sure those leavening agents are evenly distributed.
You’ll also need a good baking sheet. Make sure it’s lined with parchment paper; trust me, this saves cleanup time when they start spreading just a little. And don’t forget a pastry blender or even just two forks if you don’t have one, for cutting in that cold butter. That’s really all the specialized gear required!
Step-by-Step Guide to Amazing Orange Raisin Soda Bread Scones
Alright, time to get our hands dirty! Remember what I always say: baking is chemistry, but great scones are about *feel*. We need to move quickly once the butter hits the flour, but the initial mixing step can take its time. Preheat your oven right now to 425°F. That high heat is key to getting a great oven spring on these beauties.
Mixing the Dry Base
Grab your largest bowl. We’re whisking together the flour, sugar, baking powder, baking soda, and salt. Whisk it really well—this is your chance to make sure the leavening agents are perfectly distributed, so we don’t end up with one scone that didn’t rise at all! Once those are combined, toss in your teaspoon of fresh orange zest. I like to use my fingers here to gently rub the zest into the flour mixture a bit. This helps release those fragrant oils before we add anything wet. It smells amazing already!
Cutting in the Butter and Adding Fruit
Now for the cold butter cubes. You can use a pastry blender if you have one, but honestly, I just use my fingertips. Work the butter quickly into the flour mixture. You’re looking for a texture that resembles coarse crumbs, like quick oats or cornmeal, but you should still see some visible, pea-sized pieces of butter scattered throughout. Those chunks are what melt and create steam, making your Orange Raisin Soda Bread Scones flaky! Once you hit that texture, stir in your raisins until they look nicely scattered.
Bringing the Orange Raisin Soda Bread Scones Dough Together
Pour in that buttermilk all at once. Use a fork or a rubber spatula and mix just until the dough starts to come together. Stop mixing the second you can’t see any dry flour streaks anymore. It should look shaggy and messy—that’s perfect! Do not overmix! Turn that shaggy mess out onto a lightly floured surface. Now, here’s the crucial part for tenderness: gently knead or press the dough just 5 or 6 times—no more! We are just forcing it to hold a cohesive shape. Overhandling develops gluten, and we want tender Orange Raisin Soda Bread Scones, not tough biscuits.
Shaping and Preparing for the Oven
Divide your dough into 8 equal pieces. Don’t fuss about perfect circles; these are meant to be rustic! Just gently pat or roll each piece into a round shape, maybe about an inch thick. Place them on your parchment-lined baking sheet, making sure they have about 2 inches of space between them because they will puff up! Take that reserved tablespoon of buttermilk and lightly brush the tops of each scone. This gives them that gorgeous, shiny, deep golden finish.

Baking for Golden Perfection
Get them into that hot 425°F oven immediately. Seriously, don’t let the dough sit around once you’ve brushed it, or the soda loses its punch! Bake them for 15 to 18 minutes. You’ll know they are done because they’ll look puffed up and deeply golden brown on top. Don’t be afraid of a deep color; that means maximum flavor! They should sound hollow when you tap the bottom. Let them cool just slightly on a wire rack before you slather them with butter.
Tips for Success When Making Orange Raisin Soda Bread Scones
I want you all to have the best, most tender Orange Raisin Soda Bread Scones possible, so let me share the real secrets I learned through trial and error. The biggest takeaway, which is true for all quick breads, is temperature control. Your butter must be cold, and your oven must be hot. That initial blast of 425°F heat is what makes the soda work its magic quickly before the structure sets too hard.
My main piece of expert advice revolves around handling. You saw me mention it before, but I’ll say it again: be gentle! When you mix in the buttermilk, stop as soon as the flour disappears. If you knead this dough like you would yeast bread, you’ll develop gluten strands, and those strands turn your lovely, tender scone into something you could use to hammer a nail. That’s why we only give it 5 or 6 gentle folds.
Also, don’t skip that final buttermilk brush. That little bit of liquid protects the top crust and helps it brown beautifully. If you follow these steps—cold butter, hot oven, minimal handling—you are guaranteed a batch of amazing, rustic scones every single time.
Serving Suggestions for Your Fresh Bake
Once these citrus scones have cooled down just enough so they don’t melt everything instantly, it’s time for the best part: eating them! Because these Orange Raisin Soda Bread Scones have such wonderful flavor built right in—that sweet zest and the chewy raisins—they don’t need much dressing up at all. A simple smear of good quality salted butter is honestly heavenly.
If you want something a little fancier, grab your favorite jam. I find tart raspberry or a bright lemon curd pairs beautifully with the orange notes. If you can’t find proper clotted cream where you are, don’t panic! Whip some heavy cream with just a tiny splash of vanilla extract and a whisper of powdered sugar until it holds soft peaks. It’s a fantastic homemade substitute that lets the scone flavor shine through perfectly.
Storing and Reheating Your Delicious Batch
These scones are definitely best enjoyed the day they come out of the oven—that morning warmth is unbeatable! But they are sturdy enough that you don’t have to worry about leftovers. If you have any that don’t get eaten right away, just store them in an airtight container at room temperature. I find they stay perfectly good for about three days that way. Don’t try putting them in the fridge; they get a little sad and stiff in there, which ruins that tender crumb we worked so hard to achieve!
If you do store them, you absolutely must reheat them before serving. A quick warm-up brings back that fresh-baked texture. You can use the microwave for about 10 seconds if you’re in a huge rush, but I really prefer the oven method to crisp up the outside again.
Here’s a quick guide for bringing your scones back to life:
| Storage Duration | Reheating Method |
|---|---|
| Up to 3 Days (Room Temp) | 350°F in the oven for 5-7 minutes |
| Up to 1 Month (Frozen) | Wrap individually, microwave for 30 seconds, then toast in air fryer/oven |
Frequently Asked Questions About These Citrus Scones
I get so many questions once people start making these, and that’s great! It means you’re excited to bake them. Here are a few things I hear most often about achieving that perfect texture or making simple swaps.
Q1. My scones came out tough. What did I do wrong?
This is almost always due to overmixing or warm butter. Remember, we are aiming for a shaggy dough, and you should only knead it about five or six times total. If you work the dough too much, you develop gluten, and that’s what makes bread chewy, not these lovely rustic scones. Make sure your butter is straight from the fridge!
Q2. Can I substitute the buttermilk? I don’t keep it on hand.
You can! If you don’t have buttermilk, you can make a quick substitute. Just take one cup of regular milk (whole milk works best) and stir in one tablespoon of white vinegar or lemon juice. Let it sit on the counter for about five minutes until it looks slightly curdled. That acidity is what you need to react with the baking soda, so don’t skip that step!
Q3. What if I want a different fruit instead of raisins?
These citrus scones are very adaptable. Dried cranberries work wonderfully and give you a slightly tarter bite that pairs nicely with the orange zest. You could also use chopped dried apricots if you like something a bit chewier. Just make sure whatever dried fruit you choose is evenly distributed when you mix it in.
Q4. Do I have to use orange zest, or can I use orange extract?
Oh, please use the fresh zest! Extract is concentrated flavor, and while it works in a pinch, it doesn’t give you the bright, fragrant oil that fresh zest releases when rubbed into the flour. The zest is what makes these scones taste so fresh and vibrant!
Estimated Nutritional Data for Orange Raisin Soda Bread Scones
Now, I’m not a nutritionist, so please take these numbers with a grain of salt—or maybe a dash of orange zest! This tracking is just an estimate based on the standard ingredients used for these Orange Raisin Soda Bread Scones, calculated per single scone serving. It helps me keep track of things, but for exact dietary needs, you might want to plug the raw ingredients into a dedicated tracker. If you’re interested in more baking tips, check out our Pinterest page!
| Nutrient | Estimate Per Scone |
|---|---|
| Calories | 285 |
| Total Fat | 11 g |
| Carbohydrates | 42 g |
| Protein | 5 g |

8 Tender Orange Raisin Soda Bread Scones
- Total Time: 33 minutes
- Yield: 8 scones
- Diet: Vegetarian
Description
Tender soda bread scones with raisins and orange zest baked until golden. This is an easy rustic scone recipe with classic flavor.
Ingredients
- 2 cups all purpose flour
- ¼ cup granulated sugar
- 2 teaspoons baking powder
- ¼ teaspoon baking soda
- ½ teaspoon salt
- 6 tablespoons cold unsalted butter, cubed
- ½ cup raisins
- 1 teaspoon orange zest
- 1 cup buttermilk, plus 1 tablespoon for brushing
Instructions
- Preheat the oven to 425°F and line a baking sheet with parchment paper.
- In a large bowl, whisk together the flour, sugar, baking powder, baking soda, salt, and orange zest.
- Cut the cold butter into the dry ingredients until the mixture resembles coarse crumbs with visible butter pieces.
- Stir in the raisins until evenly distributed.
- Pour in the buttermilk and mix just until a shaggy dough forms.
- Turn the dough onto a lightly floured surface and gently knead 5 to 6 times until it holds together.
- Divide the dough into 8 equal portions and shape into rustic rounds.
- Place the scones 2 inches apart on the prepared baking sheet.
- Brush the tops with the remaining tablespoon of buttermilk.
- Bake for 15 to 18 minutes until puffed and deeply golden.
- Cool slightly on a wire rack before serving.
Notes
- Handling the dough gently keeps the scones tender and helps them rise properly in the hot oven.
- Prep Time: 15 minutes
- Cook Time: 18 minutes
- Category: Breakfast
- Method: Baking
- Cuisine: American