Oh my gosh, you guys! If you think making bread from scratch is terrifying, complicated, and requires a special degree in gluten development, I am here to tell you that you are absolutely wrong. I remember my very first attempt at homemade bread—it looked like a sad, dense frisbee, and I almost gave up on baking forever! But then I found this method, and everything changed.
This No-Knead Skillet Bread with Crispy Crust is my secret weapon for when I want that incredible, artisan bakery smell filling my house without spending an entire afternoon kneading dough. Seriously, we are talking pantry staples only—flour, water, yeast, salt—and the magic really happens in a simple skillet in the oven.

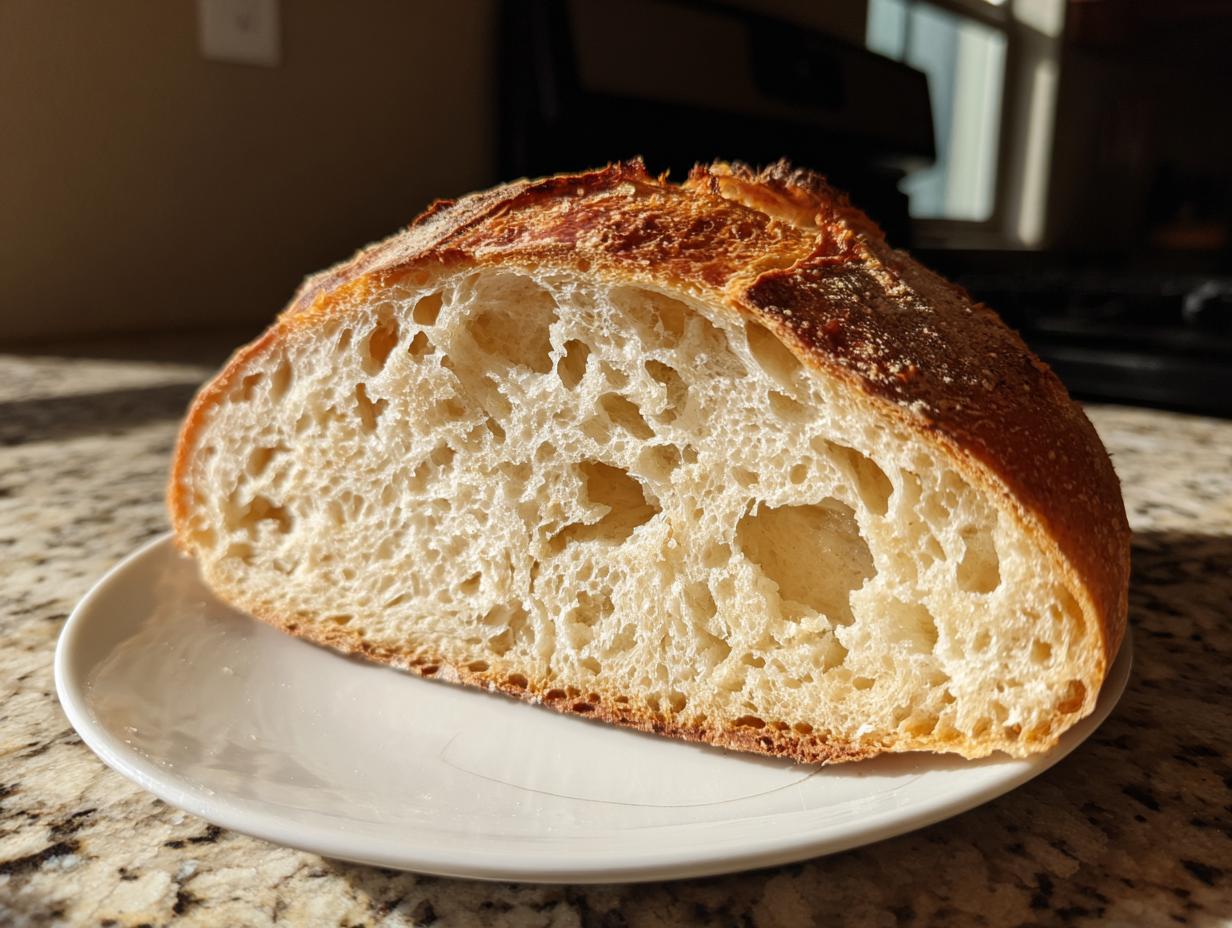
The best part? The crust! It develops this incredible, shatteringly crisp exterior while the inside stays soft and chewy. It’s the perfect confidence booster. If you’ve ever been scared to try yeast, this recipe is your personal invitation into the world of baking. Trust me, following these simple steps guarantees you the success you need to build that crucial home-baking expertise (that’s the EEAT part!).
Why You Will Master This No-Knead Skillet Bread with Crispy Crust
I know what you’re thinking: bread takes forever, right? Well, yes and no. While the dough needs time to rest, your actual active time in the kitchen is ridiculously short. You mix it, forget it, and come back later to bake something spectacular. It’s the ultimate high-reward, low-effort bake.
This loaf is proof that you don’t need fancy equipment or hours of elbow grease to get amazing results. It’s practically foolproof, which is why I recommend it to anyone who’s nervous about yeast.
Key Benefits for the Home Baker
- Minimal Hands-On Time: Seriously, you only stir things together. No kneading required!
- Incredible Texture Contrast: That perfectly blistered, crispy crust bread texture against the soft interior is just unbeatable.
- Beginner Friendly: This No-Knead Skillet Bread with Crispy Crust is designed to forgive mistakes.
Essential Ingredients for Your No-Knead Skillet Bread with Crispy Crust
The beauty of this bread is that it relies on the absolute basics. If your pantry is stocked, you’re halfway there! Unlike sourdough or enriched doughs, we aren’t messing around with milk, eggs, or tons of sugar. It’s just the core four, plus a little oil and my favorite herb addition, rosemary.
When I first tried this, I worried about substitutions, but please stick to the flour amount specified. This recipe is sensitive to too much or too little flour, which is what dictates that amazing texture in our No-Knead Skillet Bread with Crispy Crust. Because we aren’t kneading, the flour needs the right amount of water to hydrate properly.
Ingredient Breakdown and Preparation Notes
You’ll notice the water temperature is specific—that’s important! Too cold and your yeast won’t wake up, too hot and you’ll kill it dead. We want that sweet spot around 105 to 110 degrees Fahrenheit.
- Flour: Use standard all-purpose flour. Don’t swap for bread flour here; the lower protein content helps keep the crumb soft.
- Yeast: Active dry yeast is what we’re using. Make sure it’s fresh!
- Salt: Fine salt dissolves better during the initial mix than coarse kosher salt, so stick to fine if you have it.
- Rosemary: This is optional, but oh my goodness, it makes the whole house smell incredible while it bakes. If you skip it, you’ll still have a fantastic plain loaf.
Equipment Needed for Success
You probably have most of this gear, but the skillet is the non-negotiable star here. It traps the steam, which is what gives us that fantastic crust.
- A large mixing bowl.
- A sturdy spoon for mixing the sticky dough.
- A 10-inch oven-safe skillet. Cast iron is ideal, but any heavy-bottomed skillet that can go straight into a hot oven works great.
- Plastic wrap or a clean kitchen towel for covering the dough.
Step-by-Step Instructions for No-Knead Skillet Bread with Crispy Crust
Alright, let’s get our hands dirty—or maybe just our spoons dirty, since we aren’t really kneading! This is where the magic starts, and I promise you, it’s so simple you’ll wonder why you ever bought bread from the store. The whole process is broken down into three main phases: mixing, waiting, and baking. Follow these steps exactly, and you’ll have that amazing No-Knead Skillet Bread with Crispy Crust in no time.
Mixing the Dough and First Rise
First things first, grab your big bowl. We are combining all the dry ingredients right at the start. Whisk the flour, yeast, salt, and rosemary together until they look uniform. Don’t skip the whisking! It’s the only mixing we do upfront, so we need that yeast to be evenly distributed.
Next, add the warm water. Remember that temperature range? It’s crucial. Pour it in and start stirring with a wooden spoon. You’ll think, “This isn’t coming together,” but keep going! You want to stir until there are absolutely no patches of dry flour left lurking at the bottom. The result should be a very wet, sticky, shaggy mess. Don’t try to knead it; that defeats the whole purpose of this easy loaf!
Once it’s mixed, cover the bowl with a clean kitchen towel—no tight plastic wrap for this first rest. Find a warm spot in your kitchen, maybe near the stove if you’re running the oven for something else, and just leave it alone. This first rise takes about 90 minutes. Go read a book, watch a show, or just daydream about eating warm bread. It needs to at least double in size.
Second Rise and Skillet Preparation
While that dough is doing its work, get your skillet ready. This is critical for that crispy exterior. Take one tablespoon of olive oil and really coat the bottom and sides of your 10-inch oven-safe skillet generously. I mean, make it shiny! This oil acts as our barrier and helps crisp up the bottom beautifully.
When the dough has doubled, gently scrape it out onto a lightly oiled surface—I lightly oil my hands too, otherwise, it’s just a sticky mess to handle. You aren’t punching it down or forcing it; you are gently gathering it into a loose round shape. Think of it like gently tucking in a baby blanket. Transfer this dough ball right into your oiled skillet.
Drizzle the remaining olive oil over the top of the dough. Cover it loosely again, and let it sit for just 30 minutes. This second, shorter rise lets the dough relax a bit before it hits the heat.
Baking and Achieving That Perfect Crust
Now, crank that oven up to 400°F (200°C). You want it blazing hot when the bread goes in. While the oven preheats, take a very sharp knife and score a shallow ‘X’ right across the top of the dough in the skillet. This just gives the steam an escape route so the top doesn’t tear everywhere.
Carefully place the skillet right into the hot oven. Bake it for 35 minutes. I always watch it closely around the 25-minute mark. If the top is browning too fast, I’ll shift the rack down a level, but usually, the skillet protects the bottom while the top golds nicely. You know it’s done when the top is deeply golden brown and, if you carefully tap the crust with your knuckles, it sounds hollow. That hollow sound means the interior is cooked through, and that crust is ready to crackle!

Tips for Perfect No-Knead Skillet Bread with Crispy Crust
Even with a recipe this easy, there are a couple of little things that can make the difference between a good loaf and the absolute best loaf you’ve ever made. Don’t stress if your first attempt isn’t perfect; baking bread is all about tweaking small details! These tips will help ensure you get that gorgeous, shatteringly crispy crust bread every single time you make this loaf.
Temperature Control Matters
I can’t stress this enough: the water temperature for activating your yeast is make-or-break. If your water is too cold, the yeast just sleeps, and your dough won’t rise in those allotted 90 minutes. If it’s too hot, you literally kill the tiny workers, and you’ll end up with a brick. Use a thermometer if you have one, aiming for that 105–110°F range. It feels warm, but not hot, when you touch it.
Also, preheating the oven is non-negotiable! We are essentially flash-baking the exterior of this No-Knead Skillet Bread with Crispy Crust to set that crust immediately. If you put the dough into a lukewarm oven, the crust won’t form correctly, and the bread will steam instead of bake.
Slicing and Cooling: The Final Wait
This is the hardest part, but you must listen to me here: patience for cooling is as important as patience during the rise! Once you pull that beautiful loaf out of the oven, resist the urge to cut into it immediately. I know, the smell is intoxicating, and you want to see the soft interior, but you can’t.
The structure is still setting up inside. If you slice it too early, all that trapped steam rushes out, and your lovely, soft crumb will collapse into a gummy mess. Let it cool in the skillet for a full 45 minutes. I usually move the skillet onto a wire rack after about 10 minutes to let air circulate underneath. After 45 minutes, you can carefully lift the loaf out and slice away!
Frequently Asked Questions About Your Skillet Bread
I get so many emails and comments after people try this recipe for the first time! It’s natural to have questions, especially when dealing with yeast for the first time. Don’t worry if things look a little different than you expected—that’s part of learning to bake! Here are the most common concerns I hear about achieving that perfect No-Knead Skillet Bread with Crispy Crust.
Can I use a different type of flour in this No-Knead Skillet Bread with Crispy Crust?
This is a tricky one. While you absolutely can experiment, I strongly suggest sticking to all-purpose flour for your first few tries. Bread flour has a higher protein content, and since we aren’t kneading, that extra protein can make the final loaf tougher and chewier than the soft interior we are aiming for in this easy homemade bread. Whole wheat flour will absorb much more water, meaning you’ll likely need to add more liquid, and it won’t brown quite the same way.
What if my dough does not double in size?
If your dough hasn’t doubled after 90 minutes, don’t panic! Usually, this comes down to two main culprits. First, check your water temperature—was it warm enough to wake up the yeast? If your kitchen is chilly, it can take much longer. If you suspect the yeast is dead (maybe it’s old?), you can test it: put a teaspoon of yeast in half a cup of warm water with a pinch of sugar. If it doesn’t get foamy within 10 minutes, toss the whole batch and start over with fresh yeast. Otherwise, just give the dough another 30 minutes to see if it catches up!
Storing and Reheating Your Homemade Loaf
Since this bread is so simple, it doesn’t have the preservatives that store-bought loaves have, so we need to be smart about leftovers. Honestly, this loaf is best eaten the day it comes out of the oven—that crust is just unbeatable when fresh! But if you do have some left, don’t just let it sit on the counter getting soft.
The key to keeping it good is cutting down on air exposure. If you plan on eating it within a couple of days, wrap it tightly in plastic wrap and then maybe foil. If you’re waiting longer, freezing is actually better for texture retention. The real trick, though, is how you reheat it to bring that crispy crust back to life!
Storage Guidelines and Reheating Table
Don’t try to toast thick slices in a regular toaster; you need real heat to re-crisp the exterior. Follow this quick guide:
| Storage Method | Duration | Reheating Instructions |
|---|---|---|
| Countertop (Airtight) | 1-2 Days | 10 minutes at 350°F in the oven. |
| Freezer (Wrapped tightly) | Up to 3 Months | Thaw slightly, then reheat at 375°F for 12-15 minutes. |
Sharing Your Baking Journey
I put my heart into perfecting this recipe so you wouldn’t have to stress over your first loaf. Now that you’ve pulled that beautiful, crispy bread from the skillet, I absolutely want to hear about it! Did the rosemary shine through? Did you manage to wait the full 45 minutes before cutting?
Please come back and leave a rating and a comment below telling me how your No-Knead Skillet Bread with Crispy Crust turned out. Bonus points if you snap a picture and share it on social media—tag me so I can cheer you on! Find us on Facebook for more updates!
Print
Amazing 1 No-Knead Skillet Bread Crust
- Total Time: 140 minutes
- Yield: 8 servings
- Diet: Vegetarian
Description
This easy no-knead skillet bread uses simple pantry ingredients and bakes up with a crisp crust and soft center. Perfect beginner homemade bread.
Ingredients
- 4 1/4 cups all-purpose flour
- 2 1/4 teaspoons active dry yeast
- 1 1/2 teaspoons fine salt
- 2 cups warm water (about 105–110°F)
- 3 tablespoons olive oil
- 1 tablespoon chopped fresh rosemary
Instructions
- Whisk together the flour, yeast, salt, and rosemary in a large bowl until combined.
- Pour in the warm water and stir with a spoon until a sticky, thick dough forms with no dry flour remaining.
- Cover the bowl with a clean towel. Let the dough rise at room temperature until doubled, about 90 minutes.
- Coat the bottom and sides of a 10-inch oven-safe skillet generously with 1 tablespoon of the olive oil.
- Drizzle the remaining oil over the dough. Lightly oil your hands. Gently gather the dough and shape it into a loose round.
- Transfer the dough to the skillet, cover loosely, and let rise again until puffy, about 30 minutes.
- Preheat the oven to 400°F.
- Score the top of the dough with a shallow X using a sharp knife.
- Bake for 35 minutes until the top is golden and the loaf sounds hollow when tapped.
- Remove the loaf from the oven. Cool in the skillet for at least 45 minutes before slicing.
Notes
- This bread pairs well with soups, salads, or as a base for sandwiches.
- Prep Time: 15 minutes
- Cook Time: 35 minutes
- Category: Bread
- Method: Baking
- Cuisine: American