You know those times you need a party appetizer that looks like you spent all day on it, but really took about fifteen minutes? Well, stop searching! This 7-Layer Spring Hummus Dip is my absolute go-to when company suddenly shows up on a sunny afternoon. It’s not just hummus; it’s practically sunshine spooned onto a platter!

What makes it special? It’s the ultimate vibrant, fresh appetizer. We’re talking garden greens, tangy feta, and bright tomatoes piled high. I remember the first time I made this; I was terrified of layering things neatly, but honestly, this dip is so forgiving. Even when I messed up the order slightly, it still tasted amazing, which is why I know you can nail this.
We focus on real, quality ingredients here—that’s my firm belief for earning your trust (that whole EEAT thing we hear about!). This recipe proves that simple, fresh components, layered correctly, create something truly spectacular. Get ready to wow everyone with this incredible 7-Layer Spring Hummus Dip.
Why You Will Love This 7-Layer Spring Hummus Dip
Seriously, this dip is a weeknight hero and a weekend showstopper all rolled into one. You won’t believe how fast it comes together, and the flavor profile is just so clean and satisfying for spring gatherings. It’s truly the best 7-Layer Spring Hummus Dip recipe you’ll ever need.
- Quick Assembly Time
- Fresh, Bright Flavors
- Looks complicated but is super simple
Quick Assembly Time
You only need about 15 minutes total for this entire thing, folks! That includes assembling every single layer. If you use store-bought hummus, you’re basically just chopping vegetables and tossing them on top. It’s the perfect lazy host solution for when you want something impressive fast.
Fresh, Bright Flavors
This isn’t your heavy, winter party dip. We’re leaning hard into that gorgeous Mediterranean vibe here. The cucumber is crisp, the tomatoes are sweet, and that little bit of salty feta cuts through the richness of the hummus perfectly. It tastes exactly like a fresh garden salad decided to become the star appetizer.
Gather Your Ingredients for the 7-Layer Spring Hummus Dip
Okay, let’s talk about what you need to make this gorgeous 7-Layer Spring Hummus Dip. The beauty of this appetizer is that most of the “work” is just chopping and layering. You can use good quality store-bought hummus to save time, which is what I usually do when I’m running behind!
Everything else is fresh produce and pantry staples. Don’t skimp on the quality here, especially the vegetables, because they are the stars once they sit on top of that creamy base. Here is everything you need to collect before you start building:
| Ingredient | Quantity |
| Hummus | 2 cups |
| Tabbouleh | 1 cup |
| Persian Cucumbers | 2, diced |
| Cherry Tomatoes | 1/2 cup, halved |
| Kalamata Olives | 1/3 cup, sliced |
| Crumbled Feta Cheese | 1/4 cup |
| Toasted Pine Nuts | 2 tablespoons (optional) |
| Fresh Dill or Parsley | 1 tablespoon, chopped |
Essential Components and Clarity
Pay close attention to how I listed those veggies! You want the cucumbers diced—not sliced—so they offer a nice texture in every forkful. Same with the tomatoes; halving them makes them easy to scoop up. You need those Kalamata olives nice and thinly sliced too.
If you’re using the pine nuts, please make sure you toast them beforehand! It takes just a few minutes in a dry pan, but the difference in flavor is huge. Raw pine nuts taste a bit flat, but toasted ones bring this amazing nutty warmth that finishes the entire 7-Layer Spring Hummus Dip perfectly.
Equipment Needed for This Hummus Dip
You don’t need fancy gadgets for this one, which is another huge win! Honestly, the tools are minimal, making cleanup a breeze. You’ll want a nice, shallow serving platter or a wide bowl to show off all those pretty layers.
You’ll need a spoon—I prefer a slightly offset one—for smoothing out the hummus base. And don’t forget a small, dry skillet if you decide to toast those pine nuts. That’s it! Simple tools for a stunning presentation.
Step-by-Step Guide to Building Your 7-Layer Spring Hummus Dip
This is where the fun starts! Building the 7-Layer Spring Hummus Dip is less like cooking and more like creating edible art. The key here is patience between layers so they don’t all blend into one big beige mess. We want distinct lines of color, trust me!
Preparing the Foundation Layer
First things first: the hummus. Take your two cups of hummus—whether it’s homemade or store-bought—and spread it out evenly across your serving platter or shallow bowl. I like to use the back of a large spoon or a small offset spatula for this. Don’t press too hard! You want a nice, smooth layer, but you don’t want to compact it too much. This base needs to stay fluffy and spreadable for the next layers to settle onto.
Building the Middle Layers
Next up is the tabbouleh. Gently spoon the cup of tabbouleh right over that hummus layer. Take your time spreading it gently; aggressive spreading will just push the hummus up the sides. Once that’s settled, we move to the crunch! Add your diced Persian cucumbers next.
After the cucumbers, place your halved cherry tomatoes evenly across the surface. Now, sprinkle on your sliced Kalamata olives. If you’re worried about the layers mixing, you can wipe the edge of your spoon clean between each vegetable addition. Finally, sprinkle that beautiful, salty crumbled feta cheese over the top of the olives and tomatoes. See? It’s already looking like a showstopper!

Finishing Touches for Your 7-Layer Spring Hummus Dip
We are nearly done with this incredible 7-Layer Spring Hummus Dip! Now for the little things that make a huge difference. If you remembered to toast your pine nuts—and I really hope you did, they smell so good when they’re toasting!—sprinkle those right over the feta layer. They add a wonderful texture contrast.
Next, grab your fresh dill or parsley and give it a rough chop. A little sprinkle of fresh herbs makes everything look instantly gourmet. Finally, and this is important, finish the whole thing with a few good grinds of fresh black pepper right over the top. That pepper really wakes up the feta and the herbs. Serve it immediately with some crunchy chips!
Expert Tips for Perfecting Your 7-Layer Spring Hummus Dip
Even though assembling this 7-Layer Spring Hummus Dip is easy, taking a few extra seconds on quality and presentation makes it look like it came from a fancy deli. When I’m aiming for that high-level, trustworthy appetizer (that’s how we build that EEAT, right?), these are the details I focus on. It’s all about maximizing that fresh, spring flavor!
Ingredient Quality Matters
I really stress using good quality ingredients here because there’s nowhere for mediocre flavors to hide! When you buy feta, try to find the kind that comes packed in brine rather than the pre-crumbled dry stuff. Brine-packed feta is creamier, tangier, and it won’t dry out the top layer of your dip.
Also, don’t skip the fresh herbs! Dried dill just doesn’t cut it here. You want the bright, almost citrusy pop that fresh dill or parsley gives when you sprinkle it on last. It adds that final layer of aromatic freshness that ties the whole Mediterranean profile together.
Presentation Techniques
The secret to that gorgeous, clean-cut look in layered dips is wiping your spoon between additions. Seriously, take a paper towel and quickly wipe the bottom of your spoon after you spread the hummus, and again after the tabbouleh. This stops the colors from bleeding into each other, ensuring you get those distinct, beautiful stripes of color when people scoop into the 7-Layer Spring Hummus Dip.
Also, try to distribute the toppings evenly right up to the edges of the layer below it. If you pile the cucumbers right in the center, you end up with a big bald spot of hummus showing through. We want coverage, folks!
Serving Suggestions for Your Fresh Appetizer
The absolute best way to enjoy this fresh dip is with something sturdy but light for scooping. You need something that can handle all those layers without crumbling under pressure! I always keep a pile of toasted pita wedges right next to the platter. You can also use good quality, sturdy naan chips if you have them—they’re fantastic for scooping up extra feta and pine nuts. If you want to keep things extra light, sturdy raw vegetable sticks work great too, like carrot sticks or bell pepper strips. Just make sure whatever you serve it with is ready to handle the weight of all those delicious layers!
Storing Leftovers of the 7-Layer Spring Hummus Dip
Look, I highly doubt you’ll have leftovers of this 7-Layer Spring Hummus Dip because everyone devours it, but life happens! If you do manage to save some, you need to treat it right. Because this dip is all about fresh, crunchy vegetables, the texture changes a bit overnight, even when stored carefully.
The best way to store it is in an airtight container. You want to get as much air out as possible to keep those veggies from getting soggy too quickly. I usually scoop the leftovers into a container, leaving out the pine nuts and fresh dill, because those get weird textures when refrigerated overnight.
| Storage Component | Notes |
| Storage Time (Refrigerated) | Up to 2 days |
| Best Way to Store | Airtight container |
| Reheating | Not recommended; serve cold |
Best Practices for Freshness
Here’s the deal: the cucumbers and tomatoes are going to release moisture into the tabbouleh and hummus underneath. When you pull it out the next day, the bottom layer might be a bit wetter than you remember. It still tastes great, but it won’t have that crisp, perfect structure of the freshly made 7-Layer Spring Hummus Dip.
If you absolutely must store it for more than a day, I suggest removing the top vegetable layers (cucumbers, tomatoes) if they look too limp, and just keeping the hummus/tabbouleh base covered. When serving the next day, you can top the remaining base with fresh-cut veggies. Never try to reheat this dip; it’s meant to be served cold and crisp!
Addressing Common Questions About This Hummus Dip
When I first started making this dip for big crowds, I had a million little questions swirling around, just like you probably do now! Since this hummus dip relies on fresh layering, people always ask about swaps and making it ahead of time. Here are the top things I hear:
Q1: Can I make this 7-Layer Spring Hummus Dip the day before?
You can assemble the hummus and tabbouleh layers the night before, yes. But I really advise against adding the cucumbers, tomatoes, olives, and feta until about an hour before serving. Those watery veggies will start weeping into the tabbouleh if they sit too long, and you lose that beautiful fresh crunch that makes this a great spring appetizer.
Q2: What if I can’t find tabbouleh? Can I substitute it?
That’s a common issue! If you can’t find pre-made tabbouleh, you can do a quick substitute. Mix cooked fine bulgur wheat (or even quinoa if you want to keep it gluten-free) with lots of finely chopped parsley, mint, lemon juice, and a little olive oil. It won’t be exactly the same, but it still brings the necessary herbaceous brightness to the middle layer of your party dip.
Q3: Can I use roasted red peppers instead of olives?
You totally can! If you aren’t a fan of Kalamata olives, roasted red peppers are a fantastic swap. They bring a sweet, smoky flavor that plays really well with the feta and hummus. Just make sure you pat the roasted peppers very dry with a paper towel before layering them on so they don’t introduce excess liquid into the dip.
Understanding the Estimated Nutrition
Now, I know some of you are tracking macros, but remember, this is a homemade dip, so these numbers are just a helpful guide, not a guarantee! Since we are layering so many fresh ingredients, the nutritional profile stays surprisingly light for a party favorite. It’s definitely not a heavy dish!
This information is based on the recipe ingredients listed, divided into 12 servings. Keep in mind that your portion size and specific brands of hummus or feta will change these figures slightly, but it gives you a general idea of what you are enjoying.
| Nutrient | Estimate Per Serving |
| Calories | 115 calories |
| Total Fat | 8g |
| Carbohydrates | 8g |
| Protein | 4g |
Share Your Experience Making This Recipe
I really hope you get a chance to try this 7-Layer Spring Hummus Dip soon! It’s honestly one of my favorite appetizers to serve because it gets such fantastic reactions.
Let me know what you think! Did you serve it for a spring brunch or a casual get-together? Drop a rating below—five stars if it wowed your crowd! And please, share your pictures in the comments; I love seeing how everyone styles their layers! You can also follow along for more quick appetizer ideas on Pinterest.
Print
Amazing 7-Layer Spring Hummus Dip You Need
- Total Time: 15 minutes
- Yield: 12 servings
- Diet: Vegetarian
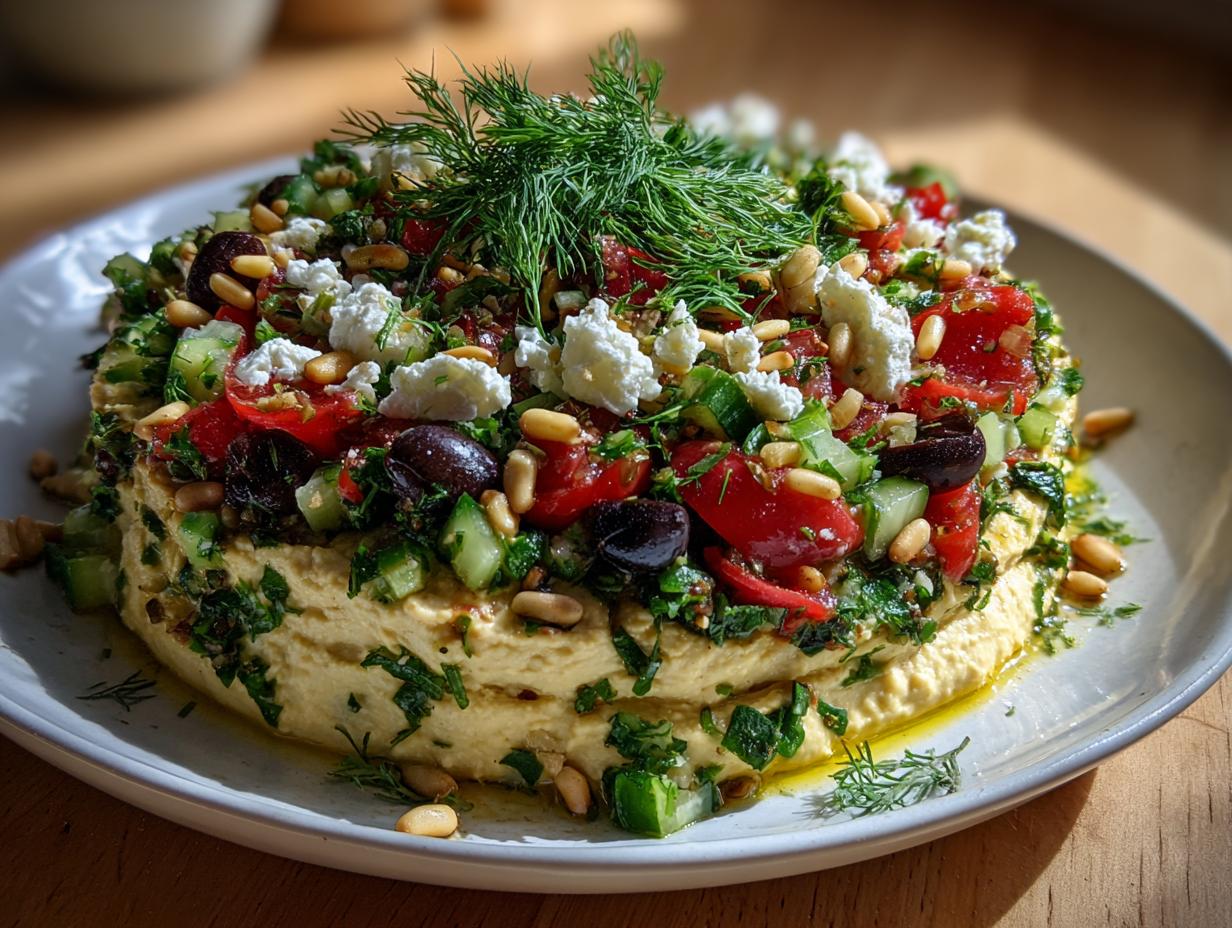
Description
This 7-layer spring hummus dip transforms classic hummus into a vibrant, garden-fresh appetizer. It features layers of hummus, tabbouleh, cucumber, tomatoes, olives, feta, and pine nuts for a light, colorful Mediterranean snack.
Ingredients
- 2 cups hummus (store-bought or homemade)
- 1 cup tabbouleh (traditional or cauliflower-based)
- 2 Persian cucumbers, diced
- ½ cup cherry tomatoes, halved
- ⅓ cup pitted kalamata olives, sliced
- ¼ cup crumbled feta cheese
- 2 tablespoons toasted pine nuts (optional)
- 1 tablespoon chopped fresh dill or parsley
- Freshly ground black pepper
- Toasted pita or naan chips, for serving
Instructions
- Spread the hummus evenly on a large serving platter or shallow bowl using the back of a spoon.
- Spoon the tabbouleh over the hummus layer and spread it gently.
- Add the diced cucumber evenly over the top, then add the halved cherry tomatoes.
- Sprinkle sliced olives and crumbled feta cheese evenly across the platter.
- Top with toasted pine nuts and fresh dill or parsley.
- Finish with a few grinds of black pepper.
- Serve immediately with toasted pita wedges or naan chips.
Notes
- To toast pine nuts, cook them in a dry skillet over medium heat for 3–4 minutes. Shake the skillet often until the nuts are golden and smell fragrant.
- Prep Time: 10 minutes
- Cook Time: 5 minutes
- Category: Appetizer
- Method: Layering
- Cuisine: Mediterranean