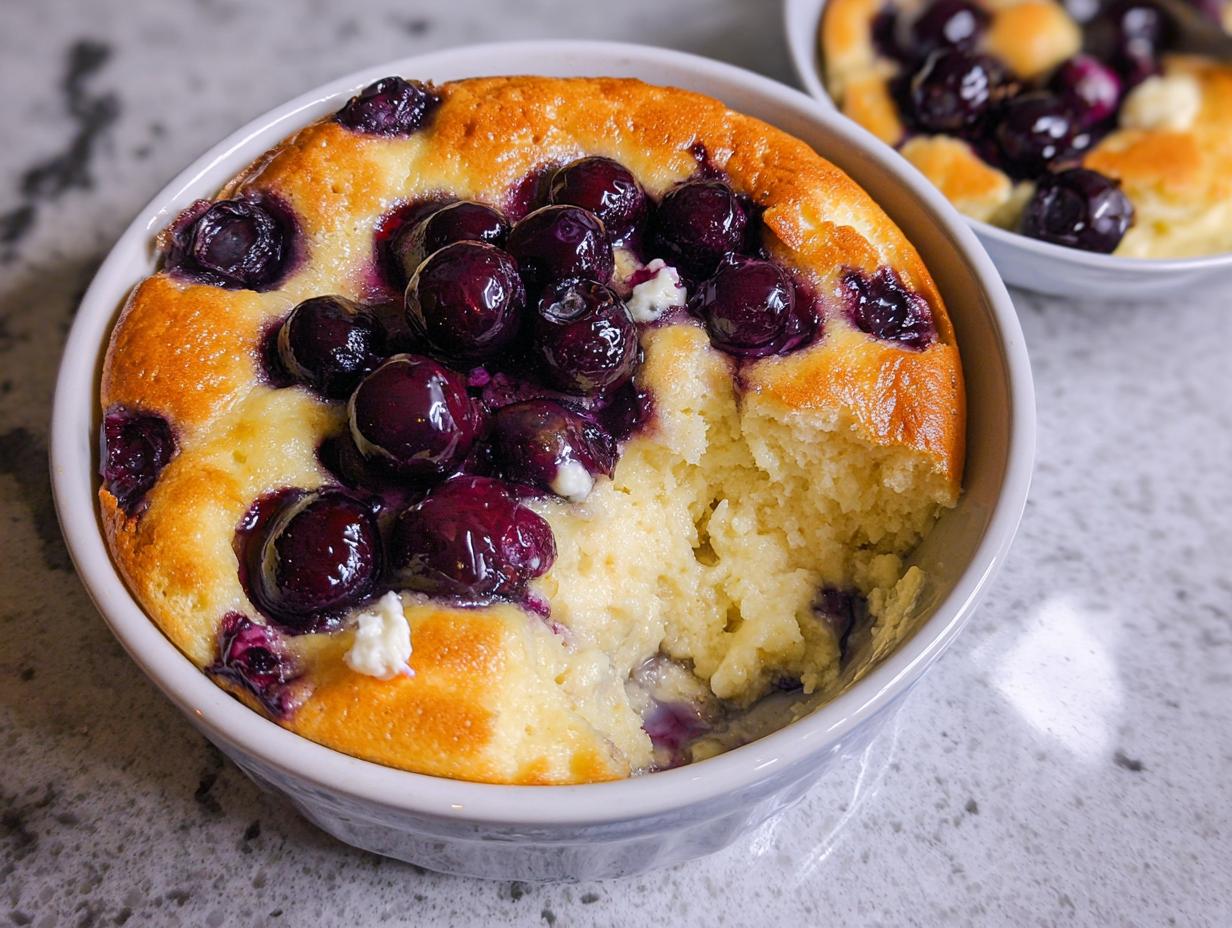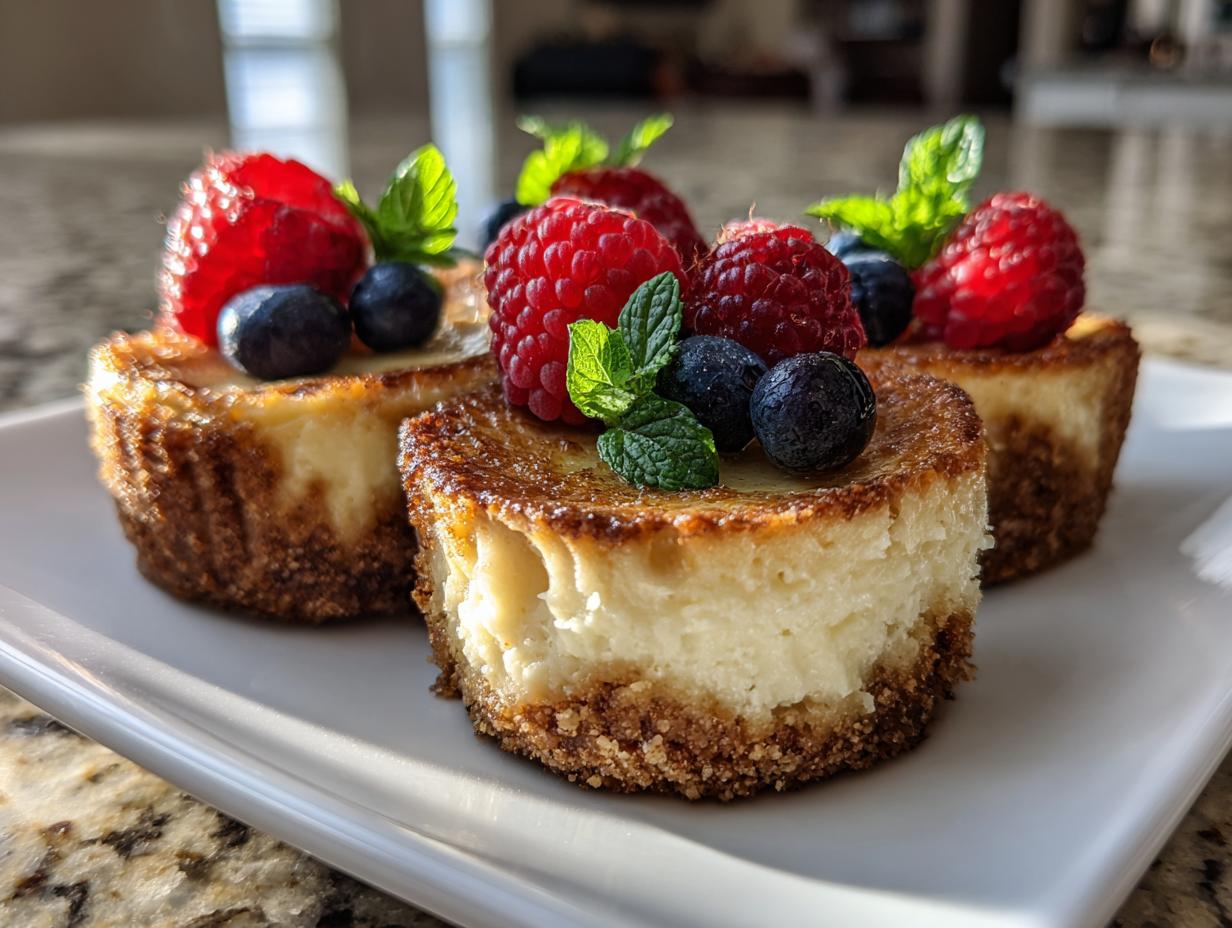
If you think you have to skip dessert when you’re trying to keep things light and hit those fitness goals, stop right there! I’m here to tell you that you absolutely do not. These mini protein cheesecakes are my new obsession, and honestly, they taste so rich, you’d never guess how much goodness is packed inside. These little guys are the perfect high-protein treat, clocking in at over 9 grams of protein each, thanks to that secret weapon: Greek yogurt!
I spent ages tweaking this recipe because I wanted something that satisfied that creamy, decadent craving without the heavy guilt. We’re using light cream cheese here, which keeps things delightfully light, but the flavor is 100% cheesecake. Trust me when I say that once you master this technique—which is surprisingly easy, by the way—you’ll be making these high protein desserts all the time. They set up beautifully and are just the right size for portion control. It’s all about that balance, and I think I finally nailed it for us!

Why You Will Love These mini protein cheesecakes
Honestly, what’s not to love? These are tiny bites of heaven that feel indulgent but aren’t. My favorite thing is how quickly they come together. You can have the whole thing mixed and into the oven in under 20 minutes, which is faster than most store-bought snacks, let alone a whole baked cheesecake!
Quick Preparation Time
Seriously, if you have ten minutes, you can make the crusts and the filling. This is perfect for those evenings when you suddenly realize you need a treat but don’t want to spend all night baking. Because they are mini, they bake up fast, too. It’s beginner-friendly baking at its best!
Satisfying High Protein Count
This is where these mini protein cheesecakes really shine for me. Knowing I’m getting 9 grams of protein in a dessert is just brilliant. It keeps me feeling full and satisfied, so I’m not tempted to snack on something else later. That Greek yogurt base does all the heavy lifting without sacrificing that signature creamy texture we all crave in a good cheesecake.
Essential Equipment for Your mini protein cheesecakes
You don’t need a ton of fancy gadgets for these delightful little treats. Having the right gear just makes the whole process smoother, and trust me, dealing with sticky batter everywhere is no fun! Since we’re making 12 individual servings, having the right muffin tin is key. You’ll want to make sure everything is clean and ready to go before you start smashing those graham crackers.
Standard Baking Gear
- 12-cup standard muffin tin
- Paper liners (essential for easy removal!)
- Food processor or a sturdy zip-top bag and rolling pin for crumbs
- Large mixing bowl and electric mixer (or a strong arm and a whisk)
- Rubber spatula
Measurement Tools
Accuracy matters here, especially with the filling ingredients, because we are aiming for that perfect, crack-free texture. Don’t try to eyeball the liquids or the cornstarch; that’s a recipe for disaster! Grab your reliable measuring cups and spoons.
- Dry measuring cups
- Liquid measuring cup
- Measuring spoons
Gathering Ingredients for mini protein cheesecakes
Okay, let’s talk about getting our supplies ready. When you’re working with something as delicate as a high protein dessert, the quality and form of your ingredients really matter. I always lay everything out on the counter first—it’s my little mise en place moment—and it stops me from forgetting something crucial, like the lemon zest!
We need two main groups of items here: the sturdy base and the creamy filling that holds all that protein. Don’t skimp on the cream cheese being fully softened; that’s the secret to a smooth batter that won’t fight your mixer.
Ingredients for the Graham Cracker Crust
This crust is so simple, but you need the right ratio of crumbs to that lovely melted salted butter. We’re using 1 and a half cups of crumbs, which sounds like a lot, but it has to fill 12 liners properly. Make sure your butter is melted but not hot when you mix it in!
Ingredients for the Light Cheesecake Filling
For the filling, the star is that 8 ounces of light cream cheese, softened perfectly. Then we bring in the protein powerhouse, which is plain 0% Greek yogurt—don’t use the sweetened kind, trust me! The lemon juice and zest, plus that tiny bit of cornstarch, are non-negotiables; they help these mini protein cheesecakes set up firm without relying on tons of fat.
| Ingredient | Amount |
|---|---|
| Graham Cracker Crumbs | 1½ cups |
| Salted Butter, melted | 5 tablespoons |
| Light Cream Cheese, softened | 8 ounces |
| Plain 0% Greek Yogurt | ¾ cup |
| Granulated Sugar | ⅓ cup |
| Large Egg | 1 |
| Egg Yolk | 1 |
| Vanilla Extract | 1 teaspoon |
| Lemon Juice | 2 teaspoons |
| Lemon Zest | ½ teaspoon |
| Cornstarch | 1 tablespoon |
Step-by-Step Instructions for Perfect mini protein cheesecakes
Alright, this is where the magic happens! Don’t be intimidated by the steps; they are super straightforward. The key to these mini protein cheesecakes turning out perfectly smooth is paying attention to timing and mixing speed. Remember, we are trying to introduce as little air as possible into that filling, which is the number one way people end up with cracks. Read through these steps before you even turn on the oven, and you’ll be golden!
Preparing and Baking the Crust Base
First things first, get that oven warmed up to 350°F. While it’s heating, line your 12-cup muffin tin with paper liners—this makes life so much easier later! Pulse those graham crackers until they look like fine sand, then mix in the melted butter until it all sticks together nicely. Spoon about a tablespoon and a half of that crumb mixture into each liner. Press it down firmly; you want a solid base that won’t crumble when you try to eat it. Pop these into the oven for exactly 6 minutes. Once they’re done, pull them out and let them cool down for about 10 minutes while you whip up the filling. Don’t skip that cooling time!
Creating the Smooth High Protein Filling
Now for the creamy part! Make sure your light cream cheese is nice and soft, or you’ll end up with lumps. Beat the cream cheese until it’s smooth as silk. Then, add everything else—the Greek yogurt, sugar, egg, yolk, vanilla, lemon stuff, and that little bit of cornstarch. Here’s the crucial bit: mix it on low speed *only* until everything just disappears into a homogenous mixture. If you see it getting fluffy or airy, stop immediately! Overbeating is the enemy here; we want density, not fluff.
Final Bake and Setting Process
Gently divide that gorgeous, smooth batter over your cooled crusts. Bake them for about 17 to 20 minutes. You’re looking for them to be *just set*. What does that mean? When you gently nudge the pan, the very center should have a slight wiggle—maybe the size of a quarter—but it shouldn’t slosh around like liquid. If they are firm all the way across, they’ll likely be overdone. Let them cool on the counter for a good 30 minutes. After that, they absolutely must go into the fridge for a minimum of 3 hours, but honestly, overnight is best for the firmest, creamiest high protein dessert texture.

Tips for Success When Making mini protein cheesecakes
Listen, I know cheesecake can feel fussy, but these mini protein cheesecakes are forgiving if you follow a couple of my little tricks. It all comes down to ingredient temperature and how gently you treat that filling. If you rush these steps, you risk losing that beautiful structure we worked so hard for in the oven. A little patience now saves you a lot of heartache later when you see those perfectly smooth tops!
Temperature Control Matters
The biggest mistake people make is using cold cream cheese. If it’s cold, it won’t blend properly, and you’ll end up scraping down the sides constantly, which whips in unnecessary air. Make sure it’s genuinely soft, leaving an indentation when you press it. Also, when you mix the filling, keep that mixer on the lowest speed. We are combining ingredients, not making meringue! Stop as soon as you don’t see any white streaks anymore.
Achieving Optimal Texture
You saw the instructions said three hours of chilling, right? Well, that’s the minimum for them to be safe to eat. For that truly firm, dense, satisfying bite that mimics a classic New York cheesecake, you really need to let them hang out in the fridge overnight. They firm up so much more when they have that extra time to fully chill and set. It makes the difference between a slightly soft treat and a perfect, melt-in-your-mouth high protein dessert.
Serving Suggestions and Variations for mini protein cheesecakes
Once these little gems are chilled and perfectly firm, the fun part is making them look as good as they taste! Presentation really elevates a simple dessert, even something as healthy as these mini protein cheesecakes. They look so elegant just sitting there, waiting to be eaten, but a few simple additions take them over the top. Don’t feel like you have to stop at the recipe either; these are very adaptable!
Fresh Toppings Ideas
The recipe calls for fresh berries and a tiny mint leaf, and honestly, that’s my favorite way to serve them. The tartness of raspberries or blueberries cuts through the rich creaminess perfectly. Just place a few berries right on top before serving, maybe tucking a little mint leaf beside them. It adds a pop of color that screams ‘fresh’!
If you’re serving these for a brunch, a tiny drizzle of sugar-free maple syrup looks gorgeous too. Just make sure you only add the toppings right before serving so the moisture doesn’t start to soften the cheesecake top.
Flavor Twists for Your mini protein cheesecakes
If you get bored of the bright lemon flavor (which I doubt you will!), you can easily switch things up. For the crust, try mixing in about a teaspoon of cinnamon or even some finely chopped walnuts before you press it into the liners. It adds a lovely warmth!
In the filling, instead of vanilla extract, you could try almond extract for something different, or even a tiny bit of pumpkin pie spice if you’re feeling autumnal. Just be careful not to add too much extract, as a little goes a long way in these small, concentrated bites!
Frequently Asked Questions About Greek Yogurt Cheesecake
I get so many questions when people try these for the first time, which is great! It shows you’re serious about making the best mini protein cheesecakes possible. Cheesecake, even the lighter, greek yogurt cheesecake version, has a few quirks, but once you know the answers, you’re practically a pro. Here are the things I hear most often about keeping these little desserts perfect.
Can I Substitute the Sugar in the mini protein cheesecakes?
You certainly can try! Because we are using a small amount of sugar already, you can usually swap it out 1:1 with your favorite granular sugar substitute, like erythritol or monk fruit blends. Just make sure the substitute you choose measures cup-for-cup like regular sugar. I haven’t tested every single one, so start slow, maybe using a little less than the recipe calls for, and taste the batter before you pour it in.
How Long Do mini protein cheesecakes Last in the Fridge?
These are fantastic for meal prepping because they hold up so well! If you store them properly covered in the refrigerator, they stay great for up to 5 days. If you think you won’t eat them within that time, definitely pop them in the freezer. They freeze beautifully, which is a huge win for a high protein dessert!
Why Did My Cheesecake Filling Crack?
Nine times out of ten, cracking happens because of two things: overbeating the filling or pulling them out of the oven too fast. When you beat the cream cheese mixture too vigorously, you whip air into it, and that air expands while baking, causing the top to puff up and then collapse and crack as it cools. Always mix on low, and always let them cool gradually on the counter before chilling!
Storing and Keeping Your Leftover mini protein cheesecakes
I hope you have some leftovers, because that means you made a successful batch! These little mini protein cheesecakes are fantastic make-ahead treats, perfect for grabbing one when that afternoon craving hits. Unlike a giant cheesecake that can dry out easily once cut, these individual servings stay fresh beautifully, provided you seal them up right. Honestly, I find they taste even better the second day once the lemon and vanilla flavors have really settled into the yogurt base.
Refrigeration and Freezing Guidelines
The key here is airtight containers. You don’t want them absorbing any smells from your fridge—nobody wants a garlicky cheesecake! For short-term storage, just cover the tin or transfer them to a flat container. If you’re planning ahead for busy weeks, freezing is the way to go. They hold up incredibly well when frozen properly, which is a huge win when you need a quick, healthy high protein dessert option.
| Storage Location | Maximum Duration | Reheating Note |
|---|---|---|
| Refrigerator | Up to 5 days | Serve chilled. No reheating needed. |
| Freezer | Up to 3 months | Thaw overnight in the fridge before serving. |
Share Your High Protein Dessert Creations
I genuinely hope you loved making these mini protein cheesecakes as much as I love eating them! There’s something so rewarding about whipping up a dessert that tastes amazing but also supports your fitness goals. When you make something this good, you have to tell someone about it, right?
I’m always tweaking things in the kitchen, and while this recipe is my gold standard for a high protein dessert, I’d love to hear how it turned out in your oven. Did you use raspberries or strawberries on top? Did you try adding cinnamon to the crust? Your experience helps the next person who tries this recipe! You can see more of my recipe adventures on Facebook.
Rate This Recipe and Tell Us How It Went
If you followed along and are enjoying the results, please take a second to leave a rating right here on the blog. A simple five-star rating tells me you loved the light texture and the satisfying protein boost. If you had an issue—maybe your crust was too crumbly, or your centers wiggled too much—please leave a comment below explaining what happened! You can also check out my latest thoughts on Medium.
I read every single comment, and telling me what worked and what didn’t helps me keep improving these recipes for our whole community. Happy baking, and enjoy that guilt-free treat! Don’t forget to pin your favorites on Pinterest.