Oh, you are going to absolutely *adore* this cake. When I first decided I wanted to tackle a proper layer cake, I got so intimidated! But this Raspberry Pistachio Layer Cake? It’s the one that changed everything for me. It looks like something you’d see in a fancy bakery window—so elegant, right?—but honestly, it’s surprisingly straightforward to put together. It just screams spring celebration!

The real magic here is the pairing. You get that lovely, soft, slightly earthy nuttiness from the pistachio cake layers, which is just the perfect backdrop for the bright, slightly tart punch of the homemade raspberry jam and buttercream. It’s a flavor profile that just sings! I’ve made dozens of layer cakes over the years, and this one always gets the most compliments because it feels special without requiring you to be some kind of pastry wizard.
Why This Raspberry Pistachio Layer Cake Recipe Works for You
I know layer cakes can feel fussy, but this one is built for success, even if you’re new to stacking tiers. The cake batter itself is sturdy thanks to the combination of sour cream and oil, meaning your layers bake up beautifully level and moist—no sinking domes or sad, dry edges here! Trust me, I’ve learned the hard way what makes a layer cake collapse, and this recipe avoids all those pitfalls.
The pistachio provides a wonderful, subtle base flavor, and when you pair it with that vibrant raspberry, it’s just heavenly. You get the richness from the nuts and butter, balanced perfectly by the sharpness of the jam. It’s the kind of cake that makes people ask, “Did you really make that?” And you get to say a big, confident, “Yes, I did!”
Gathering Your Ingredients for the Raspberry Pistachio Layer Cake
Alright, let’s talk about getting everything ready before we even turn on the oven. For any layer cake to stand tall and proud, the temperature of your ingredients is non-negotiable. I learned this the hard way when I first tried a fancy cake years ago—everything came out dense and weird because my butter was too cold! So, please, pull out your butter, eggs, and sour cream at least an hour before you start.
Having everything at room temperature helps everything emulsify beautifully, creating that tender crumb we are aiming for. It’s the difference between a good cake and *this* cake. Once you have everything ready, this list becomes your map!
Cake Layer Components
The star here is the pistachio. You need to blend your pistachios until they are truly a fine flour—I use my food processor for this, running it until it looks almost like almond flour. Don’t skimp on grinding them! Also, remember, the butter must be perfectly soft, and the eggs need to be brought up to temp. This is crucial for structure.
Homemade Raspberry Jam Ingredients
For the jam, we are cooking down the frozen raspberries with a bit of sugar and lemon juice until they thicken up nicely. The secret weapon for a firm filling that won’t ooze out everywhere is the cornstarch slurry. You mix one teaspoon of cornstarch with two teaspoons of water to make that slurry; promise me you won’t skip that little step!
Raspberry Buttercream Essentials
When we get to the buttercream, you absolutely must sift your powdered sugar. It breaks up any little clumps that would otherwise ruin the smooth texture. The freeze-dried raspberry powder is what gives us that gorgeous, natural pink color and intense flavor without adding extra liquid, so don’t substitute that if you can help it!
Essential Equipment for Your Raspberry Pistachio Layer Cake
You can’t build a beautiful structure without the right tools, right? For this Raspberry Pistachio Layer Cake, don’t try to do everything by hand—it’s just asking for tired arms! You absolutely need a stand mixer for the cake batter and especially for getting that buttercream light and fluffy.
Also, make sure you have a food processor or a high-powered blender to get those pistachios ground down properly. And finally, you need three 8-inch round cake pans. Having three gives you those perfect, reasonably thin layers that stack so nicely!
Step-by-Step Baking: Creating the Pistachio Cake Layers
Okay, now the fun part starts! Since we prepped all our ingredients, this moves surprisingly fast. We’re aiming for a cake that’s tender but sturdy enough to hold up to all that glorious raspberry filling. Remember, we’re working with three pans, so try to keep things moving efficiently.
Preparing the Dry Mix and Wet Base
First, let’s whisk together all the dry stuff. Get that finely ground pistachio flour, the all-purpose flour, baking powder, baking soda, and salt. Whisk them really well—this is your first form of aeration, so make sure everything is evenly distributed, especially that baking powder.
In your stand mixer, we’re going to cream the softened butter and sugar. Beat this on medium-high for a good three minutes until it looks pale and fluffy, almost like whipped cream. This step traps air! Then, add your eggs one at a time, making sure each one is fully incorporated before adding the next. Don’t rush this part; it builds the foundation.
Combining Batter and Baking
Now, we mix the wet and dry ingredients, but we do it gently and in stages. On low speed, mix in about half of your dry ingredients. Once that’s just combined, add the sour cream, oil, and vanilla. Finish by adding the rest of the dry mix. Stop the mixer the second you see no more streaks of flour—seriously, turn it off! If you overmix now, you’ll develop gluten and end up with a tough cake, which is the opposite of what we want.
Divide that beautiful batter evenly between your three prepared 8-inch pans. Pop them into your preheated 340°F oven. They only need about 20 to 23 minutes. Keep an eye on them! Use the toothpick test: if it comes out with just a few moist crumbs clinging to it, they’re done. Let them cool in the pans for ten minutes before turning them out onto wire racks to cool completely. Don’t even *think* about frosting them until they are totally cold!
Crafting the Raspberry Jam Filling
This jam is so much brighter than anything you buy in a jar, and it’s shockingly easy to make right on your stovetop. You’ll combine your frozen raspberries, a quarter cup of sugar, some lemon juice for that necessary tartness, and vanilla in a saucepan. Put it over medium heat and let it bubble away for about eight minutes until it starts to look visibly thicker.
This is where you introduce the slurry—that little mix of cornstarch and water we prepared. Whisk that in quickly, and let it simmer for just one more minute. It will thicken up noticeably right away. Now, here is the most important thing you’ll do for assembly: you have to let this jam cool down completely! If you try to spread warm jam on your buttercream, even a thin layer, it will melt right through and make a huge, soupy mess. Seriously, put it in the fridge if you need to speed things up, but it needs to be refrigerator-cold before we stack this beauty!
Mastering the Raspberry Buttercream for Your Raspberry Pistachio Layer Cake
If the cake layers are the foundation, the raspberry buttercream is the showstopper! This frosting is rich, intensely flavored, and fluffy enough to pipe beautifully, but it needs a bit of patience. I always start this step after the cake layers are at least halfway cooled. We’re using a huge amount of butter—almost a full pound—so you need to let it come to true room temperature. It should yield slightly when you press it, but absolutely not be greasy or melting.
Get that butter into your stand mixer bowl and beat it, empty, for a full four minutes on medium-high speed. This is non-negotiable! We are whipping air into the fat to give the frosting its volume. Once it looks pale and fluffy, we start adding the dry ingredients in controlled batches. Add the sifted powdered sugar and that glorious freeze-dried raspberry powder alternatingly. Start slow so you don’t create a sugar cloud that coats your entire kitchen! Mix well after each addition.
Once everything is incorporated, it will look a little stiff—that’s normal! Now is the time to introduce your flavorings and liquids. Add the vanilla extract and then start adding the milk, just a tablespoon at a time. You will probably need about two tablespoons total, but you want to see how the consistency changes.
Achieving the Perfect Buttercream Consistency
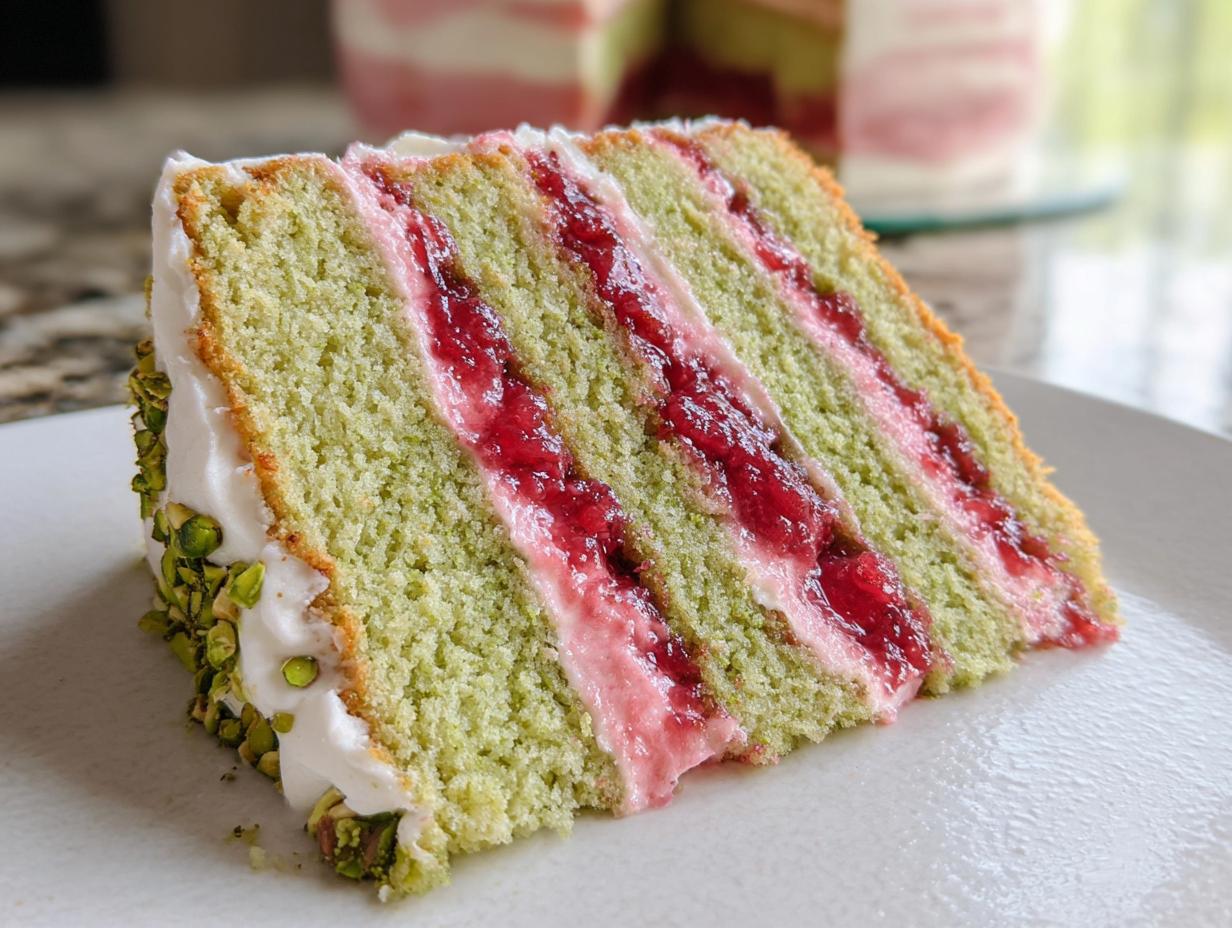
After you’ve added the milk, turn the mixer up to medium-high again and let it whip for at least two more minutes. This final whipping is what transforms stiff butter and sugar into light, airy frosting. You’re looking for a texture that holds its shape on a spatula but still feels soft and spreadable. If it looks too stiff—and this happens if your powdered sugar was extra dense—add another teaspoon of milk. If it looks a little too soft and won’t hold a peak, add a tablespoon more of sifted powdered sugar. The goal is firm but creamy. That vibrant pink color from the raspberry powder looks stunning against that pale green pistachio cake, doesn’t it?

Assembling Your Beautiful Raspberry Pistachio Layer Cake
This is the moment of truth! You have your perfectly cooled cake layers, your chilled, firm raspberry jam, and that gorgeous, fluffy raspberry buttercream. We need to be precise here, especially because we are dealing with a loose jam filling. Don’t skip the border step; it’s the secret to keeping everything neat!
Take your first cake layer—the bottom one—and place it on your serving plate or cake stand. Now, take some of that raspberry buttercream and pipe a ring or border around the entire outer edge of the layer. This acts like a little dam to hold the jam in place. Once that border is set, spoon half of your chilled raspberry jam right into the center of that ring, spreading it gently within the buttercream border.
Carefully place your second cake layer on top. Repeat the process: buttercream border, then the remaining jam in the center. Then top it with your final cake layer. Give the whole thing a quick 20-minute chill in the refrigerator. This firms up the jam and the buttercream, making the next step much cleaner.
After chilling, we apply the crumb coat. This is just a very thin layer of buttercream brushed over the entire cake—top and sides—to trap any loose crumbs. It doesn’t have to look pretty! Chill it again for about 15 minutes until that coat is firm to the touch. Then, you can go ahead and apply your final, beautiful, smooth layer of the remaining raspberry buttercream. Decorate with those fresh raspberries and chopped pistachios we talked about earlier, and you’ve got a showstopper!
Frequently Asked Questions About Your Raspberry Pistachio Layer Cake
I get so many questions when people first try this recipe because it has a few specialized steps, but once you know the tricks, it’s a breeze! Here are the things I hear most often:
Can I use fresh raspberries instead of frozen for the jam
You absolutely can use fresh raspberries, but you need to be aware that fresh ones have a much higher water content than frozen ones. If you use fresh, you might need to cook the jam down for an extra 3 to 5 minutes to get that same thickness before adding the cornstarch slurry. Also, the flavor might be slightly less intense, so you may need a tiny extra squeeze of lemon juice to keep that tartness popping against the sweet pistachio cake.
How do I ensure my pistachio flour is fine
This is super important for the texture of the cake layer! Don’t just pulse the pistachios a couple of times. You need to process them until they look like fine meal or flour. I usually process mine for about 45 seconds, stopping to scrape down the sides once or twice. If you see large chunks remaining, the texture of your cake will be uneven, and those nuts might burn slightly during the longer bake time.
Can I make the components ahead of time
Yes, this is a great cake for prepping ahead, which makes party day so much less stressful! You can bake the pistachio cake layers and wrap them tightly in plastic wrap once they are completely cool. They stay perfectly fresh at room temperature for two days, or you can freeze them for up to a month. The raspberry jam can be made up to a week ahead and stored in the fridge. The buttercream is best made the day before assembly and kept cold, but make sure you re-whip it for a few minutes before frosting so it gets that light texture back!
Storing and Serving Your Finished Raspberry Pistachio Layer Cake
We’ve done all that hard work, so let’s make sure we serve this beauty right! Because we have that lovely fresh raspberry jam and the dairy in the buttercream, this layer cake needs to live in the refrigerator. Cover it loosely once it’s fully set.
But here’s the absolute must-do step: never serve this cake straight from the fridge. Those cold temperatures make the butter in the cake and frosting incredibly hard, and you lose all that beautiful, tender texture we worked so hard to achieve. Let it sit out on the counter for at least an hour before slicing.
Storage Guidelines and Reheating Notes
I find that this cake tastes best if eaten within two days, but it keeps well for up to three days covered in the fridge. Here’s a quick breakdown of how long things last:
| Component | Storage Time | Notes |
|---|---|---|
| Cake Layers (Unfrosted) | 2 days at room temp, 1 month frozen | Wrap tightly in plastic wrap. |
| Finished Cake | 3 days refrigerated | Bring to room temperature 1 hour before serving. |
| Raspberry Jam | 1 week refrigerated | Must be completely chilled before assembly. |
If you enjoyed this recipe, you can find more of our baking adventures on Facebook or save it for later on Pinterest!
Print
Amazing 3-step Raspberry Pistachio Layer Cake
- Total Time: 1 hour 3 minutes
- Yield: 12 slices
- Diet: Vegetarian
Description
Soft pistachio cake layers with raspberry jam and raspberry buttercream—an elegant spring dessert bursting with nutty, fruity flavor.
Ingredients
- 3/4 cup unsalted pistachios, blended into a fine flour (about 100 g)
- 2 cups all-purpose flour (260 g)
- 3/4 teaspoon baking powder
- 3/4 teaspoon baking soda
- 3/4 teaspoon salt
- 3/4 cup unsalted butter, room temperature (180 g)
- 1 1/2 cups granulated sugar (300 g)
- 4 large eggs, room temperature
- 1 cup sour cream, room temperature (240 g)
- 1/4 cup vegetable oil (60 g)
- 2 teaspoons vanilla extract
- 2 cups frozen raspberries (250 g)
- 1/4 cup granulated sugar (50 g)
- 2 teaspoons lemon juice
- 1 teaspoon vanilla extract
- 1 teaspoon cornstarch mixed with 2 teaspoons water
- 1 3/4 cups unsalted butter, room temperature (400 g)
- 5 1/2 cups powdered sugar, sifted (660 g)
- 1 1/2 tablespoons freeze-dried raspberry powder
- 2 teaspoons vanilla extract
- 2 tablespoons whole milk, room temperature
- Fresh raspberries (Optional Garnish)
- Chopped pistachios (Optional Garnish)
Instructions
- Preheat your oven to 340°F. Line three 8-inch round pans with parchment paper and lightly grease the sides.
- Blend pistachios in a food processor until finely ground, resembling flour.
- In a bowl, whisk together pistachio flour, all-purpose flour, baking powder, baking soda, and salt.
- In a stand mixer, beat butter and sugar on medium-high for 3 minutes until fluffy.
- Mix in eggs, two at a time, until incorporated.
- On low speed, mix in half of the dry ingredients, then add sour cream, vegetable oil, and vanilla. Finish with the remaining dry ingredients. Gently fold with a spatula to ensure everything is mixed evenly.
- Divide the batter evenly among pans and bake for 20–23 minutes or until a toothpick comes out clean. Cool in pans for 10 minutes, then transfer to wire racks to cool completely.
- Make raspberry jam: In a saucepan, combine raspberries, sugar, lemon juice, and vanilla. Cook over medium heat until bubbling and thickened (about 8 minutes). Stir in the cornstarch slurry and simmer 1 minute. Cool completely before using.
- Prepare the raspberry buttercream: Beat butter in a stand mixer for 4 minutes. Add powdered sugar and raspberry powder in two parts, mixing well each time. Add vanilla and milk, then whip on medium-high for 2 more minutes until fluffy.
- Assemble the cake: Place one cake layer on a serving plate. Spread buttercream evenly, creating a shallow border. Spoon half of the raspberry jam inside the border. Add the second cake layer and repeat. Top with the third layer, chill for 20 minutes, then apply a thin crumb coat. Finish with a final smooth layer of buttercream.
- Garnish with fresh raspberries and chopped pistachios. Slice and serve at room temperature.
- Store covered in the refrigerator for up to 3 days. Bring to room temperature before serving.
Notes
- Use light aluminum pans for even baking. Dark pans can overbrown the cake edges.
- Cool all components completely before assembly.
- Bring the finished cake to room temperature before serving for the best texture.
- Prep Time: 40 minutes
- Cook Time: 23 minutes
- Category: Dessert
- Method: Baking
- Cuisine: American