I swear, if there’s one appetizer that instantly screams “party” or “picnic perfection,” it has to be a good batch of deviled eggs. Seriously, they disappear faster than anything else on the table! When I first started cooking for crowds, I was terrified of the peeling process, but trust me, once you nail the technique, making these creamy, savory bites is a breeze.
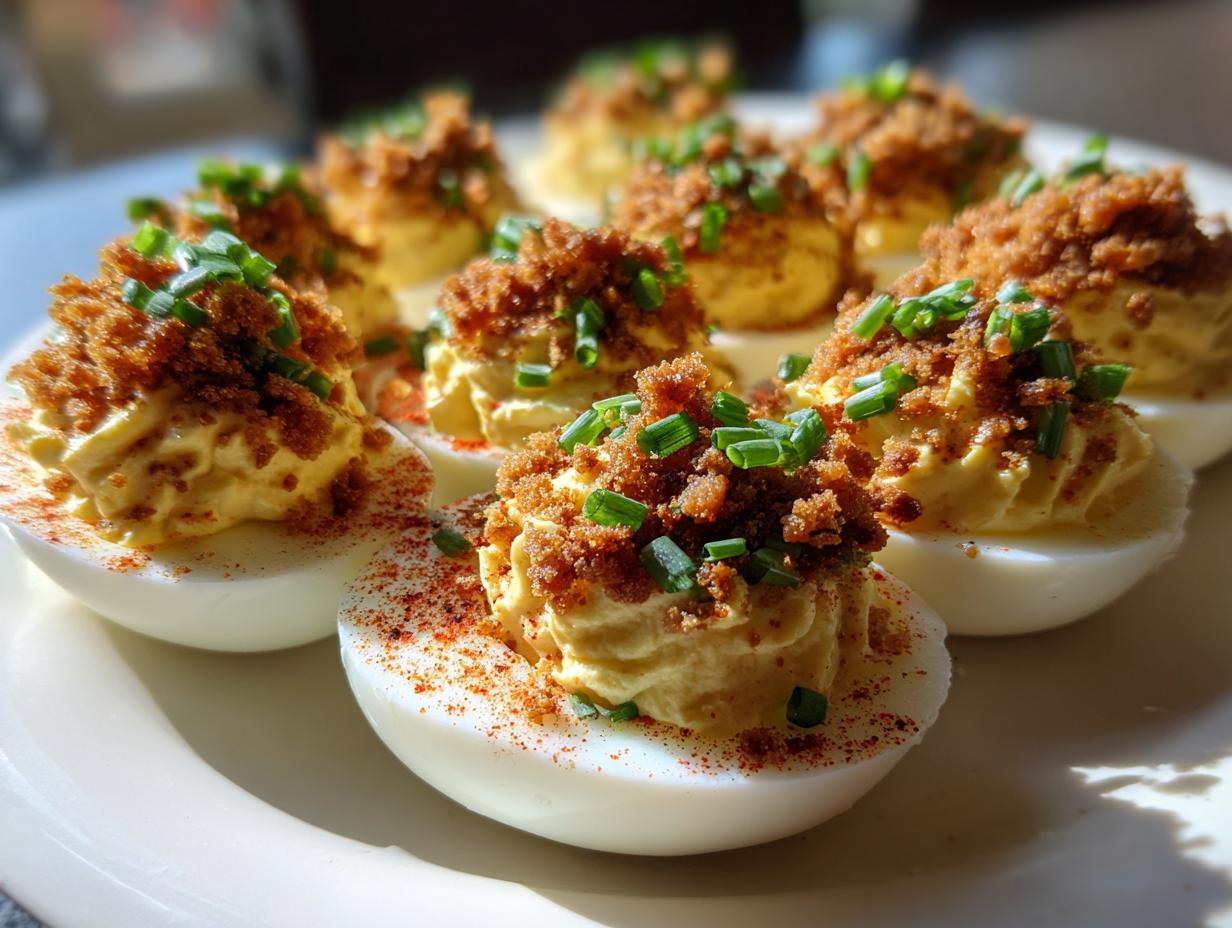
What sets my version apart from the standard mayo-and-mustard mix? It’s all about that texture and flavor pop! We’re adding crisp, salty turkey bacon and bright, fresh chives right into the filling. It gives you that comforting, classic taste but with a little something extra that people always ask about. That rich, smooth yolk mixture is what I aim for every single time. You won’t believe how simple it is to elevate your basic deviled eggs into something truly special with just two extra ingredients.
This recipe is my go-to because it’s fast—we’re talking under 35 minutes total if you’re moving! It proves you don’t need complicated techniques to impress your guests. Just follow these steps, and you’ll have the fluffiest deviled eggs they’ve ever tasted.

Essential Ingredients for Perfect deviled eggs
Getting the right measurements is key, especially when you’re aiming for that super creamy texture we talked about. Don’t eyeball the mustard or the vinegar; those little additions are what cut through the richness of the yolk and keep the filling bright and zesty. Trust me, I learned that lesson the hard way when I added too much mustard once—it was a little sharp!
We need quality ingredients here because they are the stars of the show. Since there are only a few components in these deviled eggs, make sure you use good mayonnaise and those fresh chives. The turkey bacon needs to be cooked until it’s really crisp, too, so it crumbles nicely into the filling.
Gathering Your Components for deviled eggs
Before we start boiling, let’s make sure every single item is measured out and ready to go. Having everything prepped is half the battle when you’re working fast. Below is exactly what you’ll need for a perfect batch of 24 halves.
Ingredients for deviled eggs
| Ingredient | Amount |
|---|---|
| Large eggs | 12 |
| Mayonnaise | ⅓ cup |
| Yellow mustard | 1 teaspoon |
| White vinegar | 1 teaspoon |
| Salt | ½ teaspoon |
| Black pepper | ¼ teaspoon |
| Sugar | ½ teaspoon |
| Finely chopped chives | 2 tablespoons |
| Paprika for garnish | ½ teaspoon |
| Turkey bacon, cooked crisp and finely crumbled | 4 slices |
Equipment Needed for Your deviled eggs Project
You don’t need anything fancy for this recipe, which is why I love it for beginners! You’ll definitely need a decent-sized saucepan to boil those eggs. A sturdy mixing bowl is a must for getting that filling perfectly smooth. And while you can use a regular spoon, I highly recommend having a fork for mashing and maybe even a piping bag if you want those pretty swirls on top of your deviled eggs.
Preparing the Eggs for deviled eggs
Okay, this part is where most people go wrong, but it’s so simple once you know the trick! We need perfectly cooked eggs that peel like a dream. Don’t just boil them until they look done; timing here is everything for the best texture. After boiling, you have to shock them immediately. That temperature change is what makes the egg white separate cleanly from the shell.
Get a big bowl ready with ice and cold water before the eggs even hit the stove—we need that ice bath waiting! We bring the water to a rolling boil, drop the eggs in, turn the heat off, cover it up, and let them sit for exactly 12 minutes. Seriously, set a timer! Once that timer goes off, drain the hot water and plunge those eggs right into the ice bath for a full 10 minutes before you even attempt to peel them. This step guarantees easy peeling later!
Step-by-Step Instructions for Creamy deviled eggs
Now that we have our ingredients lined up and we know the secret to easy peeling, let’s get down to the fun part—making the filling! This process is fast, but you need to be methodical, especially when mashing those yolks. We want zero lumps in our final product, so pay attention to the mixing order.
Cooking and Cooling the Hard-Boiled Eggs
Remember what I said about the ice bath? This is crucial for perfect deviled eggs. Place your 12 eggs in a large saucepan and cover them with cold water, making sure the water is about an inch over the top of the eggs. Bring that water up to a full, rolling boil over medium heat. The second it hits that boil, kill the heat completely, slap a lid on the pan, and let them sit untouched for 12 minutes. No peeking!
When the timer buzzes, drain that hot water immediately and flood the pan with ice water, or quickly transfer the eggs to your pre-made ice bath. They need that cold shock for 10 minutes. Once they are cool enough to handle, start peeling. If you followed the steps, the shells should slip right off! Slice those peeled eggs in half lengthwise and gently scoop every single yolk into a medium bowl. Save those white halves; they are waiting for their creamy filling.
Creating the Smooth deviled eggs Filling Base
This is where we build the flavor foundation. Take your fork and mash those yolks until they are as fine and crumbly as possible. Don’t leave any big chunks—we’re aiming for baby food consistency before we add anything else! Once they are smooth, it’s time for the wet ingredients. Add your mayonnaise, mustard, white vinegar, salt, pepper, and that little bit of sugar. Stir this mixture vigorously until it is completely homogenous and velvety smooth. Seriously work it with the fork until you can’t see any streaks of yolk or mayo.
Once the base is perfect, take half of your finely chopped chives and gently fold them into the yolk mixture. This keeps the flavor distributed but saves some for garnish later. Taste it here and adjust salt or pepper if you think it needs a little kick!
Folding and Filling the deviled eggs Halves
Now we move to the presentation stage for these delicious deviled eggs. You can use a small spoon to dollop the mixture back into the egg white halves, but if you want that restaurant-quality look, grab that piping bag fitted with a star tip. Fill your bag with the yolk mixture—carefully!—and pipe a beautiful swirl back into each egg white cavity. If you don’t have a bag, just spoon it in neatly.

Final Garnish and Chilling the deviled eggs
We’re almost done! Take your crumbled, crisp turkey bacon and sprinkle a generous pinch over the top of each filled egg. Then, use the remaining half of your fresh chives to add a final touch of green color. Finish every single one with the lightest dusting of paprika—that classic orange-red color really makes them pop visually.
Don’t rush this last step! Cover the platter loosely with plastic wrap and chill your completed deviled eggs in the refrigerator for at least 30 minutes. This chilling time is essential; it helps the filling firm up so it holds its shape perfectly when people pick them up.
Tips for Success with deviled eggs
I’ve made hundreds of these over the years, and I’ve picked up a few little tricks that make the whole process smoother. The first big one, which I mentioned before, is about the eggs themselves. Don’t use eggs that are super fresh from the farm stand; slightly older eggs (about a week or two old) actually peel so much easier, which saves you a ton of frustration when you’re trying to get those perfect white halves!
Another thing I always stress is the texture of the filling. You want these to be decadent, not chunky. If you leave large bits of yolk, the filling won’t hold its shape nicely when you pipe or spoon it back in. Don’t worry about the turkey bacon—it adds saltiness and crunch, but the base needs to be impeccable.
Making Smooth deviled eggs Filling Every Time
The trick to that velvety smooth filling is simple: mash, mash, mash! Before you even think about adding the mayonnaise or mustard, take your fork and work those cooked yolks against the bottom of the bowl until they are completely powdered. It should look like fine sand. Seriously, take an extra minute here to press out every lump. Once the yolks are pulverized, then you add the liquids. Because the yolks are already broken down finely, the mayonnaise and vinegar will incorporate instantly, and you won’t have to overmix, which keeps the texture light and creamy rather than tough!
Frequently Asked Questions About deviled eggs
I know you might have a few questions, especially if you’re new to making these from scratch. It’s easy to get hung up on the details, but these little appetizers are very forgiving! Here are the things I get asked most often about making my turkey bacon and chive deviled eggs.
How long can I make deviled eggs ahead of time?
You can definitely prep these ahead, which is great for parties! I usually say to fill them up to about 24 hours in advance. Store them snugly covered in the refrigerator. They hold up really well, but honestly, they taste best when they’ve had at least 30 minutes to chill after being garnished. If you’re making them further out, you can boil and peel the eggs a day ahead, but keep the yolks separate until just before you’re ready to mix the filling.
What is the best way to peel hard-boiled eggs for deviled eggs?
The absolute best trick is using eggs that aren’t brand new—eggs that are about a week old peel much easier than super fresh ones. But if you’re using fresh eggs, the ice bath is non-negotiable! After the 12 minutes off the heat, plunging them straight into ice water stops the cooking and causes the membrane to contract away from the shell. Crack them gently all over and peel under cool running water; it helps wash any tiny shell fragments away.
Can I substitute the turkey bacon in these deviled eggs?
Of course! While I adore the smoky saltiness of the turkey bacon, if you need a non-pork option or just want a different texture, go for it. For crunch, I highly recommend using toasted sunflower seeds or even finely chopped pecans mixed in with the chives. They add a fantastic little snap to the creamy filling without changing the flavor profile too much. Just make sure whatever you use is crumbled or chopped small!
Storing and Serving Your deviled eggs
Once you’ve garnished these beauties, the wait is the hardest part! You must keep these chilled until serving time. They are an appetizer, so serving them cold is non-negotiable for both food safety and texture. Don’t try to reheat them, obviously—that would turn the filling into scrambled egg soup! Just pull them out of the fridge about 15 minutes before you plan to eat them so they aren’t ice-cold, but definitely keep them cool.
Storage and Serving Guidance for deviled eggs
| Guidance Area | Detail |
|---|---|
| Refrigeration Duration | Up to 2 days (Yolks taste best within 24 hours) |
| Covering Method | Airtight container or plastic wrap placed directly over the tops |
| Best Serving Temperature | Chilled, but allowed to sit at room temperature for 15 minutes prior |
Share Your deviled eggs Results
I truly hope you loved making these creamy, smoky deviled eggs as much as I love eating them! They are such a crowd-pleaser, and I’m always eager to hear how they turned out for you. Did the turkey bacon add the perfect salty crunch you were hoping for?
Don’t be shy—head down to the comments below and leave me a rating! Tell me if you tried the piping bag trick or if you stuck to the spoon. I read every single comment, and your feedback helps me keep perfecting this recipe! You can also follow our latest recipe updates on Facebook or check out our inspiration on Pinterest.
Print
Amazing 24 deviled eggs in 35 min
- Total Time: 32 minutes
- Yield: 24 deviled eggs (12 servings)
- Diet: Low Fat
Description
Classic deviled eggs made creamy and flavorful with turkey bacon and fresh chives. These are great for any gathering.
Ingredients
- 12 large eggs
- ⅓ cup mayonnaise
- 1 teaspoon yellow mustard
- 1 teaspoon white vinegar
- ½ teaspoon salt
- ¼ teaspoon black pepper
- ½ teaspoon sugar
- 2 tablespoons finely chopped chives
- ½ teaspoon paprika for garnish
- 4 slices turkey bacon, cooked crisp and finely crumbled
Instructions
- Place eggs in a large saucepan and cover with cold water by 1 inch. Bring to a boil over medium heat.
- Once boiling, turn off the heat, cover, and let sit for 12 minutes.
- Drain and immediately transfer eggs to an ice bath. Let cool for 10 minutes before peeling.
- Slice eggs lengthwise and gently remove yolks into a bowl.
- Mash yolks with a fork until fine and crumbly.
- Add mayonnaise, mustard, vinegar, salt, pepper, and sugar. Stir until smooth and creamy.
- Fold in half of the chopped chives.
- Spoon or pipe the yolk mixture into the egg white halves.
- Top each egg with crumbled turkey bacon, remaining chives, and a light sprinkle of paprika.
- Chill for at least 30 minutes before serving.
Notes
- Use a piping bag for a professional look when filling the egg whites.
- For easy peeling, use slightly older eggs rather than very fresh ones.
- Prep Time: 20 minutes
- Cook Time: 12 minutes
- Category: Appetizer
- Method: Boiling and Mixing
- Cuisine: American