If you think sourdough is too tricky for a weeknight bake, I’m here to change your mind! Seriously. I’ve wrestled with a lot of wild yeast creations over the years, and I promise you, this maple sourdough bread is the friendliest loaf you’ll ever meet. It’s rich, it’s naturally leavened, and it smells like a cozy Saturday morning when it comes out of the oven.
What makes this recipe so special? Well, it’s the subtle sweetness from the maple syrup that really cuts through the tang. It’s enriched just enough with milk and butter to make it perfect for slicing thick, slathering with butter, and toasting. I’ve gone through so many iterations to ensure the process is totally manageable, even if you’re just starting out with your starter. Trust me, baking this bread shows you exactly what that active starter can do!
I’ve made sure every step is clear so you can bake this delicious breakfast bread with confidence. It’s all about the flavor balance!

Gathering Your Ingredients for Maple Sourdough Bread
Okay, let’s talk supplies. You can’t make magic without the right stuff, right? For this loaf, we are leaning into richness, so make sure your butter is ready to go. Don’t try to rush softening it in the microwave, or you’ll end up with melted butter pockets, and we definitely don’t want that in our beautiful maple sourdough bread dough.
We’re making a slightly sweet, enriched dough, so having everything measured out and ready before you start mixing is my number one tip for success. It makes the whole process feel calm instead of chaotic!
Essential Components for Rich Flavor
These are the core players that make up the structure and sweetness of your sourdough loaf:
- Active sourdough starter (make sure it’s bubbly!)
- Bread flour (it needs that high protein for good structure)
- Whole milk, gently warmed
- One large egg, brought to room temperature
- Maple syrup (the real stuff, please!)
- Fine sea salt
- Unsalted butter, softened so it easily mixes in
The Simple Maple Glaze Mix
This is just a quick little brush-on finish right when the bread comes out of the oven. It adds a lovely sheen and extra hint of sweetness:
- Pure maple syrup
- Unsalted butter, melted
Equipment Required for Your Maple Sourdough Bread
You don’t need fancy gadgets for this loaf, but a few basics will make your life so much easier. I always use my stand mixer for the kneading part—it saves my arms! But honestly, you can totally do it by hand if you’re feeling energetic.
Here are the tools you’ll definitely want on hand for making this wonderful maple sourdough bread:
- A large mixing bowl for combining everything.
- A 9 by 5 inch loaf pan. Grease it really well!
- A stand mixer with a dough hook, or just strong hands for kneading.
- Plastic wrap or a clean kitchen towel for covering the dough during its long rests.
Step-by-Step Instructions for Maple Sourdough Bread
Follow these steps closely, and you’ll have the most incredible, soft, naturally leavened loaf that smells like pure comfort. Don’t rush the rising times; that’s where the sourdough magic happens!
Mixing the Wet and Dry Dough Elements
First things first, whisk together all your wet ingredients in your big bowl: the active starter, the warmed milk, the first measure of maple syrup, the room-temperature egg, and the salt. Whisk until it looks like a smooth, slightly sweet liquid. Now, toss in all your bread flour. Mix this gently until you just don’t see any dry spots left. It will look shaggy, and that’s exactly what we want! Cover the bowl with a damp towel or plastic wrap and just let it sit for 20 minutes. This rest period, called autolyse, lets the flour start absorbing all that liquid before we even start kneading.
Developing Strength and Enriching the Dough
After that short rest, it’s time to build structure. Knead the dough for about six minutes. It will still feel a little sticky, but you should see some strength developing. Now comes the fun part—adding the fat! Add your softened butter one tablespoon at a time, waiting until the previous bit is totally incorporated before adding the next. This takes patience, but it’s crucial for the texture of your maple sourdough bread. Keep kneading for about five more minutes until the dough is smooth, supple, and holds together beautifully. It should pass the windowpane test, or at least feel really elastic!
Bulk Fermentation and Initial Shaping
Shape your dough into a nice tight ball. Lightly grease a clean bowl—not the mixing bowl you just used! Place the dough in there, cover it up again, and leave it somewhere cozy at room temperature. You are waiting for it to double in size. For me, this usually takes about five hours, but it depends on how warm your kitchen is. Once it’s doubled, gently turn it out onto a clean surface. Don’t punch it down hard! Just gently deflate it, shape it into the final loaf shape you want, and place it into your greased 9×5 inch loaf pan.
Final Proofing and Oven Preparation
Cover the pan loosely. This final proof is all about getting that perfect oven spring. You’re looking for the dough to rise about one inch above the rim of the pan. This usually takes around three hours. While it’s doing that last rise, preheat your oven to 375°F. Make sure that oven gets nice and hot before you slide the bread in!
Baking and Applying the Maple Sourdough Bread Glaze
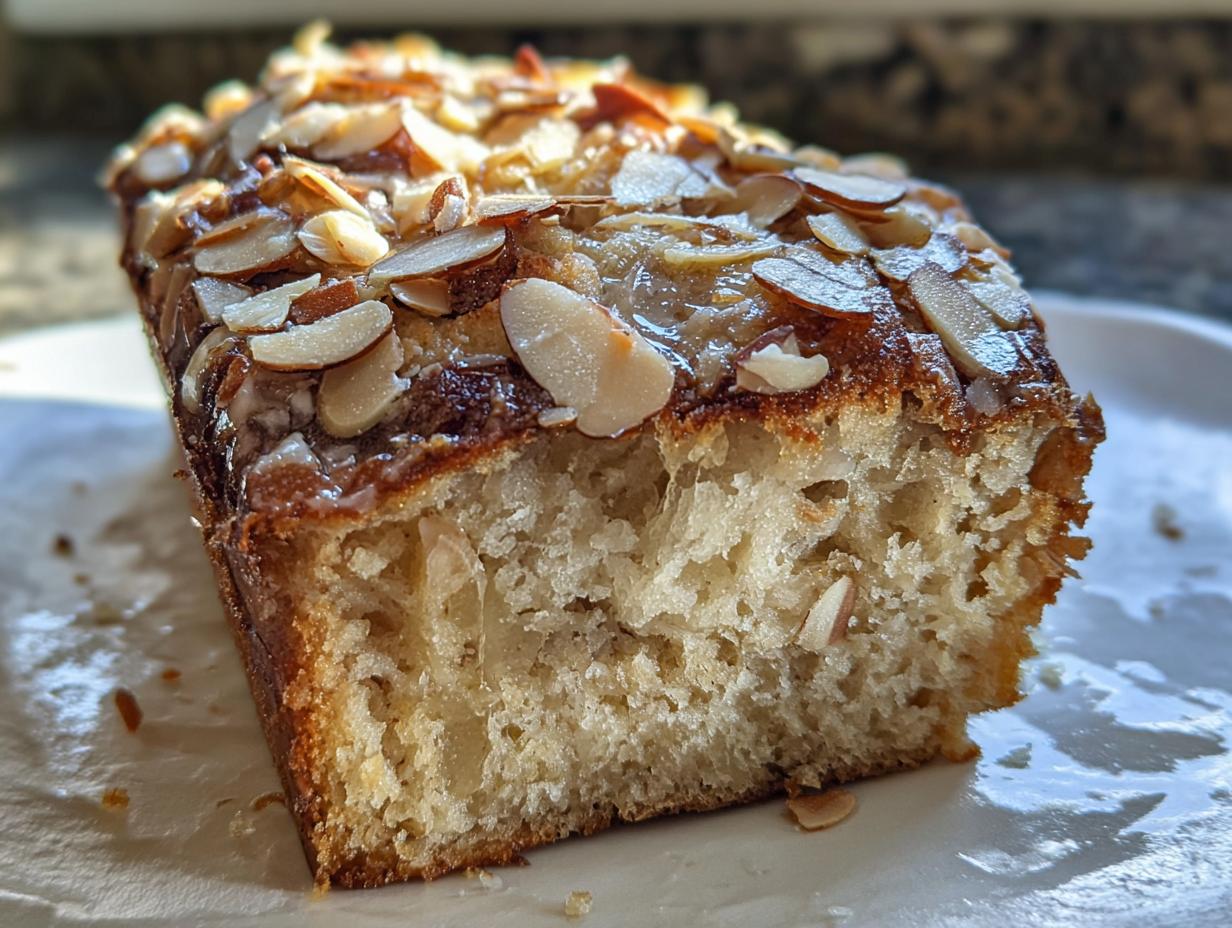
Bake the loaf for 40 minutes. You want it to be a deep, lovely golden brown color. Use an instant-read thermometer—you’re looking for an internal temperature of 190°F for a perfectly cooked crumb. While it’s baking, quickly stir together the final two tablespoons of maple syrup and the melted butter. The second you pull that hot loaf out of the oven, brush this glaze mixture all over the top. It will sizzle! Let it cool in the pan for 15 minutes before carefully turning it out onto a wire rack to cool completely. Seriously, try not to slice it while it’s hot!

Tips for Baking Exceptional Maple Sourdough Bread
Even though this is a beginner-friendly loaf, there are a few little secrets I’ve learned over time that make the difference between good and absolutely amazing maple sourdough bread. You’ve got the recipe down, but these small adjustments nail the texture every time.
First, don’t be afraid of a slightly sticky dough when you add the butter. If you try to add too much flour to make it manageable during the butter stage, you’ll end up with a dry loaf. Just keep kneading through the stickiness; the butter will eventually be absorbed and strengthen the dough!
Second, watch your final proofing time closely. Since this is a sweet dough, it can sometimes proof faster than a standard sourdough. If you over-proof it, it might collapse slightly in the oven. Look for that one-inch rise, not two inches! The dough should look puffy and jiggly, not ready to burst.
And finally, that glaze! Apply it when the bread is piping hot. The heat helps the glaze soak in just a tiny bit, giving you a soft, shiny crust instead of a hard, sticky shell. It’s these little touches that elevate this simple breakfast bread.
Frequently Asked Questions About Sweet Sourdough Loaves
I know baking naturally leavened bread can bring up a few questions, especially when you add sweet ingredients like maple syrup! Don’t stress; most issues are easy fixes once you know the drill. Here are the ones I get asked most often about this wonderful breakfast bread.
How Long Does the Maple Sourdough Bread Take Overall?
If you’re looking for a quick bake, this isn’t quite it—sourdough takes time to develop flavor! The active prep time is super short, maybe only 25 minutes total. However, between the bulk fermentation and the final proof, you’re looking at about 8 hours of rising time at room temperature. Plus the 40 minutes of baking. So, plan to start this in the morning if you want it for dinner, or start it the night before for an amazing breakfast!
Can I Use Active Starter for This Recipe?
Yes, you absolutely must use an active, bubbly starter! Think of your starter as the engine for this loaf. If you feed it and it doubles in size within four to six hours, it’s ready to go. A sluggish or unfed starter won’t have the strength to lift this enriched dough, and your maple sourdough bread won’t rise properly. Always use starter that has peaked or is just starting to fall back down.
What is the Best Way to Store Leftover Sweet Bread?
Because this loaf has milk and butter, it stays soft for a few days at room temperature if you keep it wrapped tightly in plastic wrap or in an airtight container. It’s actually fantastic for toasting on the second or third day! I don’t recommend putting it in the fridge right away because that can make the crumb stale faster. If you know you won’t eat it all in three days, slice it, and freeze the extra slices!
Storing and Refreshing Your Maple Sourdough Bread
This bread tastes best the day it’s baked, but honestly, it holds up really well for a few days because of the enriched dough. I never put my sweet sourdough loaves in the fridge right away because it dries them out quicker than you’d think. Keep it wrapped tightly on the counter for up to three days.
The real secret, though, is how great the leftovers toast up. That light sweetness really shines when you warm it through. If you’ve frozen slices, just pop them straight from the freezer into the toaster!
Here’s my quick guide for keeping your loaf perfect:
| Storage Method | Duration | Best For |
|---|---|---|
| Airtight on Counter | 3 Days | Immediate Slicing |
| Freezer (Wrapped) | Up to 3 Months | Toasting Later |
When you reheat a slice, a quick 30 seconds in the microwave right before toasting can bring back that just-baked softness if it feels a little firm!
Sharing Your Experience Baking Maple Sourdough Bread
I just love seeing how your loaves turn out! Honestly, sharing pictures of your finished maple sourdough bread makes my day. Did you get a nice dark crust? Did you use maple pecan mix-ins? You can see more of my baking adventures over on Pinterest.
Please leave me a rating below and tell me what you thought. I hope this sweet, naturally leavened loaf becomes a new favorite for your weekend brunch! Feel free to share your results on Facebook too.
Print
Maple Sourdough Bread: 1 Amazing Sweet Secret
- Total Time: 65 minutes
- Yield: 10 slices
- Diet: Vegetarian
Description
Maple sourdough breakfast bread is softly enriched, lightly sweet, and perfect for toast with butter. This is a naturally leavened loaf for mornings.
Ingredients
- 1 cup active sourdough starter
- 3 cups bread flour
- 3/4 cup whole milk warmed
- 1 large egg at room temperature
- 1/3 cup pure maple syrup
- 1 teaspoon fine sea salt
- 6 tablespoons unsalted butter softened
- 2 tablespoons pure maple syrup (for glaze)
- 1 tablespoon unsalted butter melted (for glaze)
Instructions
- Add sourdough starter, milk, maple syrup, egg, and salt to a large bowl. Whisk until smooth.
- Add bread flour and mix until a soft dough forms. Cover and rest for 20 minutes.
- Knead the dough for 6 minutes until elastic. Add butter one tablespoon at a time and knead 5 minutes more until smooth and supple.
- Shape the dough into a ball. Place in a lightly greased bowl, cover, and let rise at room temperature until doubled, about 5 hours.
- Turn the dough onto a clean surface, gently deflate, and shape into a loaf. Place into a greased 9 by 5 inch loaf pan.
- Cover and proof until the dough rises 1 inch above the pan, about 3 hours.
- Heat the oven to 375°F. Bake for 40 minutes until deep golden and the internal temperature reaches 190°F.
- Stir 2 tablespoons maple syrup and melted butter. Brush this mixture over the hot loaf.
- Cool in the pan for 15 minutes. Transfer to a rack to cool completely before slicing.
Notes
- This bread toasts beautifully.
- Ideal for relaxed mornings or brunch spreads.
- Make ahead slicing is recommended.
- Prep Time: 25 minutes
- Cook Time: 40 minutes
- Category: Bread
- Method: Baking
- Cuisine: American