I have to tell you about this recipe. Forget everything you think you know about making chili on a weeknight. Seriously! I spent years simmering pots on the stove, trying to coax out that deep, slow-cooked flavor, only to end up with scorched meat at the bottom. Then, I brought in the big guns: my Instant Pot. This Instant Pot chili is a game-changer. It takes beef, beans, and spices and transforms them into something rich and smoky in about 40 minutes total. That’s faster than most delivery apps, and it tastes a million times better.
I’ve tested this rigorously, making sure even if you’ve never touched a pressure cooker before, you can nail this on the first try. We’re talking real-world results from my kitchen to yours. This isn’t some complicated recipe meant for professional chefs; this is pure, delicious, weeknight magic that honors good cooking principles while saving you hours. It’s the perfect easy chili recipe for anyone looking to ditch the slow cooker without sacrificing flavor depth.

Why This Instant Pot Chili is Perfect for Beginners
If you’re new to pressure cooking, this is absolutely the recipe you should start with. It uses the Sauté function right on the machine, which means fewer dishes! We brown the beef and sweat the onions right in the pot—no separate skillet required. The beauty of the Instant Pot is that once you seal the lid, it handles the hard work of melding those flavors together incredibly fast.
We only cook this for 25 minutes under high pressure, and thanks to the 10-minute natural release, you get that fantastic, thick texture without babysitting a stovetop burner. Honestly, if you can brown meat and push a button, you can make incredible pressure cooker beef chili. It’s fast, it’s foolproof, and it delivers that classic comfort food taste!
Gathering Your Ingredients for Instant Pot Chili
Okay, let’s talk about what you need to grab from the pantry. This is where the magic starts for our fantastic Instant Pot chili. The good news is that most of this stuff is probably already sitting in your cupboard. We’re using ground beef because honestly, it gives the best texture for a quick chili, but feel free to swap in ground turkey if that’s what you have on hand.
The real flavor boosters here are the spices and the tomatoes. Don’t skip the smoked paprika—it brings that campfire taste we all crave without having to actually build a fire! Remember, when you’re pressure cooking, accurate measurement is key to making sure everything cooks evenly and safely.
Essential Components for Flavorful Instant Pot Chili
Here is the list you need to check off. Measure everything carefully, especially the spices, because when the flavors concentrate under pressure, even a little too much salt can throw things off. Trust me on this one; precision pays off huge when you open that lid!
- 2 tablespoons olive oil
- 1\u00bd pounds ground beef (85% lean)
- 1 large yellow onion, diced
- 1 red bell pepper, diced
- 1 green bell pepper, diced
- 4 cloves garlic, minced
- 2 cans (15 ounces each) kidney beans, drained and rinsed
- 1 can (15 ounces) pinto beans, drained and rinsed
- 1 can (28 ounces) crushed tomatoes
- 1 can (15 ounces) tomato sauce
- 1 cup beef broth
- 3 tablespoons chili powder
- 1 tablespoon ground cumin
- 1 tablespoon smoked paprika
- 1 teaspoon unsweetened cocoa powder
- 1 teaspoon granulated sugar
- 1 teaspoon salt
- \u00bd teaspoon black pepper
Necessary Equipment for Quick Instant Pot Chili
You don’t need a million gadgets for this one, which is why I love it so much! The star, obviously, is the electric pressure cooker itself. Since we’re building flavor right inside, cleanup is surprisingly minimal. This is fast food that tastes homemade, and it all happens in one pot. Get your trusty Instant Pot chili maker ready!
Key Tools for Pressure Cooking Chili
Make sure you have these handy before you start chopping. It makes the whole process flow so much smoother:
- Your Instant Pot (6-quart or 8-quart works great)
- A good cutting board and sharp knife
- Measuring cups and spoons (accuracy matters here!)
- A wooden spoon or silicone spatula for scraping up the bottom
Step-by-Step Instructions for Perfect Instant Pot Chili
Alright, let’s get cooking! This is the part where we turn those simple ingredients into that deep, rich flavor you usually only get after hours on the stove. Don’t rush the sautéing; that’s where the foundation for our amazing Instant Pot chili is laid. Grab your spatula, and let’s dive in!
Phase One: Sautéing and Building the Base Flavor
First things first, hit that Sauté button on your Instant Pot and set it to More or High. Wait until it says HOT—don’t put the oil in before that, or it just sits there getting sad! Add your olive oil and let it warm up for just a minute. Next, toss in the ground beef. You need to cook this until it’s totally browned, usually about five or six minutes. Break it up as you go; nobody wants giant clumps of meat in their chili!
Once the beef looks good, toss in the onions and peppers. Let those cook down for about three minutes until they start smelling sweet and getting soft. This is important so they aren’t crunchy later. Now, the fun part: the aromatics! Stir in your minced garlic, chili powder, cumin, smoked paprika, cocoa powder (trust me on the cocoa!), sugar, salt, and pepper. You only need to cook this for a minute or two until you can really smell those spices waking up. That fragrance is the taste of success, seriously!
Phase Two: Pressure Cooking the Instant Pot Chili
Time to stop sautéing! Hit Cancel. Now, pour in that cup of beef broth. This is the most vital step if you want to avoid the dreaded burn notice. Take your wooden spoon and scrape EVERY little brown bit off the bottom of the pot. Those bits are pure flavor, and if they stick, the machine throws a tantrum. We call that ‘deglazing,’ and it’s key for great Instant Pot chili.
After you’ve scraped the bottom clean, gently stir in the crushed tomatoes, tomato sauce, and both kinds of beans. Don’t mix it too vigorously; just combine everything nicely. Now, secure the lid—make sure that floating valve is turned to Sealing. Press the Manual or Pressure Cook button and set it to High Pressure for exactly 25 minutes. The pot takes about 5 to 10 minutes just to come up to pressure before those 25 minutes even start counting down, so be patient!
Phase Three: Releasing Pressure and Thickening
When the timer dings, do not immediately switch the valve! This is where we get that slow-cooked texture. Let the pressure release naturally for a full 10 minutes. This gentle release prevents the chili from sputtering hot liquid all over your counter. After those 10 minutes are up, carefully switch the valve to Venting to let out any last bits of steam. Always tilt the lid away from your face when you open it, just to be safe.
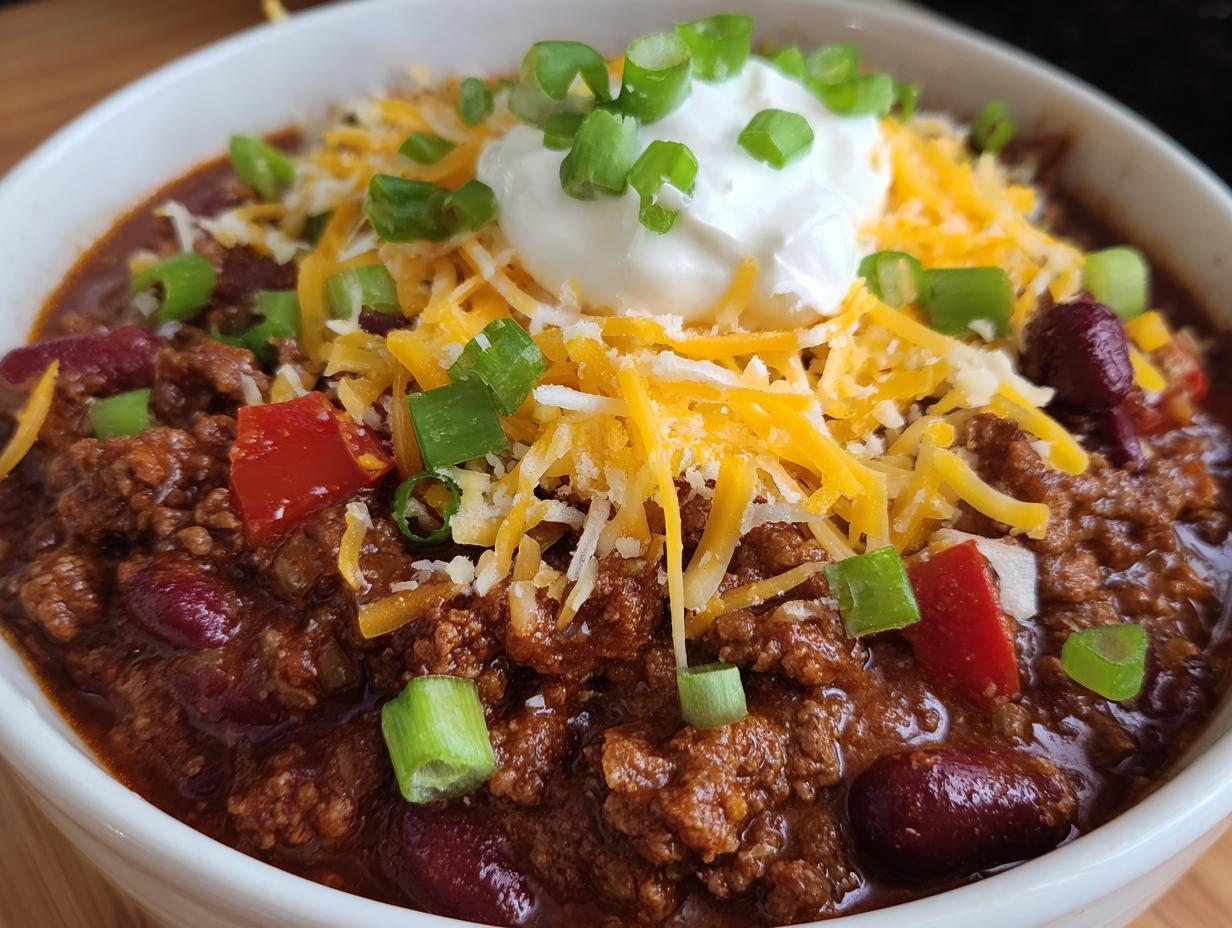
Once the float valve has dropped, give the chili a good stir. It might look a little soupy right now, but don’t panic! Take the lid off and let it just sit uncovered for about 5 to 10 minutes. This resting time lets the excess moisture evaporate, and the chili thickens up beautifully. Check the temperature—it should be steaming hot, over 165°F—and then get ready for toppings!

Tips for Next-Level Instant Pot Chili Success
Even though this is an easy recipe, a couple of Grandma’s old tricks really elevate this Instant Pot chili from good to absolutely unforgettable. Pressure cooking concentrates flavor so quickly, so little details make a big difference later on. I learned this the hard way—the first time I made it, I skipped a step and ended up with a slightly thin batch.
Also, and this is a big one: make this chili the day before you plan to eat it! Seriously, let it cool down, stick it in the fridge overnight, and reheat it the next day. The flavors marry together so much better. It’s the absolute best way to serve this pressure cooker beef chili. If you are looking for more great dinner ideas, check out our sheet pan chicken parmesan!
Avoiding the Burn Notice in Your Instant Pot Chili
The number one mistake people make when using the Sauté function is not deglazing properly. Remember when I told you to scrape the bottom after adding the broth? That’s not just for flavor; that’s insurance! If you leave any bits of browned meat or spices stuck to the metal, the sensor thinks the pot is overheating and throws that annoying ‘BURN’ warning. A good, thorough scrape with a wooden spoon after the broth goes in is non-negotiable for successful Instant Pot chili.
Adjusting Consistency for Your Instant Pot Chili
If, after that 10-minute natural release and the resting time, you still feel like your chili is a little too watery—and this happens sometimes depending on how much liquid was in your canned tomatoes—don’t worry! We have a simple fix. Whisk together about two tablespoons of cornstarch with two tablespoons of cold water until it’s totally smooth. Pour that slurry right into your hot chili while it’s still in the pot, stir it well, and let it sit uncovered for about five more minutes. It will thicken right up into that perfect, hearty consistency we want!
Common Questions About Making Instant Pot Chili
I get so many questions about this recipe, which just tells me how popular this Instant Pot chili is becoming! Most people are worried about the timing or substitutions, but honestly, the machine handles most of the hard work. It’s great that so many of you are curious about how to customize it while keeping that fast cook time we love so much. You can follow us on Pinterest for more quick meal inspiration!
Let’s tackle the most common things I hear so you can feel totally confident when you hit that start button. Remember, just because it’s fast doesn’t mean we skip the flavor; we’re just speeding up the simmering process!
How Long Does the Pressure Build Time Take for Instant Pot Chili?
This is the biggest source of confusion for anyone new to pressure cooking! When you set the timer for 25 minutes, that clock doesn’t start ticking down until the pot has fully built up pressure. Depending on how much liquid you used and the starting temperature of your ingredients, this initial build time can take anywhere from 5 to 15 minutes. Don’t panic when the pot sits there silently reading “On”—it’s just warming up and pressurizing. Once it starts hissing steadily, the 25 minutes for your easy chili recipe begin!
Can I Use Different Kinds of Beans in This Instant Pot Chili?
Absolutely! That’s one of the joys of making homemade pressure cooker beef chili. The recipe calls for kidney and pinto beans because they hold their shape really well under pressure. If you want to use black beans or cannellini beans, go right ahead! The only thing I advise is that you use canned beans (drained and rinsed, just like the recipe says) rather than dry beans. If you use dry beans, you’ll need to soak them overnight and significantly increase your cooking time, which defeats the purpose of a quick Instant Pot chili!
Storing and Reheating Leftover Instant Pot Chili
The best part about this recipe? It tastes even better the next day! Seriously, the spices settle in and deepen overnight. Since this Instant Pot chili is so rich, a little goes a long way, and leftovers make lunch a snap. You definitely want to store it correctly so you can enjoy it all week long. For more comforting meals, check out our creamy white chicken chili recipe.
Best Practices for Storing Your Pressure Cooker Beef Chili
Once the chili has cooled down a bit—never put scalding hot food directly into the fridge—transfer it to airtight containers. It keeps beautifully in the refrigerator for up to four days. When you’re ready to eat it again, just reheat it gently on the stovetop or in the microwave until it’s steaming hot all the way through. This pressure cooker beef chili freezes like a dream too, so make a double batch! We share more tips and tricks on our Medium page.
Understanding the Estimated Nutrition for Instant Pot Chili
I always like to give you a general idea of what you’re eating when you make this fantastic Instant Pot chili. Keep in mind these are just estimates, since the exact count depends on the leanness of your beef and exactly how much you pile on with toppings like cheese and sour cream. But this gives you a good baseline for a solid, protein-packed meal that comes together in under an hour!
This breakdown is for one standard serving size, without any extra toppings added in. It’s surprisingly hearty while still keeping the fat content reasonable for a beef chili. Here’s the snapshot of what’s in one bowl of this wonderful easy chili recipe:
| Nutrient | Amount per Serving |
|---|---|
| Calories | 385 |
| Fat | 16g |
| Carbohydrates | 32g |
| Protein | 28g |

Instant Pot chili: 385 Cal Power Batch
- Total Time: 40 minutes
- Yield: 8 servings
- Diet: Omnivore
Description
Make beginner-friendly Instant Pot chili in about 40 minutes. This recipe guides you through using the sauté function, building pressure safely, and achieving a deep, slow-cooked flavor quickly.
Ingredients
- 2 tablespoons olive oil
- 1½ pounds ground beef (85% lean)
- 1 large yellow onion, diced
- 1 red bell pepper, diced
- 1 green bell pepper, diced
- 4 cloves garlic, minced
- 2 cans (15 ounces each) kidney beans, drained and rinsed
- 1 can (15 ounces) pinto beans, drained and rinsed
- 1 can (28 ounces) crushed tomatoes
- 1 can (15 ounces) tomato sauce
- 1 cup beef broth
- 3 tablespoons chili powder
- 1 tablespoon ground cumin
- 1 tablespoon smoked paprika
- 1 teaspoon unsweetened cocoa powder
- 1 teaspoon granulated sugar
- 1 teaspoon salt
- ½ teaspoon black pepper
Instructions
- Press Sauté on your Instant Pot to More or High heat. Wait until display reads HOT, then add olive oil and heat for 1 minute.
- Add ground beef. Cook for 5-6 minutes, breaking it up until completely browned.
- Add diced onion and bell peppers. Cook for 3 minutes, stirring occasionally, until vegetables soften.
- Stir in minced garlic, chili powder, cumin, smoked paprika, cocoa powder, sugar, salt, and pepper. Cook for 1-2 minutes until fragrant.
- Pour in beef broth. Scrape the bottom of the pot thoroughly to remove browned bits.
- Add crushed tomatoes, tomato sauce, kidney beans, and pinto beans. Stir to combine.
- Press Cancel. Secure the lid and turn the pressure valve to Sealing.
- Press Manual or Pressure Cook button. Set to High Pressure and adjust the timer to 25 minutes.
- When cooking ends, allow pressure to release naturally for 10 minutes. Carefully turn the valve to Venting to quick release remaining pressure.
- Once the float valve drops, remove the lid tilting it away from you.
- Stir the chili well. Let it rest uncovered for 5-10 minutes to thicken.
- Confirm chili reaches 165°F before serving. Top with shredded cheddar cheese, sour cream, sliced green onions, and tortilla chips.
Notes
- Always deglaze the pot after browning meat to prevent the burn notice and add flavor.
- The Instant Pot takes 5-10 minutes to come to pressure before the cook time starts.
- Natural pressure release for 10 minutes prevents splattering when venting.
- Chili flavor improves when made a day ahead.
- If chili is thin, whisk 2 tablespoons cornstarch mixed with 2 tablespoons cold water into the hot chili; let stand 5 minutes to thicken.
- Prep Time: 10 minutes
- Cook Time: 30 minutes
- Category: Main Dish
- Method: Pressure Cooking
- Cuisine: American