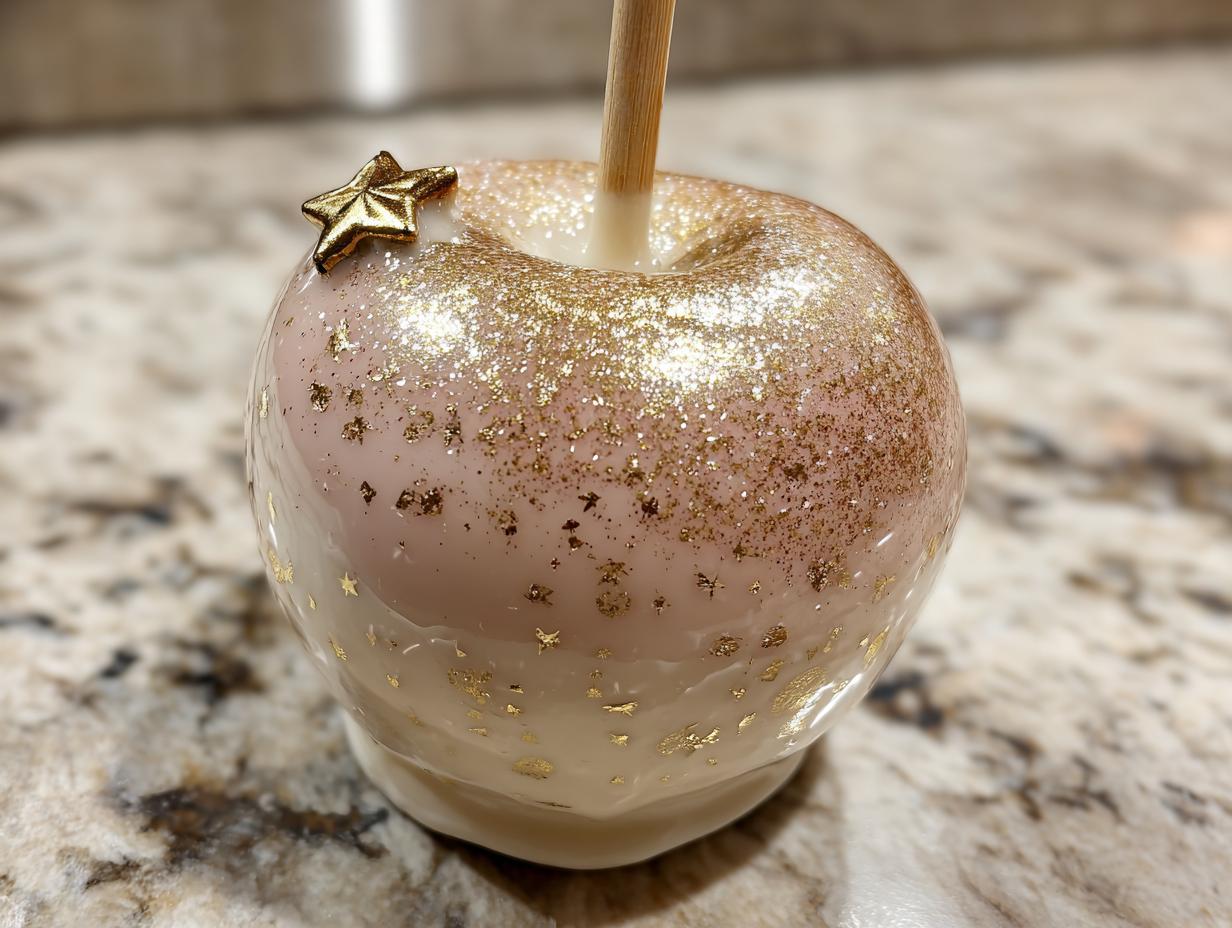
You know those desserts that look like they belong in a magazine? Well, making stunning gold champagne candy apples that look this elegant used to feel impossible, but trust me, it’s totally doable! This recipe is my secret weapon for New Year’s Eve parties because it gives you that incredible midnight sparkle without requiring you to be a professional candy maker.
We’re aiming for that soft, pale, ethereal coating—the champagne vibe—then we hit it with serious gold. The best part? We use a candy thermometer, which takes all the guesswork out of hitting that tricky hard-crack stage. You get that perfect, glossy shell every single time. Seriously, get ready for compliments!

Essential Components for Your gold champagne candy apples
When you’re going for a look this refined, every single ingredient counts. We aren’t just making a snack here; we’re making edible jewelry! Getting the right base components ensures your gold champagne candy apples look professionally done. Don’t skimp on the quality of your apples or your decorations, because they really shine through.
Selecting Perfect Apples and Sticks
First up, the apples! You absolutely need small, crisp apples—Granny Smith are usually my go-to because they hold up so well against the hot syrup and have a nice tartness to cut the sugar. Make sure they are small enough that you can fully dip them without the candy level getting too high on the stick. And please, use sturdy wooden sticks or even thick paper straws. A flimsy stick means a wobbly, broken apple candy shell, and we definitely don’t want that!
The Gold Champagne Candy Base Ingredients
For the actual candy coating, we need the basics: sugar, light corn syrup, and water. The corn syrup is key; it stops the sugar from crystallizing into grainy rock candy, which is a total disaster. We add cream of tartar, which is like the unsung hero here—it helps stabilize everything as it heats up. If you want that true, soft champagne look instead of clear, add just a drop or two of ivory or pale gold gel coloring. It makes such a subtle, beautiful difference!
Decorative Elements for gold champagne candy apples
Now for the fun stuff! You’ll need gold sanding sugar or sprinkles for texture, and the edible gold luster dust is non-negotiable for that metallic sheen. That dust is what makes them look expensive! Finally, we need some dark or semisweet chocolate for the little toppers. Melting chocolate separately lets you pipe little numbers or stars, adding that final, personalized touch to your gorgeous creation.
Preparing Your Workspace for gold champagne candy apples
Before that syrup even thinks about hitting the heat, you need to get your station totally prepped. Candy making moves fast once it gets hot, and you don’t want to be scrambling for parchment paper while your sugar is burning! Cleanliness is huge here, too. Any grease or water left on the apples will make the candy slide right off, and nobody wants that.
Apple Preparation and Skewering
You must wash those apples really well in warm water—this removes the waxy coating grocery stores put on them, which prevents the candy from sticking. Then, and this is important, dry them until they are bone dry. Seriously, wipe them down with a clean towel. Next, pop those sticks in! Push them straight down into the center, maybe halfway through the apple, so they feel secure. We need those sticks to hold tight when we dip them in that hot sugar bath!
Mastering the Hard-Crack Syrup for gold champagne candy apples
This is where most folks get nervous, but I promise you, if you have a candy thermometer, you are golden! We are aiming for the hard-crack stage, which is 300 degrees Fahrenheit. If it’s even slightly under, your beautiful candy shell will be sticky and messy, and if it’s way over, it’ll taste burnt. So, trust the thermometer—it’s your best friend here.
We start by putting the sugar, corn syrup, water, and the cream of tartar into a medium, heavy-bottomed saucepan. A heavy pan helps distribute the heat evenly, which stops those awful hot spots that cause burning. At this stage, you can gently stir everything together just until the sugar dissolves and looks wet. But listen closely: as soon as you see that mixture start to boil, you must stop stirring completely!
Combining and Cooking the Syrup Mixture
Once that boil starts, don’t touch it! Stirring after it boils creates sugar crystals, and those crystals will creep up the sides of the pan and ruin the smooth texture we want. Just let it bubble away over medium-high heat. You can use a pastry brush dipped in water to gently wash down any sugar crystals that climb the sides of the pot—that’s a pro trick to keep things smooth. Watch that thermometer like a hawk! We need it to hit exactly 300°F (150°C). That is the magic number for that satisfying, crisp snap.
Flavoring and Coloring the Gold Champagne Candy
The second that thermometer hits 300°F, yank that pan right off the heat! Don’t wait a second. Now is the time for the delicate additions. Carefully stir in your clear vanilla extract—we use clear so it doesn’t muddy the pale color. If you decided to use a few drops of ivory or pale gold gel coloring, mix that in now too. Stir slowly and gently just until incorporated. The mixture will bubble up a bit when you add things off the heat, so be careful; it’s still scorching hot! This is what gives us that soft, elegant champagne hue before we add the bright gold sparkle later.
Dipping and Decorating Your gold champagne candy apples
Okay, the syrup is perfect, the apples are ready, and the anticipation is building! This is the show-stopping part where your hard work pays off. The key to beautiful gold champagne candy apples is speed and confidence during the dipping stage. You need to work quickly but methodically so the candy doesn’t set up in the pan before you get all your apples done.
The Dipping Technique
First, make sure your prepared baking sheet with the parchment or silicone mat is right next to your stove. Tilt the saucepan slightly so the syrup pools nicely on one side. Take one apple by the stick, dip it straight down into the candy, and start turning it immediately. You want a nice, even coat all over. Once it looks fully covered, pull it up slowly and hold it over the pan for a moment, letting all that excess syrup drip back down. Gravity helps smooth out any thick spots! Then, gently place it onto your prepared sheet.
Applying Gold Sprinkles and Luster Dust
Here’s the timing trick: as soon as that apple hits the sheet, the candy will still be tacky—that’s your window! Quickly sprinkle your gold sanding sugar or sprinkles over the parts you want coated. I usually focus on the bottom half or just dust the top edge. Once the coating is completely dry and hard, we move to the luster dust. Mix that dust with just a tiny bit of neutral oil or clear extract until it looks like metallic paint. Use a small, clean pastry brush to lightly sweep this “paint” over sections of the apple shell. Applying it in thin layers lets you build up that gorgeous, reflective sheen without looking clumpy.
Creating and Attaching Chocolate Toppers
While the apples are setting, you can get your final decorations ready. Melt your chocolate chips and coconut oil together in short bursts in the microwave. Stir well between each burst—chocolate burns faster than you think! Pour that smooth melted chocolate into your small silicone molds for stars or numbers, or just pipe little shapes onto parchment paper. Once those chocolate pieces are totally firm, you’ll need a tiny dab of leftover melted chocolate on the back to act as glue. Gently press the chocolate piece right onto the top of the apple near where the stick enters. Let everything rest for about 20 minutes so all those beautiful decorations secure themselves perfectly.

Tips for Perfect gold champagne candy apples Every Time
Even with the best recipe, candy can be temperamental! But don’t worry, I’ve learned a few tricks over the years to make sure your gold champagne candy apples come out looking flawless instead of frustrating. These little details are what separate a good candy apple from a show-stopping one.
Temperature Control and Setting Time
I can’t stress this enough: the 300°F hard-crack stage is crucial. If you pull it off the heat too soon, the candy stays tacky, and your beautiful gold sprinkles will just slide right off! On the flip side, if you overcook it, the flavor gets sharp. Once they are decorated, you must let them sit undisturbed. Seriously, walk away! They need that full resting period—I recommend at least 20 minutes—so the shell fully hardens and the chocolate toppers are cemented in place before you even think about moving them.
Achieving the Best Gold Finish
That edible luster dust is gorgeous, but it needs patience. If you mix it with too much oil or extract, you’ll end up with thick, greasy streaks instead of a fine metallic shimmer. You only need a tiny bit of liquid to make a workable paint. Mix it slowly until it resembles thin watercolor paint. Then, apply it in very thin layers, brushing lightly. It’s better to do two super light coats than one heavy one. This builds up that amazing, reflective gold sheen that makes these apples look so luxurious! If you want more great recipe ideas, check out our snacks section.
Frequently Asked Questions About gold champagne candy apples
I get so many questions whenever I bring these sparkling beauties to a party! People always want to know how to keep that gold looking bright or what happens if they don’t have the exact ingredients. Here are the things I hear most often about making the best gold champagne candy apples.
Can I Make gold champagne candy apples Ahead of Time?
Yes, you absolutely can make them ahead, which is a lifesaver for big celebrations! If your kitchen is cool, they are great stored loosely wrapped at room temperature for up to two days. If your house is warm, or if you need them to last longer, pop them in the fridge. But here’s the catch: you must let them sit out on the counter for about 20 minutes before serving. If you try to eat them ice-cold, the shell can sometimes crack.
What Temperature Should the Candy Reach?
This is the most important question! You absolutely must hit the hard-crack stage, which means your candy thermometer needs to read exactly 300°F. If you pull it off the heat even five degrees early, the shell will be sticky and messy, and all your beautiful gold work will slide right off. Trust your thermometer—it’s the key to that perfect, crisp snap!
Can I Use Different Apple Varieties?
You should definitely stick to crisp apples! I love Granny Smith because they are tart and firm. Avoid softer apples like McIntosh, as they tend to break down or get mushy when they sit under the hot candy coating. The firmer the apple, the better it holds up to the dipping process and the longer it stays crisp after coating.
Storing and Serving Your Finished gold champagne candy apples
Once all that gold dust is shimmering and the chocolate toppers are set, you want to make sure these beauties last until midnight! Storing candy apples correctly is all about managing humidity and temperature. Because these gold champagne candy apples are so glamorous, how you present them matters just as much as how you store them.
Recommended Storage Conditions
If you’re making these a day or two ahead, cool room temperature is usually fine, provided your kitchen isn’t too warm or humid. Just wrap them loosely—you don’t want plastic touching the candy shell, or it might sweat and get sticky! I usually lay mine on parchment paper inside a large container, making sure they aren’t touching each other. For holding them longer, up to three days, the fridge is your friend. But remember the rule: always take them out about 20 minutes before serving so the candy can warm up slightly. If you serve them straight from the cold, the hard shell can sometimes crack when you bite into it.
For presentation, don’t just lay them on a plate! Displaying them on a dark charger or even a mirrored platter really catches the light and makes that gold finish absolutely pop. They look amazing lined up! If you enjoy sharing your culinary adventures, follow us on Facebook.
Share Your Sparkling gold champagne candy apples Creations
Whew! Now you have all my secrets for making these dazzling gold champagne candy apples. They are truly spectacular for ringing in the New Year or any big celebration. I hope you love the process as much as I do. When you make a batch, please come back and leave a rating or share a picture! You can also find more great dessert inspiration on our dessert cakes page.
I just love seeing how everyone manages to get that perfect gold shimmer. Let me know what you think! For more visual inspiration, check out our Pinterest page.
Print
Stunning gold champagne candy apples: 1 trick
- Total Time: 55 minutes
- Yield: 6 to 8 candy apples
- Diet: N/A
Description
New Year’s gold and champagne-inspired candy apples feature a pale candy coating, gold sprinkles, edible luster dust, and chocolate toppers for a sparkling midnight dessert.
Ingredients
- 6 to 8 small crisp apples
- 6 to 8 sturdy wooden sticks or paper straws
- 2 ½ cups granulated sugar
- 1 cup light corn syrup
- 1 cup water
- ½ teaspoon cream of tartar
- ½ teaspoon clear vanilla extract
- A few drops ivory or very pale gold gel food coloring, optional
- 3 to 4 tablespoons gold sanding sugar or gold sprinkles
- 1 to 2 teaspoons edible gold luster dust
- 1 to 2 teaspoons neutral-flavored oil or clear extract (for luster dust paint)
- ½ cup dark or semisweet chocolate chips
- 1 teaspoon coconut oil
- Small silicone molds for numbers or stars, or parchment for piping
Instructions
- Wash apples in warm water and dry them completely. Remove stems and insert a wooden stick straight into the center of each apple.
- Line a baking sheet with parchment or a silicone mat and lightly grease it.
- In a medium heavy saucepan, combine sugar, corn syrup, water, and cream of tartar. Stir gently until everything is moistened.
- Bring the mixture to a boil over medium-high heat without stirring. Cook until it reaches 300°F (hard-crack stage) using a candy thermometer.
- Remove the pan from heat. Carefully stir in the clear vanilla and any optional food coloring.
- Tilt the pan slightly. Carefully dip each apple into the hot candy syrup, turning to coat evenly. Let excess drip back into the pan. Place apples on the prepared baking sheet.
- While the coating is tacky, sprinkle gold sanding sugar or sprinkles over the lower half or entire surface of each apple.
- Let the apples sit at room temperature until the candy coating is fully set and dry.
- Mix the edible gold luster dust with just enough oil or clear extract to form a smooth, paintable liquid in a small bowl. Lightly brush this mixture over parts of the apples for a metallic sheen.
- Melt chocolate chips and coconut oil in a microwave-safe bowl using short bursts, stirring between each, until smooth.
- Pour or pipe the melted chocolate into small silicone molds (for numbers or stars) or pipe shapes onto parchment. Let them set until firm.
- Gently press one set chocolate topper onto the top of each apple near the stick. Use a small amount of leftover melted chocolate as glue if needed.
- Allow the finished candy apples to rest for 15 to 20 minutes so all decorations secure before serving.
Notes
- Use clear vanilla and pale gel color for a soft, elegant champagne tone.
- Add sanding sugar when the candy is slightly tacky for best adhesion.
- Apply luster dust in thin layers, building the metallic finish gradually.
- Make chocolate toppers ahead of time so they are fully set before use.
- Display apples on a dark or mirrored platter to catch the light.
- Store apples loosely wrapped at cool room temperature for up to 2 days.
- If your space is warm, refrigerate for up to 3 days, letting them sit at room temperature for 20 minutes before serving.
- Do not freeze candy apples; the shell may crack.
- Prep Time: 35 minutes
- Cook Time: 20 minutes
- Category: Dessert
- Method: Candy Coating
- Cuisine: American