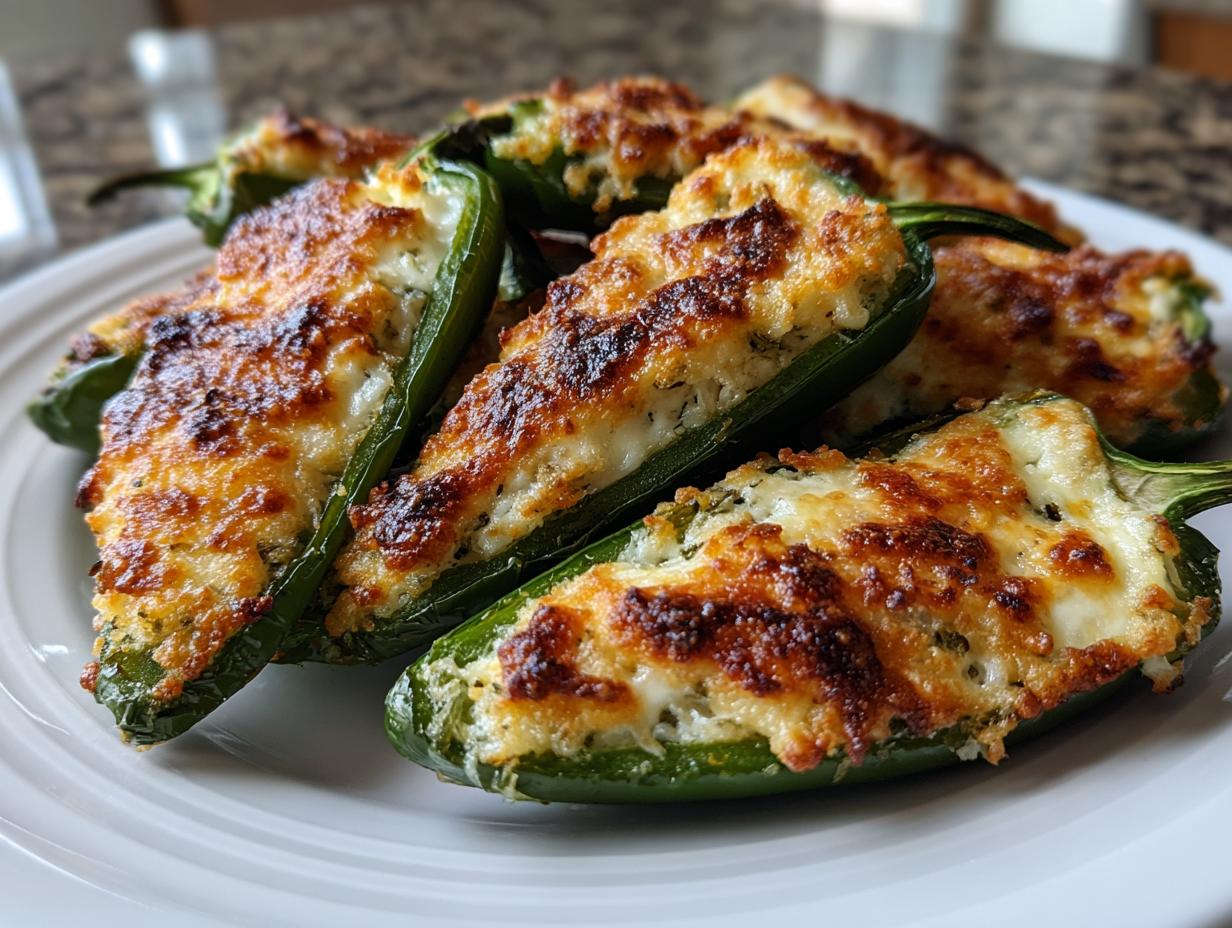
Baked Jalapeño Poppers are about to become your new favorite party trick, I promise you that! When I started NoobRecipes, I swore to myself I’d only share things that a total beginner could nail on the first try. And let me tell you, deep-frying things? That’s usually a disaster zone for a newbie cook—oil everywhere, burning smells, and sad, soggy peppers. Not fun!
But these Baked Jalapeño Poppers? They are different. I remember the first time I tried making these, I was terrified of the heat, but I figured out the trick to scooping out those seeds and membranes, which really tames the fire. Instead of dealing with hot oil, we’re just popping these beauties into a 400-degree oven. You get that amazing gooey, cheesy center, and the panko topping turns perfectly golden brown and crispy, all without needing a deep fryer. Seriously, if you’ve ever wanted a crowd-pleasing appetizer that doesn’t require a culinary degree or a fire extinguisher, this recipe for Baked Jalapeño Poppers is exactly what you need. You’ve got this!

Why You Will Love These Baked Jalapeño Poppers
This recipe isn’t just good; it’s incredibly smart for anyone who doesn’t want to spend hours in the kitchen or deep clean a fryer afterward. I designed this recipe specifically so you can walk away feeling like a total kitchen hero. They are unbelievably flavorful, but the real win is how easy they are to manage.
- Super Beginner Friendly: Seriously, if you can hold a knife and stir a bowl, you can make these poppers. No complicated steps here!
- Gooey Perfection: That sharp cheddar and cream cheese mix melts into pure savory heaven inside the tender pepper shell.
- Healthier Snack: We skip the messy, heavy oil bath and bake them until they are crisp on top. That’s a win-win in my book.
- Fast Appetizer: They come together faster than ordering takeout.
Quick Prep Time for Easy Entertaining
The best part about these cheesy poppers is the minimal time commitment. You only need about ten minutes of active prep time before they head into the oven. Ten minutes! That means you can whip these up while your guests are walking in the door, and you won’t miss any of the fun. Plus, since they bake so fast, they are perfect for last-minute game days or when unexpected company drops by.
Essential Ingredients for Perfect Baked Jalapeño Poppers
When we talk about making amazing Baked Jalapeño Poppers, the ingredients are surprisingly simple. That’s what I love about good party food—you don’t need a million fancy items. We are relying on high-quality staples to give you that perfect balance of creamy heat and that essential crispy crunch on top. Don’t feel like you need to hunt down specialty items; most of this is probably already in your fridge!
The key here is the cheese blend. Using real sharp cheddar really makes the filling pop, and the cream cheese is what gives it that luxurious, melt-in-your-mouth texture we all want. I always stress using fresh chives or green onions because dried herbs just don’t cut it when you need that bright, fresh flavor to balance the spice of the jalapeño. Trust me, keeping the list short means less stress for you, the busy home cook!
Ingredient List Overview
Here’s what you need to gather up before you start stuffing. I’ve noted exactly how you need things prepped so you can move quickly through the stuffing stage:
| Ingredient | Amount | Prep Needed |
|---|---|---|
| Jalapeños | 12 medium | Halved lengthwise |
| Cream Cheese | 8 ounces | Softened |
| Sharp Cheddar Cheese | 1 cup | Shredded |
| Chives or Green Onions | 2 tablespoons | Finely chopped |
| Garlic | 1 clove | Minced |
| Panko Bread Crumbs | 1/2 cup | For topping |
| Unsalted Butter | 1 tablespoon | Melted |
| Parmesan Cheese | 1 tablespoon | Grated |
Equipment Needed for Your Baked Jalapeño Poppers
Since we’re keeping this recipe super simple for my NoobRecipes crew, you don’t need any fancy gadgets. If you have basic baking sheets and bowls, you are totally set. Forget the immersion circulators and stand mixers for this one! We want standard, reliable tools that everyone has.
- A sharp knife for slicing the peppers.
- A sturdy mixing bowl for that creamy filling.
- A small bowl just for mixing up the crispy topping.
- A large baking sheet—this is important for giving the poppers room to breathe so they crisp up nicely.
- Parchment paper, because nobody enjoys scrubbing baked cheese off a sheet pan!
Step-by-Step Instructions for Baked Jalapeño Poppers
Okay, this is where the magic happens! Don’t let the thought of handling peppers scare you off; we’re going to handle these juicy jalapeños like pros. Following these steps precisely is how we guarantee you’ll have the best Baked Jalapeño Poppers your friends have ever tasted. Remember, precision in the prep means perfection on the plate!
Preparing the Jalapeños Safely
First things first: safety! You absolutely must put on gloves before you touch these peppers. I learned the hard way years ago that touching your eyes after handling jalapeños is a rookie mistake you only make once! Put on your gloves, grab your sharp knife, and preheat your oven to 400°F. Line your baking sheet with parchment paper now—it saves scrubbing later, trust me.
Take each pepper and slice it right down the middle, lengthwise. You want two halves from each pepper. Now, use a small spoon or the tip of your knife to scrape out every single seed and all that white membrane inside. That membrane is where most of the heat lives! The goal is to create little boats ready to hold our cheesy filling. Lay them all cut-side up on your prepared sheet.
Creating the Creamy Filling Mixture
Time to whip up the filling! Grab your mixing bowl. You need the softened cream cheese—make sure it’s really soft so you don’t end up with lumps! Toss in your shredded cheddar, the chopped chives, minced garlic, onion powder, salt, and pepper. Now, use a sturdy spoon or a rubber spatula and just mix it all together really well until it’s totally smooth and uniform. You want zero streaks of plain cream cheese left. Give it a taste—it should be sharp, savory, and ready to go!
Stuffing and Topping the Baked Jalapeño Poppers
This part is so satisfying! Take a small spoon and scoop a generous amount of that creamy mixture into each jalapeño half. Don’t be shy, but make sure you smooth the top so the filling is level with the pepper edge. This helps everything bake evenly.
For the topping, which gives these Baked Jalapeño Poppers that fantastic crunch, you just mix the panko bread crumbs, the melted butter, and the Parmesan cheese in a tiny bowl. Stir quickly until the crumbs are evenly coated. Sprinkle this mixture lightly but evenly over the top of all that creamy filling. This topping is what separates a good popper from a great one!

Baking Time and Finishing Touches
Carefully slide that baking sheet into your preheated 400°F oven. You’re going to bake these poppers for about 18 to 22 minutes. You want the peppers to look tender, and you’ll see the cheese bubbling happily around the edges. If, after 22 minutes, the topping isn’t quite as brown as you’d like—and this is optional—you can switch the oven to broil for just one to two minutes. Watch it constantly during the broil, seriously, because panko burns faster than you can blink!
Once they look perfect, pull them out. This is crucial: let the poppers rest on the hot pan or a cooling rack for about five minutes before serving. This lets the filling firm up just a tiny bit so they don’t ooze out everywhere when you pick them up. Enjoy!
Tips for Perfect Baked Jalapeño Poppers Every Time
Even though this recipe is super easy, sometimes little things can trip a new cook up. If you follow these little bits of insider knowledge, your Baked Jalapeño Poppers will turn out perfectly golden and creamy every single time. I’ve learned these tricks through trial and error so you don’t have to!
The secret to making an appetizer that everyone loves is making sure it fits their needs. We want happy guests, not overly spicy ones! And honestly, who doesn’t love a good crisp topping? Using the right breadcrumbs makes all the difference here. If you want to see more great appetizer ideas, check out our Festive Caprese Wreath Appetizer!
Controlling the Heat Level
If you or your guests aren’t huge fans of intense spice, you have a couple of easy outs. The biggest heat control comes from how well you clean those peppers. Be thorough when removing the seeds and the white pithy membranes—that’s where the capsaicin really hangs out. If you want to add a layer of flavor without cranking up the heat too much, swap out half of your sharp cheddar for Pepper Jack cheese. It adds a nice, creamy melt with just a little friendly warmth.
Alternative Crunch Options
Sometimes you run out of panko, or maybe you just want a different texture for your Baked Jalapeño Poppers. That’s totally fine! If you skip the panko entirely, just make sure you pile a little extra cheddar on top before baking, and it will melt into this fantastic, bubbly, cheesy crust instead. Or, if you want a smoky flavor, I suggest crushing up about two tablespoons of your favorite tortilla chips—plain or lightly seasoned—and mixing those into the melted butter and Parmesan instead of the panko. It gives a great chip flavor without needing to fry anything!
Storing and Reheating Your Baked Jalapeño Poppers
These appetizers are definitely best fresh out of the oven, but let’s be real—sometimes you have leftovers! If you have any of these cheesy poppers left over, don’t worry about them going to waste. They keep really well, and reheating them is simple. Just make sure you store them correctly so they don’t get soggy overnight.
| Storage Method | Duration | Reheating Tip |
|---|---|---|
| Airtight Container (Fridge) | Up to 3 days | Toast in toaster oven or bake at 350°F for 5 minutes. |
| Freezing (Not Recommended) | N/A | The texture of the cream cheese filling changes significantly when frozen and thawed. Eat fresh or refrigerated! |
I strongly suggest avoiding the microwave for reheating, as it turns the crispy topping into sad, soft mush. If you want that crunch back, use a toaster oven or even pop them back onto a baking sheet in a warm oven for just a few minutes. That quick blast of dry heat revives the panko beautifully.
Frequently Asked Questions About Baked Jalapeño Poppers
I get tons of questions about these poppers because everyone wants to make sure their first batch of Baked Jalapeño Poppers turns out flawless. Here are a few of the most common things people ask me when they are trying this recipe out for the first time. Don’t hesitate to ask if you have more!
Can I Make These Ahead of Time?
Yes, you absolutely can! You can stuff all the jalapeño halves with the cheese mixture, top them with the panko, and then place them on the baking sheet. Cover the whole thing tightly with plastic wrap and stick it in the fridge for up to 24 hours. When you’re ready to cook, just add about 5 extra minutes to the baking time since they are starting cold. Don’t leave them sitting out at room temperature too long before baking, though!
What is the Best Way to Cut the Peppers?
You must slice them lengthwise, right down the middle from tip to stem. This gives you a flat surface to sit them on the baking sheet, which prevents the filling from spilling out while baking. It also gives you the biggest surface area to remove all those seeds and membranes so you can control the heat level in your Baked Jalapeño Poppers.
Can I Use Different Cheese in My Baked Jalapeño Poppers?
Of course! While I love the sharpness of cheddar, this recipe is very forgiving. Feel free to substitute Monterey Jack for a milder, stretchier melt, or use Pepper Jack if you want a little extra kick. Just make sure whatever you use is shredded well so it mixes smoothly with the cream cheese! For more easy appetizer ideas, see our Quick Pepper Jelly Cream Cheese Appetizer.
Share Your Success with These Baked Jalapeño Poppers
I absolutely love seeing what you all create in your own kitchens! If you tried out this simple, oven-baked take on the classic appetizer, please jump down to the comments section below and let me know how they turned out. Were they as crispy as you hoped? Did you try the tortilla chip topping? You can also share your creations with our community on Pinterest!
Don’t forget to give this recipe a star rating if you enjoyed it—it truly helps other beginner cooks like you decide what to try next. Tag me in your photos if you share them online! Seeing your successful batch of Baked Jalapeño Poppers makes my day and proves that anyone can master great party food. Follow us on Facebook for more beginner tips!
Tips for Perfect Baked Jalapeño Poppers Every Time
I’ve spent way too much time perfecting these cheesy poppers so you don’t have to! Even though this recipe is designed to be foolproof, sometimes little things throw a wrench in the works. If you follow these little bits of insider knowledge, your Baked Jalapeño Poppers will turn out perfectly golden and creamy every single time. I’ve learned these tricks through trial and error so you don’t have to!
The secret to making an appetizer that everyone loves is making sure it fits their needs. We want happy guests, not overly spicy ones! And honestly, who doesn’t love a good crisp topping? Using the right breadcrumbs makes all the difference here. If you are looking for other great snacks, check out our recipe for Cottage Cheese Chips.
Controlling the Heat Level
If you or your guests aren’t huge fans of intense spice, you have a couple of easy outs. The biggest heat control comes from how well you clean those peppers. Be thorough when removing the seeds and the white pithy membranes—that’s where the capsaicin really hangs out. If you want to add a layer of flavor without cranking up the heat too much, swap out half of your sharp cheddar for Pepper Jack cheese. It adds a nice, creamy melt with just a little friendly warmth.
Alternative Crunch Options
Sometimes you run out of panko, or maybe you just want a different texture for your Baked Jalapeño Poppers. That’s totally fine! If you skip the panko entirely, just make sure you pile a little extra cheddar on top before baking, and it will melt into this fantastic, bubbly, cheesy crust instead. Or, if you want a smoky flavor, I suggest crushing up about two tablespoons of your favorite tortilla chips—plain or lightly seasoned—and mixing those into the melted butter and Parmesan instead of the panko. It gives a great chip flavor without needing to fry anything!
Storing and Reheating Your Baked Jalapeño Poppers
These appetizers are definitely best fresh out of the oven, but let’s be real—sometimes you have leftovers! If you have any of these cheesy poppers left over, don’t worry about them going to waste. They keep really well, and reheating them is simple. Just make sure you store them correctly so they don’t get soggy overnight.
| Storage Method | Duration | Reheating Tip |
|---|---|---|
| Airtight Container (Fridge) | Up to 3 days | Toast in toaster oven or bake at 350°F for 5 minutes. |
| Freezing (Not Recommended) | N/A | The texture of the cream cheese filling changes significantly when frozen and thawed. Eat fresh or refrigerated! |
I strongly suggest avoiding the microwave for reheating, as it turns the crispy topping into sad, soft mush. If you want that crunch back, use a toaster oven or even pop them back onto a baking sheet in a warm oven for just a few minutes. That quick blast of dry heat revives the panko beautifully.
Frequently Asked Questions About Baked Jalapeño Poppers
I get tons of questions about these poppers because everyone wants to make sure their first batch of Baked Jalapeño Poppers turns out flawless. Here are a few of the most common things people ask me when they are trying this recipe out for the first time. Don’t hesitate to ask if you have more!
Can I Make These Ahead of Time?
Yes, you absolutely can! You can stuff all the jalapeño halves with the cheese mixture, top them with the panko, and then place them on the baking sheet. Cover the whole thing tightly with plastic wrap and stick it in the fridge for up to 24 hours. When you’re ready to cook, just add about 5 extra minutes to the baking time since they are starting cold. Don’t leave them sitting out at room temperature too long before baking, though!
What is the Best Way to Cut the Peppers?
You must slice them lengthwise, right down the middle from tip to stem. This gives you a flat surface to sit them on the baking sheet, which prevents the filling from spilling out while baking. It also gives you the biggest surface area to remove all those seeds and membranes so you can control the heat level in your Baked Jalapeño Poppers.
Can I Use Different Cheese in My Baked Jalapeño Poppers?
Of course! While I love the sharpness of cheddar, this recipe is very forgiving. Feel free to substitute Monterey Jack for a milder, stretchier melt, or use Pepper Jack if you want a little extra kick. Just make sure whatever you use is shredded well so it mixes smoothly with the cream cheese!
Share Your Success with These Baked Jalapeño Poppers
I absolutely love seeing what you all create in your own kitchens! If you tried out this simple, oven-baked take on the classic appetizer, please jump down to the comments section below and let me know how they turned out. Were they as crispy as you hoped? Did you try the tortilla chip topping?
Don’t forget to give this recipe a star rating if you enjoyed it—it truly helps other beginner cooks like you decide what to try next. Tag me in your photos if you share them online! Seeing your successful batch of Baked Jalapeño Poppers makes my day and proves that anyone can master great party food. Check out our Medium page for more cooking insights!
Tips for Perfect Baked Jalapeño Poppers Every Time
I’ve spent way too much time perfecting these cheesy poppers so you don’t have to! Even though this recipe is designed to be foolproof, sometimes little things throw a wrench in the works. If you follow these little bits of insider knowledge, your Baked Jalapeño Poppers will turn out perfectly golden and creamy every single time. I’ve learned these tricks through trial and error so you don’t have to!
The secret to making an appetizer that everyone loves is making sure it fits their needs. We want happy guests, not overly spicy ones! And honestly, who doesn’t love a good crisp topping? Using the right breadcrumbs makes all the difference here.
Controlling the Heat Level
If you or your guests aren’t huge fans of intense spice, you have a couple of easy outs. The biggest heat control comes from how well you clean those peppers. Be thorough when removing the seeds and the white pithy membranes—that’s where the capsaicin really hangs out. If you want to add a layer of flavor without cranking up the heat too much, swap out half of your sharp cheddar for Pepper Jack cheese. It adds a nice, creamy melt with just a little friendly warmth.
Alternative Crunch Options
Sometimes you run out of panko, or maybe you just want a different texture for your Baked Jalapeño Poppers. That’s totally fine! If you skip the panko entirely, just make sure you pile a little extra cheddar on top before baking, and it will melt into this fantastic, bubbly, cheesy crust instead. Or, if you want a smoky flavor, I suggest crushing up about two tablespoons of your favorite tortilla chips—plain or lightly seasoned—and mixing those into the melted butter and Parmesan instead of the panko. It gives a great chip flavor without needing to fry anything!
Storing and Reheating Your Baked Jalapeño Poppers
These appetizers are definitely best fresh out of the oven, but let’s be real—sometimes you have leftovers! If you have any of these cheesy poppers left over, don’t worry about them going to waste. They keep really well, and reheating them is simple. Just make sure you store them correctly so they don’t get soggy overnight.
| Storage Method | Duration | Reheating Tip |
|---|---|---|
| Airtight Container (Fridge) | Up to 3 days | Toast in toaster oven or bake at 350°F for 5 minutes. |
| Freezing (Not Recommended) | N/A | The texture of the cream cheese filling changes significantly when frozen and thawed. Eat fresh or refrigerated! |
I strongly suggest avoiding the microwave for reheating, as it turns the crispy topping into sad, soft mush. If you want that crunch back, use a toaster oven or even pop them back onto a baking sheet in a warm oven for just a few minutes. That quick blast of dry heat revives the panko beautifully.
Frequently Asked Questions About Baked Jalapeño Poppers
I get tons of questions about these poppers because everyone wants to make sure their first batch of Baked Jalapeño Poppers turns out flawless. Here are a few of the most common things people ask me when they are trying this recipe out for the first time. Don’t hesitate to ask if you have more!
Can I Make These Ahead of Time?
Yes, you absolutely can! You can stuff all the jalapeño halves with the cheese mixture, top them with the panko, and then place them on the baking sheet. Cover the whole thing tightly with plastic wrap and stick it in the fridge for up to 24 hours. When you’re ready to cook, just add about 5 extra minutes to the baking time since they are starting cold. Don’t leave them sitting out at room temperature too long before baking, though!
What is the Best Way to Cut the Peppers?
You must slice them lengthwise, right down the middle from tip to stem. This gives you a flat surface to sit them on the baking sheet, which prevents the filling from spilling out while baking. It also gives you the biggest surface area to remove all those seeds and membranes so you can control the heat level in your Baked Jalapeño Poppers.
Can I Use Different Cheese in My Baked Jalapeño Poppers?
Of course! While I love the sharpness of cheddar, this recipe is very forgiving. Feel free to substitute Monterey Jack for a milder, stretchier melt, or use Pepper Jack if you want a little extra kick. Just make sure whatever you use is shredded well so it mixes smoothly with the cream cheese!
Share Your Success with These Baked Jalapeño Poppers
I absolutely love seeing what you all create in your own kitchens! If you tried out this simple, oven-baked take on the classic appetizer, please jump down to the comments section below and let me know how they turned out. Were they as crispy as you hoped? Did you try the tortilla chip topping?
Don’t forget to give this recipe a star rating if you enjoyed it—it truly helps other beginner cooks like you decide what to try next. Tag me in your photos if you share them online! Seeing your successful batch of Baked Jalapeño Poppers makes my day and proves that anyone can master great party food.
Print
Baked Jalapeño Poppers: 1 Recipe Hero Trick
- Total Time: 28–32 minutes
- Yield: 24 poppers
- Diet: Vegetarian
Description
These oven-baked Jalapeño Poppers offer a creamy, cheesy filling and a crisp topping. Baking simplifies the process, giving you a gooey, savory appetizer perfect for any gathering.
Ingredients
- 12 medium jalapeños
- 8 ounces cream cheese, softened
- 1 cup shredded sharp cheddar cheese
- 2 tablespoons finely chopped chives or green onions
- 1 clove garlic, minced
- 1/4 teaspoon onion powder
- 1/4 teaspoon kosher salt
- 1/8 teaspoon black pepper
- 1/2 cup panko bread crumbs
- 1 tablespoon unsalted butter, melted
- 1 tablespoon grated Parmesan cheese
Instructions
- Heat oven to 400°F. Line a large baking sheet with parchment paper.
- Wear gloves. Slice jalapeños in half lengthwise. Remove seeds and membranes. Arrange cut-side up on the baking sheet.
- In a bowl, mix cream cheese, cheddar, chives, garlic, onion powder, salt, and black pepper until smooth.
- Spoon the mixture into each jalapeño half. Smooth the tops so the filling sits level.
- In a small bowl, stir panko with melted butter and Parmesan. Sprinkle this topping evenly over the filled peppers.
- Bake 18–22 minutes until peppers are tender, edges bubble, and the topping turns golden brown. Broil for 1–2 minutes if you want extra color, but watch closely.
- Rest the poppers for 5 minutes before serving warm.
Notes
- For extra heat, use pepper jack for half the cheddar or add cayenne to the filling.
- To skip breadcrumbs, top with extra cheddar for a melty finish.
- Add 2 tablespoons crushed tortilla chips for a smoky crunch instead of bacon.
- Stir in 1 teaspoon lime zest and 2 tablespoons chopped cilantro for an herby flavor.
- You can cook these in an air fryer at 375°F for 7–9 minutes.
- Always wear gloves when handling jalapeños.
- Refrigerate leftovers in an airtight container for up to 3 days.
- Prep Time: 10 minutes
- Cook Time: 18–22 minutes
- Category: Appetizer
- Method: Baking
- Cuisine: American