Berry Mousse with Cottage Cheese is the kind of recipe that makes me feel like a kitchen wizard without actually doing any magic. When I first started NoobRecipes, I promised myself I’d only feature things that a genuine beginner—like me, five years ago—could nail on the first try. This mousse is the perfect example! It’s ridiculously high in protein, you don’t even have to turn the oven on, and honestly, you’re looking at 10 minutes of work, tops. If you’re looking for that perfectly light, creamy dessert that feels indulgent but is secretly good for you, stop scrolling right now. We’re making magic!
Why You Will Love This Berry Mousse with Cottage Cheese
I know what it’s like to stare down a recipe that looks amazing but requires three hours, specialized equipment, or a trip to three different stores. That’s why this cottage cheese mousse is one of my absolute go-to recipes for my beginner audience. It checks every box a busy person or a nervous new cook could ever have. Seriously, it’s a winner!
- It’s incredibly fast—you’re talking about 10 minutes of active work before it heads to the fridge.
- It tastes like a fancy dessert, but the ingredient list is short and sweet.
- The protein content is fantastic, which means you feel satisfied, not guilty, after eating it!
Quick Preparation and Minimal Effort
This entire recipe is no-bake, which is a huge win in my book. You dump everything into the blender, hit the power button, and you’re done with the mixing part. There’s zero fuss about tempering eggs or waiting for butter to soften perfectly. The only waiting you do is chilling time, and honestly, that’s the hardest part because you’ll want to eat it immediately.

High Protein Boost
The secret weapon here is that low-fat cottage cheese. Don’t let it scare you! Once it’s blended with the sweet berries and honey, you absolutely cannot taste it—it just turns into the creamiest base imaginable. For anyone trying to eat healthier, this is a game-changer. It packs a solid 14 grams of protein per serving, which keeps you full way longer than a standard sugary pudding. It turns dessert into functional fuel!
Essential Equipment for Berry Mousse with Cottage Cheese
When you’re making something this simple, you don’t need a drawer full of fancy gadgets, thank goodness. For this high-protein mousse, we really only have one non-negotiable tool. If you have this one thing, you’re ready to go. Everything else is just for serving it up nicely!
Blender Requirements
You absolutely must have a high-speed blender for this recipe to work its magic. I’m talking about something powerful enough to completely obliterate those cottage cheese curds. If you try this in a weak blender, you’ll end up with a slightly gritty berry smoothie instead of that gorgeous, silky mousse texture we are aiming for. Trust me, blend it until you think it’s smooth, and then blend it for 15 more seconds!
Optional Tools for Presentation
Once it’s blended, you’ll need something to put it in while it chills. Small, clear glasses or ramekins work perfectly because they let you see the beautiful color. You could also use small dessert bowls. It makes the final product look much more intentional than just eating it straight out of the blender jar, which I’ve definitely done before!
Gathering Your Ingredients for Berry Mousse with Cottage Cheese
Okay, let’s get our ingredients lined up. This is the easiest part of the whole process, but for my fellow beginners, precision matters, especially since we aren’t baking anything where the ratios can hide themselves later. When you’re working with just a few components in a no-bake recipe like this, every measurement counts to get that perfect, light texture.
Core Mousse Components
You’ll need two cups of low-fat cottage cheese—make sure it’s the low-fat kind because that mixes smoother, in my experience. Then grab about a cup and a half of your mixed berries. Fresh is great, but if you’re doing this on a Tuesday night like me, thawed frozen berries work just fine! We sweeten this with two to three tablespoons of honey or maple syrup. Start with two, taste it later, and add the third if your berries are super tart. Don’t forget that splash of vanilla extract for warmth.
Flavor Enhancers
This is where we stop it from tasting like a healthy snack and start making it taste like dessert. The lemon zest and the lemon juice are crucial here. They cut through the richness of the cheese and brighten up the berries. Seriously, don’t skip the zest! And please, add that tiny pinch of fine sea salt. It sounds weird, but it makes the honey taste sweeter and the berries pop. It’s a tiny step that makes a huge difference.
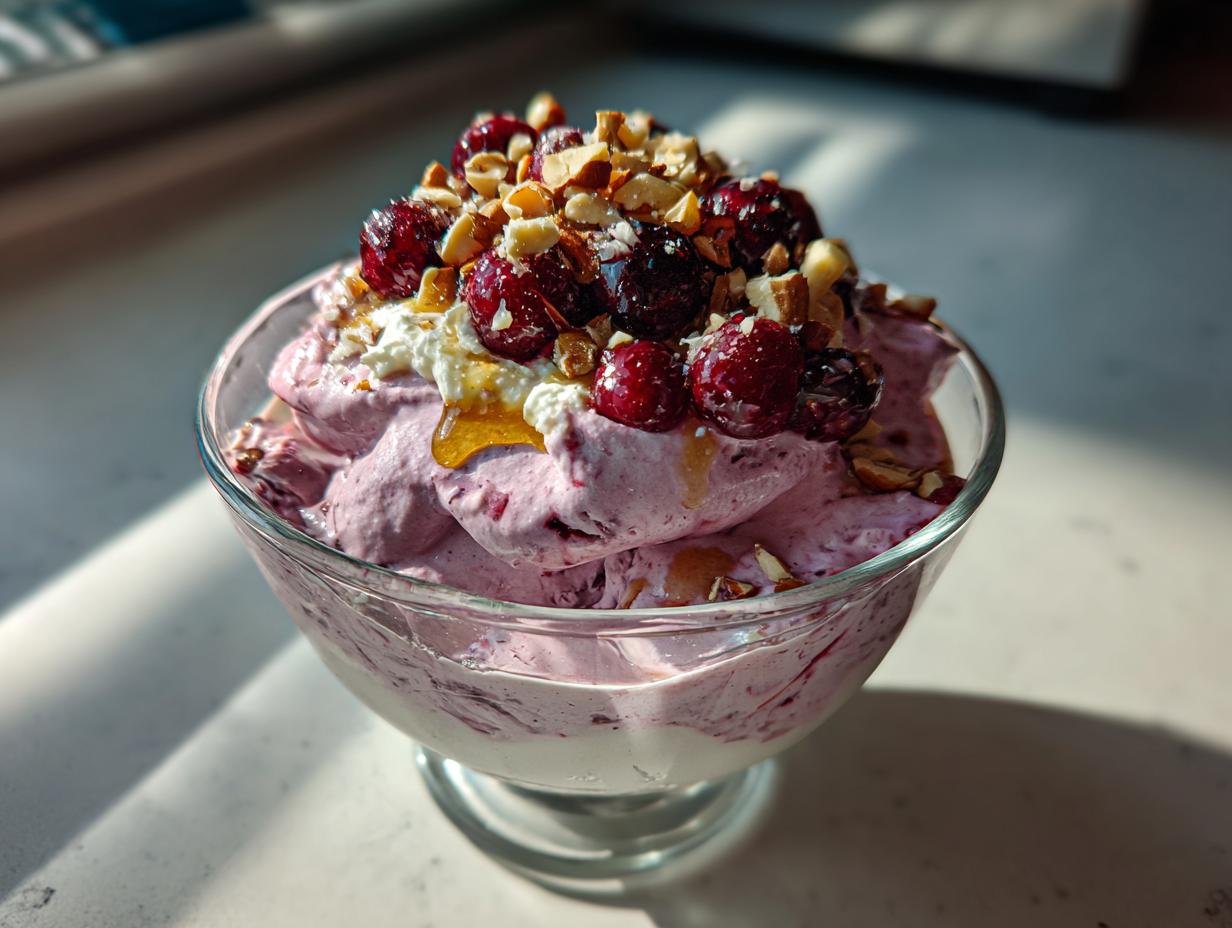
Topping Elements
We save the toppings for last because we want that textural contrast against the smooth mousse! You’ll need about half a cup of extra berries, maybe some fresh raspberries or blueberries. Chop up a tablespoon of almonds or pistachios—I love the green color the pistachios add. Finally, a tiny drizzle of honey right on top just before it hits the table makes it look professional.
Step-by-Step Instructions for Perfect Berry Mousse with Cottage Cheese
This is the part where you prove just how easy amazing desserts can be! Since this is a no-bake recipe, the process is quick, but you have to trust the blender. If you’re nervous about the cottage cheese curds, just follow my timing advice, and you’ll have the silkiest texture imaginable.
Blending for Silkiness
Step one is easy: get everything that goes into the mousse—the cottage cheese, the berries, the honey, the lemon bits, vanilla, and that little bit of salt—right into your high-speed blender jar. Now, don’t just pulse it! You need to blend this on high speed for a full 60 to 90 seconds. I know that feels like a long time, but that’s how we eliminate those pesky curds. If you see stuff clinging to the sides, stop the machine, scrape it down with a spatula—be careful of the blades!—and blend again until it looks like glossy, pale pink cloud.
After that initial blend, give it a taste test. If your berries were extra tart, now is the time to add that extra tablespoon of honey, then pulse it for just five seconds to mix it in. We don’t want to over-blend once the sweetness is adjusted.
Setting and Chilling
Once it looks perfect, carefully spoon the mixture into your four serving glasses or bowls. Smooth out the tops with the back of your spoon. This is where patience comes in, and it’s the only slightly tough part! You need to chill this for at least 30 minutes, but honestly, an hour is better. You’re waiting for it to go from being a thick smoothie consistency to something that actually holds a soft peak—that’s the mousse texture we want. It should look glossy and airy when it’s ready.

Final Presentation
Do not put the toppings on before chilling! If you do, the nuts will get soggy, and the berries will bleed into the mousse. Right before you serve it—and I mean right before—spoon those extra fresh berries on top. Then, add that drizzle of honey and sprinkle your chopped nuts over everything. That contrast in temperature and texture between the cold, smooth mousse and the crunchy nuts is what makes the whole thing sing!
Tips for Success with Your No-Bake Berry Mousse with Cottage Cheese
Even though this recipe is incredibly forgiving, there are a couple of things I learned over my many batches that can take your mousse from good to absolutely perfect. Since we aren’t using gelatin or heavy cream here, texture is everything, and knowing how to tweak it on the fly is key for any beginner baker or no-bake dessert maker.
Achieving the Right Consistency
If you followed the blending instructions perfectly but you still find the mousse isn’t setting up quite firm enough after that initial hour in the fridge—maybe your berries were extra watery, or your fridge isn’t the coldest—don’t panic! You can easily fix this. After blending, gently fold in about two tablespoons of thick Greek yogurt. You don’t want to blend it again, just gently fold it in until it’s incorporated. That extra thickness will help the mousse achieve that firm, airy structure faster.
Flavor Adjustment Guidance
The biggest variable in this recipe is the fruit. Some berries are naturally sweeter than others, so you absolutely must taste it before you serve it. After the initial 60-to-90-second blend, use a clean spoon to sample a tiny bit. If it tastes a little too sharp or tart for your liking, that’s when you add your extra tablespoon of honey. Blend it for just five more seconds to mix it in, and then get it chilling. This small adjustment step ensures the final flavor profile is exactly what you want!
Storage and Reheating Instructions
Since this is a fresh, no-bake dessert packed with dairy and fruit, we need to treat it right in the fridge. The good news is that this Berry Mousse with Cottage Cheese holds up really well! You can totally make it ahead of time, which is perfect for parties or meal prepping healthy snacks. The texture actually firms up a little more after a full day in the cold, which some people prefer.
The rule here is simple: keep it cold! It doesn’t reheat well, of course, since it’s a chilled mousse, but storage is easy. You get about three days out of it if you keep it covered properly. I always make sure to add the toppings right before I eat it, not before storage, to keep everything fresh looking.
| Storage Duration | Best Practice |
|---|---|
| Up to 3 Days | Keep covered tightly in the refrigerator. |
| Over 3 Days | Texture may degrade; best eaten fresh. |
Best Practices for Leftovers
When I’m portioning this out into those little glasses, I always leave a little bit of space at the top because the mousse is airy and might expand slightly when it sets. Then, the most important part: cover those individual servings tightly. If you are using bowls, plastic wrap pressed right down onto the surface of the mousse works wonders to prevent any fridge odors from getting in and keeping the top from drying out. If you used glasses, a matching lid or a small piece of foil works great. Remember, always return any leftovers to the fridge promptly after serving!
Frequently Asked Questions About This Berry Mousse with Cottage Cheese
I get so many questions about this recipe because it’s one of those healthy hacks people want to customize! It’s great that you’re thinking about substitutions, but remember, for a no-bake item like this, the texture is everything. Here are the most common things I hear from other beginner cooks.
Can I use full-fat cottage cheese
You totally can substitute the low-fat cottage cheese with the full-fat version if that’s what you have on hand. Just know that the final product will be a bit richer and slightly heavier, maybe less airy, because of the extra fat content. The blending process should still work fine, but the final texture might lean more towards a thick, creamy dip than a light mousse. For the best results, stick to low-fat, but don’t stress if you need to swap it out!
What if I don’t have a powerful blender
This is a big one! If your blender is older or a standard model, you’ll need to be extra patient. You might need to blend for closer to two full minutes, scraping down the sides every 30 seconds. If after that time you still see tiny white specks, you can try pouring the mixture through a fine-mesh sieve into a bowl. It’s extra work, but it guarantees you get rid of those curds and achieve that smooth, high-protein dessert finish.
Can I make this recipe ahead of time
Yes, you absolutely can make this ahead of time! I often whip up a batch the night before. The minimum chilling time is 30 minutes just to get it set enough to eat, but chilling it for four hours or even overnight is actually perfect. It firms up nicely, and the flavors really meld together. Just remember to hold off on adding the crunchy toppings—the nuts and extra berries—until right before you serve it so they stay crisp!
Share Your Berry Mousse with Cottage Cheese Creations
I’m so excited for you to try this super easy, high-protein mousse! If you nailed the silky texture on the first go, please let me know in the comments below. Drop a rating if you loved it, and send me pictures of your beautiful toppings! Remember, if you can blend, you can master this recipe. Happy snacking! You can also follow along for more easy recipes on Facebook or save this recipe on Pinterest.
Print
Amazing 10-min Berry Mousse with Cottage Cheese
- Total Time: 10 minutes plus 30–60 minutes chilling
- Yield: 4 servings
- Diet: Vegetarian
Description
Light, creamy berry mousse blended with cottage cheese and a touch of honey. This no-bake dessert is ready in 10 minutes, offering a high-protein snack perfect for any time.
Ingredients
- 2 cups low-fat cottage cheese
- 1 1/2 cups mixed berries fresh or thawed
- 2–3 tablespoons honey or maple syrup
- 1 teaspoon lemon zest
- 1 teaspoon lemon juice
- 1 teaspoon vanilla extract
- 1 small pinch fine sea salt
- 1/2 cup mixed berries (for topping)
- 1 tablespoon chopped almonds or pistachios (for topping)
- 1 teaspoon honey (for topping)
Instructions
- Add cottage cheese, berries, honey, lemon zest, lemon juice, vanilla, and salt to a high-speed blender.
- Blend on high for 60–90 seconds, scraping down as needed, until completely smooth and silky with no curds visible.
- Taste and add a little more honey if the berries are very tart, then blend 5 seconds to combine.
- Spoon into 4 small glasses or bowls and smooth the tops with the back of a spoon.
- Chill 30–60 minutes until lightly set and mousse-like; it should hold soft peaks and look glossy and airy.
- Top with fresh berries, a drizzle of honey, and chopped nuts right before serving for contrast.
- Keep cold until serving and return any leftovers to the refrigerator promptly.
Notes
- Blend until fully smooth for the best mousse texture.
- Use thawed frozen berries for budget-friendliness.
- For a firmer set, chill at least 2 hours or fold in 2 tablespoons Greek yogurt after blending.
- A small pinch of salt sharpens the sweetness and fruit flavor.
- Store covered in the fridge up to 3 days.
- Prep Time: 10 minutes
- Cook Time: 0 minutes
- Category: Dessert
- Method: Blender, No-Bake
- Cuisine: American