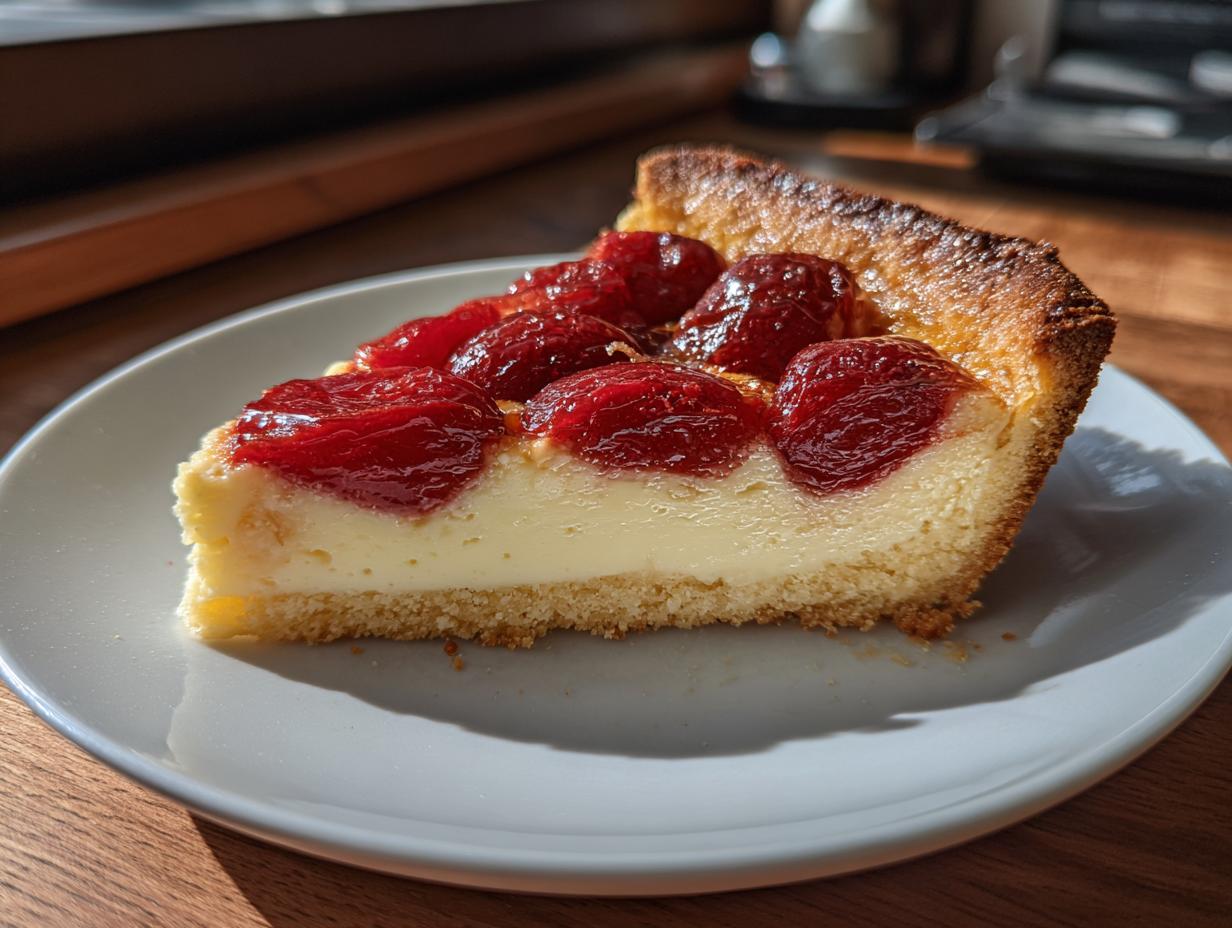
Oh my gosh, you are going to absolutely *adore* this dessert! When spring finally rolls around and those first beautiful, bright cherries start showing up at the market, this is the first thing I bake. Forget fussy rolled pastry; this Fresh Cherry Tart with Creamy Custard is my absolute go-to because of the crust. It’s a ridiculously easy press-in base that comes together in minutes!
I’ve made this recipe probably a hundred times testing out different cherry varieties and custard ratios—I’m telling you, this version is foolproof. It’s the perfect marriage of textures: that slightly crisp, buttery crust holding a cloud of smooth, vanilla-flecked custard, topped with juicy, slightly tart fruit. It’s just stunning and proves you don’t need fancy skills to make something spectacular for your table. Trust me, once you try this, it’ll replace every other pie recipe you own.

Why You Will Love This Fresh Cherry Tart with Creamy Custard
Honestly, this recipe is pure joy in dessert form. It’s everything I want when I’m craving something sweet but don’t want to spend all day wrestling with dough. The contrast between the textures is what really sets this Fresh Cherry Tart with Creamy Custard apart from anything else. It’s elegant but so, so easy.
- The prep time is lightning fast—we’re talking 25 minutes max before it heads to the oven!
- That buttery crust is spooned right into the pan; no chilling, no rolling, no mess!
- You get that beautiful textural play between crumbly crust, silky custard, and tender fruit.
Quick Preparation Time for Your Fresh Cherry Tart with Creamy Custard
You really can make this happen on a weeknight, I promise! The entire hands-on part of the recipe takes about 25 minutes. That includes mixing the crust dough and whipping up the custard base. Because the crust uses melted butter, you skip the whole chilling step that usually adds an hour to any good pastry recipe. It’s ready to bake almost as soon as you decide you want dessert.
Simple Steps for a Perfect Spring Baking Dessert
If you’ve ever been intimidated by traditional tart shells that need rolling out perfectly thin, this is your answer. We just mix the flour, sugar, salt, and melted butter until it’s a shaggy, soft dough. Then you simply press it into the pan with your fingers. It sounds too easy, but that’s the secret! It bakes up sturdy enough to hold the heavy custard and all those gorgeous cherries without cracking or shrinking.
Essential Equipment for the Fresh Cherry Tart with Creamy Custard
You don’t need a ton of fancy gadgets for this recipe, which is another reason I love making this Fresh Cherry Tart with Creamy Custard. The star here is definitely the pan itself. You absolutely need a 9-inch tart pan that has a removable bottom.
That removable bottom is crucial for getting those clean, perfect slices when you serve it up. Beyond that, just grab your standard kitchen gear:
- A sturdy mixing bowl for the crust.
- A small saucepan for cooking the custard.
- A whisk—you’ll be using this a lot for the custard, so make sure it’s a good one!
- A rubber spatula for spreading the custard evenly.
Ingredients for Your Fresh Cherry Tart with Creamy Custard
Gathering your ingredients is half the fun! This Fresh Cherry Tart with Creamy Custard relies on simple, high-quality components to shine. We need things for the quick crust, the luscious custard filling, and of course, those beautiful cherries. Don’t be tempted to skip the vanilla powder if you can find it; it gives the custard a really deep, authentic flavor that extract sometimes misses. But if you must substitute, use a good quality clear vanilla extract! If you want to see more of my favorite baking tips, check out my posts on Medium.
Here is exactly what you need to round up:
| Component | Ingredient | Amount |
|---|---|---|
| Crust | All Purpose Flour | 1 1/2 cups |
| Crust | Granulated Sugar | 1/3 cup |
| Crust | Fine Sea Salt | 1/4 teaspoon |
| Crust | Unsalted Butter (melted) | 1/2 cup |
| Custard | Whole Milk | 1 cup |
| Custard | Large Egg Yolks | 3 |
| Custard | Granulated Sugar | 1/3 cup |
| Custard | Cornstarch | 2 tablespoons |
| Custard | Vanilla Powder | 1 teaspoon |
| Topping | Fresh Cherries (pitted) | 1 pound |
Crust Components Explained
This is the magic of the press-in crust! We use melted butter here, which is a huge departure from traditional pastry that requires cold, cubed butter. When you mix that melted butter into the flour, sugar, and salt, you get what I call a ‘soft dough.’ It won’t look like a ball of dough you can roll out; it’ll look more like wet sand with clumps. That’s perfect! It’s designed to be pressed right into the pan with your fingers, creating a sturdy, slightly crumbly shell once baked.
Creamy Custard Base Details
For the creamiest texture, stick to whole milk—none of that skim stuff! The richness from the fat helps the custard set beautifully. We whisk in the egg yolks, sugar, and cornstarch until there are absolutely no lumps. Cornstarch is our thickener here, so make sure it’s fully incorporated before it hits the heat. If you can’t find vanilla powder, use 1 1/2 teaspoons of a very good quality vanilla extract, but add it *after* you take the custard off the heat so the flavor stays bright.
Preparing the Fresh Cherries
You need about a full pound of fresh cherries for this tart to look magazine-worthy. The most important step here is preparation: they must be pitted and then halved. Halving them exposes the flesh so they soften nicely during the bake and nestle perfectly into the custard. Don’t worry if the halves aren’t uniform; we are aiming for rustic charm here, not perfection! If you are looking for other great spring recipes, check out my Spring Mix Garden Salad.
Step-by-Step Instructions for Your Fresh Cherry Tart with Creamy Custard
Okay, let’s get baking! I want you to follow these steps in order because the timing between the crust and the custard is important. We need the crust warm when we pour in the custard, and we need the custard to set perfectly before we even think about slicing. This whole process for making your Fresh Cherry Tart with Creamy Custard is straightforward, but attention to detail here ensures that ultimate creamy texture.
Creating and Pre-Baking the Easy Crust
First things first, get your oven warmed up to 350°F. While it’s heating, grab a bowl and mix your dry crust ingredients: the flour, the 1/3 cup of sugar, and the salt. Now, pour in that half cup of melted butter. Don’t stir too gently—you want to work it in until it comes together into that soft, shaggy dough we talked about. It should hold its shape when you squeeze a bit. Press this dough evenly right into the bottom and up the sides of your prepared 9-inch tart pan. Don’t worry about making it perfectly uniform; just get it evenly distributed. Pop that crust into the oven for 15 minutes. We’re just setting it so it doesn’t get soggy later. It should look lightly set when you pull it out.
Making the Smooth Creamy Custard
While the crust is setting up, you’re going to make the filling. Get your saucepan ready. Whisk together the milk, those three egg yolks, the second portion of sugar, the cornstarch, and the vanilla powder. Whisk it really well until it’s completely smooth and you see no streaks of cornstarch hiding on the bottom. Now, turn your stove to medium heat. This is where you have to stay put—whisk constantly! You have to keep that whisk moving so the eggs don’t scramble on the bottom. After about five minutes, the mixture will start to thicken up dramatically and you’ll see it just beginning to bubble gently around the edges. That’s your cue to kill the heat immediately!
Assembling and Final Baking
Take that warm, pre-baked crust out of the oven. Pour that gorgeous, thick custard right into the warm shell and use your spatula to smooth the top out evenly. Now for the cherries! Take your pound of pitted and halved cherries and arrange them artfully over the custard. I always place them cut-side down so the beautiful red color shows through the baked custard a bit. Slide the whole tart back into the 350°F oven. It needs to bake for another 35 to 40 minutes. You’ll know it’s done when the custard looks set—it shouldn’t jiggle wildly in the center—and the cherries look softened and glossy.
Cooling for the Best Fresh Cherry Tart with Creamy Custard Results
This is the hardest part, but you absolutely cannot skip it! Resist the urge to cut into this tart while it’s warm. The custard needs time to finish setting up as it cools down. Let it cool completely at room temperature first. If you slice it too soon, your beautiful filling will ooze out, and you won’t get those clean slices you deserve. Patience here is the key to the perfect presentation of your Fresh Cherry Tart with Creamy Custard! If you want to follow along on social media, find us on Facebook.
Tips for Success with Your Fresh Cherry Tart with Creamy Custard
Even though this recipe is pretty foolproof, I have a few little tricks I’ve picked up over the years to make sure your Fresh Cherry Tart with Creamy Custard comes out perfectly every single time. These small adjustments really make a difference in the final texture!
- Watch that custard heat like a hawk! If you stop whisking, the eggs will scramble, and you’ll end up with grainy custard instead of smooth silk. Medium heat is your friend here; don’t try to rush it by cranking it up.
- If you notice the crust edges browning too quickly during the second bake, don’t panic. Just take a small strip of aluminum foil and loosely wrap it around the rim of the tart pan. This shields the edges while the center finishes cooking.
- When arranging the cherries, try to pack them in fairly tightly—but not so tight that they are stacked on top of each other. This helps support the custard underneath and gives you a great fruit-to-custard ratio in every bite.
Storing and Serving Suggestions for This Classic Tart
Serving this tart is almost as fun as baking it! Because of that beautiful, creamy custard filling, we need to treat it right once it’s cooled down. I usually serve this tart slightly chilled, not straight from the fridge cold, but definitely not warm. Let it sit on the counter for about 20 minutes before slicing makes the custard just soft enough to melt in your mouth.
If you happen to have leftovers—which I doubt, honestly—storage is straightforward. You just need to make sure it stays cool so that custard stays firm and safe. It looks gorgeous just sitting on a cake stand for a few hours, but overnight it needs the fridge.
Storing Leftover Fresh Cherry Tart with Creamy Custard
Because of the dairy and eggs in the custard, you must refrigerate any leftovers of your Fresh Cherry Tart with Creamy Custard. Cover the tart loosely with plastic wrap or foil—don’t press the plastic onto the cherries, or it will stick! It keeps beautifully for about three days in the refrigerator. If you want to serve a slice that’s been chilled, pull it out about 20 minutes before you plan to eat it. That little bit of warming up brings the crust flavor back to life! For more dessert inspiration, check out my Pinterest page.
| Storage Condition | Maximum Time |
|---|---|
| Countertop (Short term) | 4 hours |
| Refrigerator | 3 days |
Frequently Asked Questions About This Recipe
I get so many questions about this recipe because people want to make sure their Fresh Cherry Tart with Creamy Custard turns out just like mine! Here are the things I hear most often from bakers trying it out for the first time. Don’t worry if you have to make a little swap here or there; this tart is forgiving!
Can I substitute the fresh cherries in this tart?
Yes, you absolutely can! If fresh cherries aren’t in season, you can use good quality canned tart cherries, but make sure you drain them really, really well. You don’t want extra liquid seeping into that custard. Frozen cherries work too, but you must thaw them completely and pat them dry before using them. Don’t try to bake them frozen, or they will release too much water!
Why did my custard curdle in the Fresh Cherry Tart with Creamy Custard?
Nine times out of ten, if your custard curdles, it means it got too hot, too fast. The egg yolks cooked too quickly. The key is constant whisking over *medium* heat. If you see it start to bubble vigorously, pull the pan off the burner for 30 seconds while you whisk hard, then put it back on low. We want it thick and smooth, not scrambled!
Can I make the crust ahead of time?
Oh yes, that’s a great time saver! You can definitely mix up the crust dough, press it into the pan, and then cover it tightly with plastic wrap. Pop it in the fridge for up to two days. When you’re ready to bake, just take it straight from the fridge, prick the bottom with a fork a few times, and follow the recipe instructions for the 15-minute pre-bake. It works like a charm!
Print
Amazing Fresh Cherry Tart with Creamy Custard
- Total Time: 80 minutes
- Yield: 8 servings
- Diet: Vegetarian
Description
This fresh cherry tart shows off juicy cherries and a creamy vanilla custard in a simple press-in crust. It is a great dessert for spring baking.
Ingredients
- 1 1/2 cups all purpose flour
- 1/3 cup granulated sugar
- 1/4 teaspoon fine sea salt
- 1/2 cup unsalted butter melted
- 1 cup whole milk
- 3 large egg yolks
- 1/3 cup granulated sugar
- 2 tablespoons cornstarch
- 1 teaspoon vanilla powder
- 1 pound fresh cherries pitted and halved
Instructions
- Heat oven to 350°F and grease a 9-inch tart pan with a removable bottom.
- In a bowl, mix flour, sugar, and salt, then stir in melted butter until a soft dough forms.
- Press the dough evenly into the bottom and sides of the tart pan.
- Bake the crust for 15 minutes until lightly set, then remove from the oven.
- In a saucepan, whisk milk, egg yolks, sugar, cornstarch, and vanilla powder until smooth.
- Cook over medium heat, whisking constantly, until thickened and just beginning to bubble, about 5 minutes.
- Pour custard into the warm crust and spread evenly.
- Arrange cherries cut side down over the custard.
- Bake for 35 to 40 minutes until the custard is set and the cherries are soft.
- Cool completely at room temperature before slicing and serving.
Notes
- Allow the tart to cool fully so the custard sets cleanly for neat slices.
- Prep Time: 25 minutes
- Cook Time: 55 minutes
- Category: Dessert
- Method: Baking
- Cuisine: American